











6. Rustic Crochet Angel
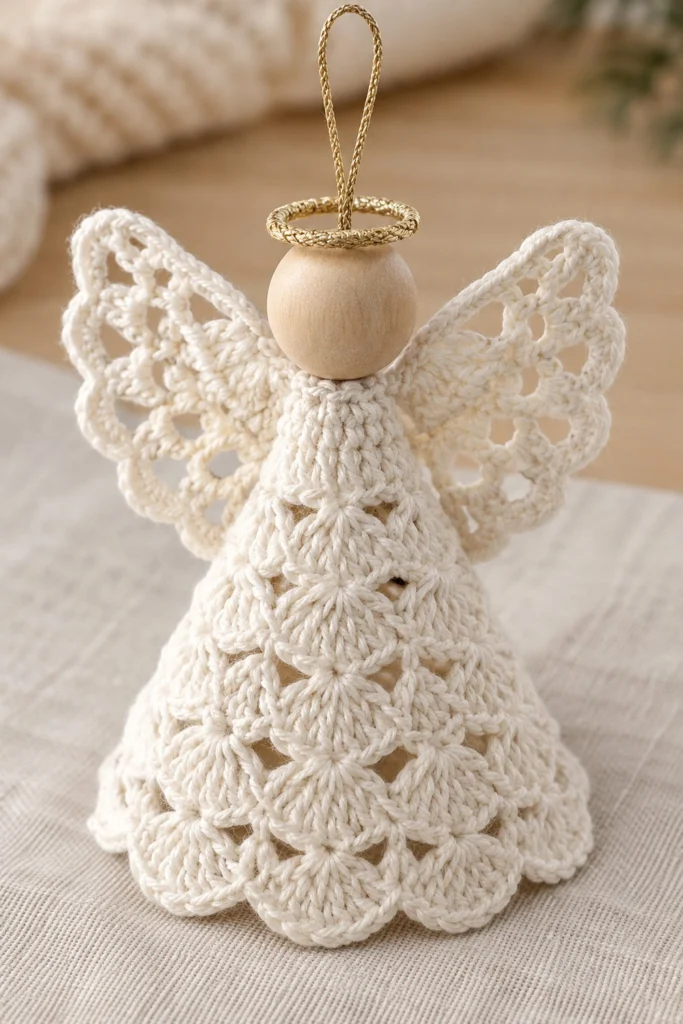
Bring a touch of timeless, handmade beauty to your seasonal decor with this delicate rustic crochet angel. Crafted with intricate fan-stitch lace and a natural wooden head, she makes a stunning Christmas tree ornament or mantelpiece display piece in just under an hour.
Quick Facts
| Skill level | Finished size | Yarn | Hook | Time |
|---|---|---|---|---|
| Easy | 3.5 in / 9 cm tall | Sport weight cotton (Cat. 2), natural off-white, 15 g / 45 m | 2.75 mm (US C/2) | 45 minutes |
Materials You Will Need
- Sport weight cotton yarn (Category 2) in natural off-white (approx. 15 grams / 45 metres)
- Metallic gold embroidery floss or gold cord (approx. 1 metre) for halo and hanging loop
- Round unfinished wooden bead, 20 mm diameter with a 4 mm vertical hole (1 piece)
- 2.75 mm (US C/2) crochet hook
- Tapestry needle
- Sharp scissors
- Fabric stiffener or sugar water mixture (optional, for shaping the dress and wings)
Gauge
First 3 rounds of the dress measure 3 cm across. Maintaining consistent, slightly firm tension matters more than exact gauge so the angel holds its conical shape.
Abbreviations (US Terms)
- ch = chain
- dc = double crochet
- sc = single crochet
- sl st = slip stitch
- sp = space
- st = stitch
- yo = yarn over
- shell = 5 dc in the same stitch or chain space
- picot = ch 3, sl st in the back bump of the first ch
UK terms: sc = dc, hdc = htr, dc = tr.
Pattern Notes
- The dress is worked top-down in joined rounds. The starting chain of each round does not count as a stitch unless stated otherwise.
- Wings are worked in rows with a delicate scalloped edging.
- Always join with a slip stitch to the first stitch of the round unless instructed otherwise.
- Keep stitch counts in brackets at the end of every round to ensure accuracy.
Instructions
Dress – Off-white, make 1
Rnd 1: Ch 24, join with sl st to form a ring, being careful not to twist. (24 ch)
Rnd 2: Ch 1, work 24 sc evenly around the ring, join with sl st to first sc (24)
Rnd 3: Ch 3 (counts as 1 dc here and throughout), (1 dc, ch 2, 2 dc) in same st, *skip 2 sts, (2 dc, ch 2, 2 dc) in next st; repeat from * around, skip last 2 sts, join with sl st to top of ch-3 (8 shell groups)
Rnd 4: Sl st into the first ch-2 sp, ch 3, (1 dc, ch 2, 2 dc) in same ch-2 sp, *(2 dc, ch 2, 2 dc) in next ch-2 sp; repeat from * around, join with sl st to top of ch-3 (8 shell groups)
Rnd 5: Sl st into first ch-2 sp, ch 3, (2 dc, ch 2, 3 dc) in same ch-2 sp, *(3 dc, ch 2, 3 dc) in next ch-2 sp; repeat from * around, join with sl st to top of ch-3 (8 expanded shell groups)
Rnd 6: Sl st into first ch-2 sp, ch 3, (3 dc, ch 2, 3 dc) in same ch-2 sp, *(3 dc, ch 2, 3 dc) in next ch-2 sp; repeat from * around, join with sl st to top of ch-3 (8 expanded shell groups)
Rnd 7: Sl st into first ch-2 sp, ch 1, work 7 sc in each ch-2 sp around, join with sl st to first sc (56)
Fasten off, weave in all ends.
Wings – Off-white, make 2
Row 1: Ch 11, working in back bumps of chain, sc in 2nd ch from hook and in each ch across, turn (10)
Row 2: Ch 1, sc in first 2 sts, ch 3, skip 2 sts, sc in next 2 sts, ch 3, skip 2 sts, sc in last 2 sts, turn (6 sc, 2 ch-3 sps)
Row 3: Ch 1, sc in first st, (shell of 5 dc in next ch-3 sp, sc in next 2 sc, shell of 5 dc in next ch-3 sp), sc in last st, turn (2 shells)
Row 4: Ch 1, sc in first st, ch 3, skip 2 dc, sc in next dc, ch 3, skip 2 dc, sc in between the two shells, ch 3, skip 2 dc, sc in next dc, ch 3, skip 2 dc, sc in last st, turn (4 ch-3 sps)
Row 5: Ch 1, work (sc, picot, sc) in each ch-3 sp across, working a final sl st into the base of the final sc (4 picot lobes)
Fasten off, leaving a 25 cm tail for sewing.
Assembly
Thread a 30 cm length of metallic gold cord through the wooden bead from bottom to top, leaving a 10 cm loop at the top for hanging. Tie a secure knot at the underside base of the bead so the bead sits firmly against the knot.
Pass the bottom tails of the gold cord down through the top opening of the crochet dress, pulling the bead down until it rests snugly on top of Round 2 of the dress.
Anchor the bead and dress together by stitching through the top of the dress and around the cord ends inside the cavity, then fasten off securely.
Position the straight edge of each wing against the upper back of the dress, just below the wooden bead, angled slightly outward. Sew securely using the yarn tails.
Finishing
Weave in any remaining loose yarn ends inside the dress cavity.
Shape the hem of the dress and the wings gently. If desired, lightly mist the cotton elements with fabric stiffener or diluted sugar water and allow to dry completely over a small conical form to maintain crisp shape.
Tips and Common Mistakes
- Do not over-stuff the dress interior; the dress relies on its natural crochet structure and optional stiffener to hold a clean cone shape.
- Ensure your starting ring for the dress is neither too tight nor too loose, as Round 2 relies on an even 24 stitches.
- When attaching the wings, check from the front to make sure they peek out symmetrically on both sides of the wooden head.
- Use a tapestry needle with a blunt tip to avoid splitting the cotton yarn when weaving in ends.
Frequently Asked Questions
Can I make the angel larger by using worsted weight yarn?
Yes, switching to a heavier yarn and a larger hook will produce a bigger angel, but you will also need a larger wooden bead for the head.
How do I keep the dress from collapsing?
Applying a commercial fabric stiffener or a water-and-glue solution to the finished dress will help it keep its rigid conical shape over the holidays.
What can I use if I don’t have a pre-drilled wooden bead?
You can crochet a small sphere stuffed with scrap yarn, though a smooth wooden bead gives the most authentic rustic finish shown in the photo.
My wing edges are curling. How do I fix this?
Block the wings by pinning them out flat on a towel, misting them with water, and letting them dry completely.
📄 Your free PDF pattern