











12. Mini Gingerbread House
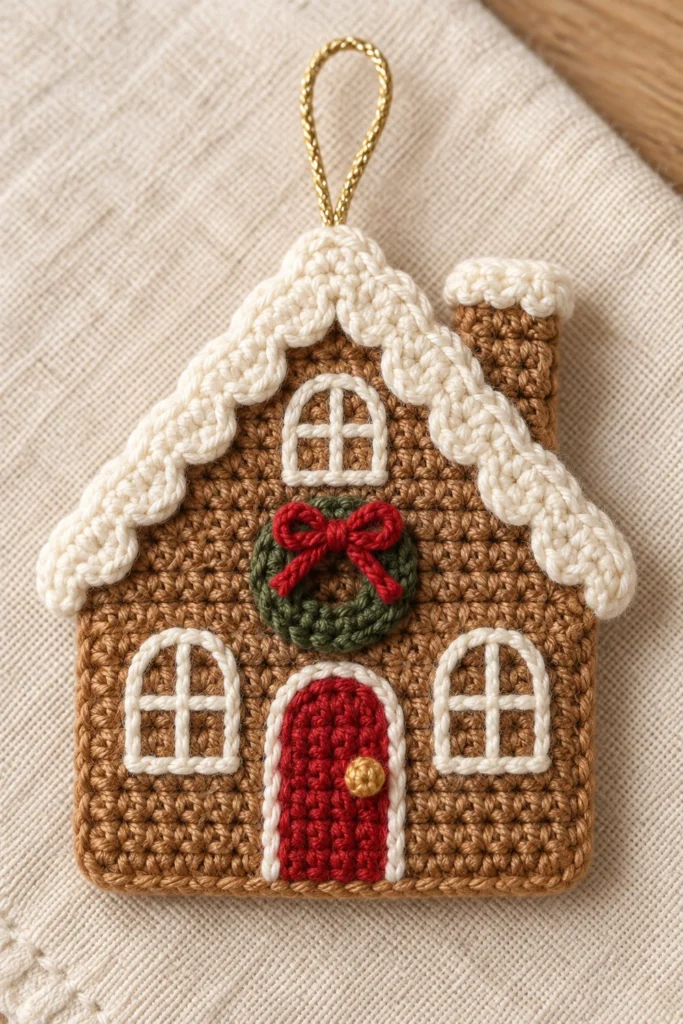
Bring cozy holiday charm to your Christmas tree with this mini gingerbread house ornament. Complete with a snowy scalloped roofline, neat embroidered windows, a festive red arched door, and a tiny green wreath, this sweet keepsake captures all the warmth of winter baking. It measures 3.5 inches (9 cm) tall and can be completed in just one hour.
Quick Facts
| Skill level | Finished size | Yarn | Hook | Time |
|---|---|---|---|---|
| Intermediate | 3.5 in / 9 cm tall | Sport weight cotton (Cat. 2) | 2.5 mm (US C/2) | 1 hour |
Materials You Will Need
- Gingerbread Tan Yarn: 15 g / 38 m (100% Sport weight cotton)
- Off-White Yarn: 8 g / 20 m (100% Sport weight cotton)
- Red Yarn: 5 g / 13 m (100% Sport weight cotton)
- Forest Green Yarn: 3 g / 8 m (100% Sport weight cotton)
- Gold Metallic Thread: 30 cm / 12 in (for hanging loop)
- Hook: 2.5 mm (US C/2) crochet hook
- Notions: Tapestry needle, embroidery needle, stitch marker, scissors
Gauge
24 sts and 26 rows = 4 in (10 cm) in single crochet using a 2.5 mm hook. A single house panel should measure approximately 3.25 in (8.5 cm) wide by 3.5 in (9 cm) tall. Working with a tight, even tension is key to giving the flat house structure and stability without sagging.
Abbreviations (US Terms)
- ch: chain
- sc: single crochet
- dc: double crochet
- sc2tog: single crochet 2 stitches together (decrease)
- sl st: slip stitch
- st(s): stitch(es)
- sk: skip
- rep: repeat
UK terms: sc = dc, hdc = htr, dc = tr.
Pattern Notes
- The house body consists of two identical flat panels (Front and Back) worked in rows, which are stitched together around the edges to create a sturdy, double-thick ornament.
- Turning chains (ch 1) do not count as a stitch throughout this pattern.
- Stitch counts are provided in parentheses at the end of each row or round.
- All facial and architectural details (windows, door, wreath, and roof trim) are added to the front panel before joining the front and back panels together.
Instructions
House Panel – Gingerbread Tan, make 2
Ch 13.
Row 1: sc in 2nd ch from hook and in each of next 11 ch, ch 1, turn (12)
Rows 2–10: sc in each st across, ch 1, turn (12)
Row 11: sc2tog, sc 8, sc2tog, ch 1, turn (10)
Row 12: sc in each st across, ch 1, turn (10)
Row 13: sc2tog, sc 6, sc2tog, ch 1, turn (8)
Row 14: sc in each st across, ch 1, turn (8)
Row 15: sc2tog, sc 4, sc2tog, ch 1, turn (6)
Row 16: sc2tog, sc 2, sc2tog, ch 1, turn (4)
Row 17: sc2tog x 2, ch 1, turn (2)
Row 18: sc2tog (1)
Fasten off. On Panel 1 (Front), weave in ends. On Panel 2 (Back), leave a long tail for joining.
Door – Red, make 1
Ch 5.
Row 1: sc in 2nd ch from hook and in each of next 3 ch, ch 1, turn (4)
Rows 2–4: sc in each st across, ch 1, turn (4)
Row 5: sk 1 st, 4 dc in next st, sk 1 st, sl st in last st (5)
Fasten off, leaving a 20 cm tail for sewing.
Mini Wreath – Forest Green, make 1
Ch 8, sl st to first ch to form a ring.
Rnd 1: Work 10 sc directly into the center of the ring, sl st to first sc to join (10)
Fasten off, leaving a 20 cm tail for sewing.
Snow Roof Trim – Off-White, make 1
Ch 23.
Row 1: sc in 2nd ch from hook, *sk 1 ch, 4 dc in next ch, sk 1 ch, sc in next ch; rep from * 4 more times (26 sts forming 5 scallops)
Fasten off, leaving a 25 cm tail for sewing.
Assembly
Work all embellishments onto the Front Panel before joining it to the Back Panel:
1. Door Placement: Position the Red Door centrally along the bottom edge of the Front Panel (Rows 1–5). Sew in place using the yarn tail and tapestry needle.
2. Wreath Placement: Position the Mini Wreath directly above the arched door. Sew securely in place using the green yarn tail.
3. Snow Trim Placement: Drape the Off-White Snow Roof Trim over the top gable of the house, aligning the center scallop with the peak of the roof (Row 18) and letting the remaining scallops drape evenly along the sloping eaves. Stitch in place along the roof line.
Finishing
1. Window Embroidery: Using Off-White yarn and an embroidery needle, embroider two square window outlines with cross-grid pane lines on either side of the red door (spanning across Rows 3–6 and sts 2–4 on the left, sts 9–11 on the right).
2. Door Accent: With Off-White yarn, stitch a clean outline around the curved edge of the door and make a single French knot on the right edge of the door for a handle.
3. Wreath Bow: Using Red yarn, stitch a tiny cross bow onto the bottom center of the green wreath.
4. Joining Panels: Place Front and Back panels wrong sides together. Using the Gingerbread Tan yarn tail from Panel 2, sc through both layers around the outer edges to join them, working (sc, ch 1, sc) into bottom corners and (sc, ch 2, sc) into the top roof peak. Sl st to first sc to join. Fasten off and weave in ends.
5. Hanging Loop: Thread the 30 cm gold metallic thread through the top roof peak, tie the ends securely inside a knot, and hide the knot within the stitches.
Tips and Common Mistakes
- Uneven Scallops: Make sure you skip exactly 1 chain between scallops on the roof trim so the scalloped snow overhang sits flat along the eaves without puckering.
- Distorted Windows: Block your embroidered window stitches to keep the lines parallel with the crochet rows. Keep embroidery tension relaxed so the crochet panel doesn’t gather.
- Over-tight Seams: When crocheting the front and back panels together, avoid pulling the single crochet border too tight, as this can cause the edges of the house to curl inward.
Frequently Asked Questions
Can I substitute yarn weight for this pattern?
Yes! You can use DK or Worsted weight yarn with a matching hook (such as a 3.0 mm or 3.5 mm). Note that using thicker yarn will result in a slightly larger ornament, perfect for a statement piece on your tree.
How do I ensure the ornament stays flat over time?
Working double panels (Front and Back) joined with a border provides strong structure. Additionally, lightly steam blocking the finished ornament before attaching the gold hanging loop will set the stitches flat permanently.
Is this pattern safe for homes with toddlers or pets?
Yes! This ornament is entirely soft and free of safety eyes or small plastic parts. Ensure all yarn ends and embroidered details are knotted securely inside the two panels during assembly.
📄 Your free PDF pattern