
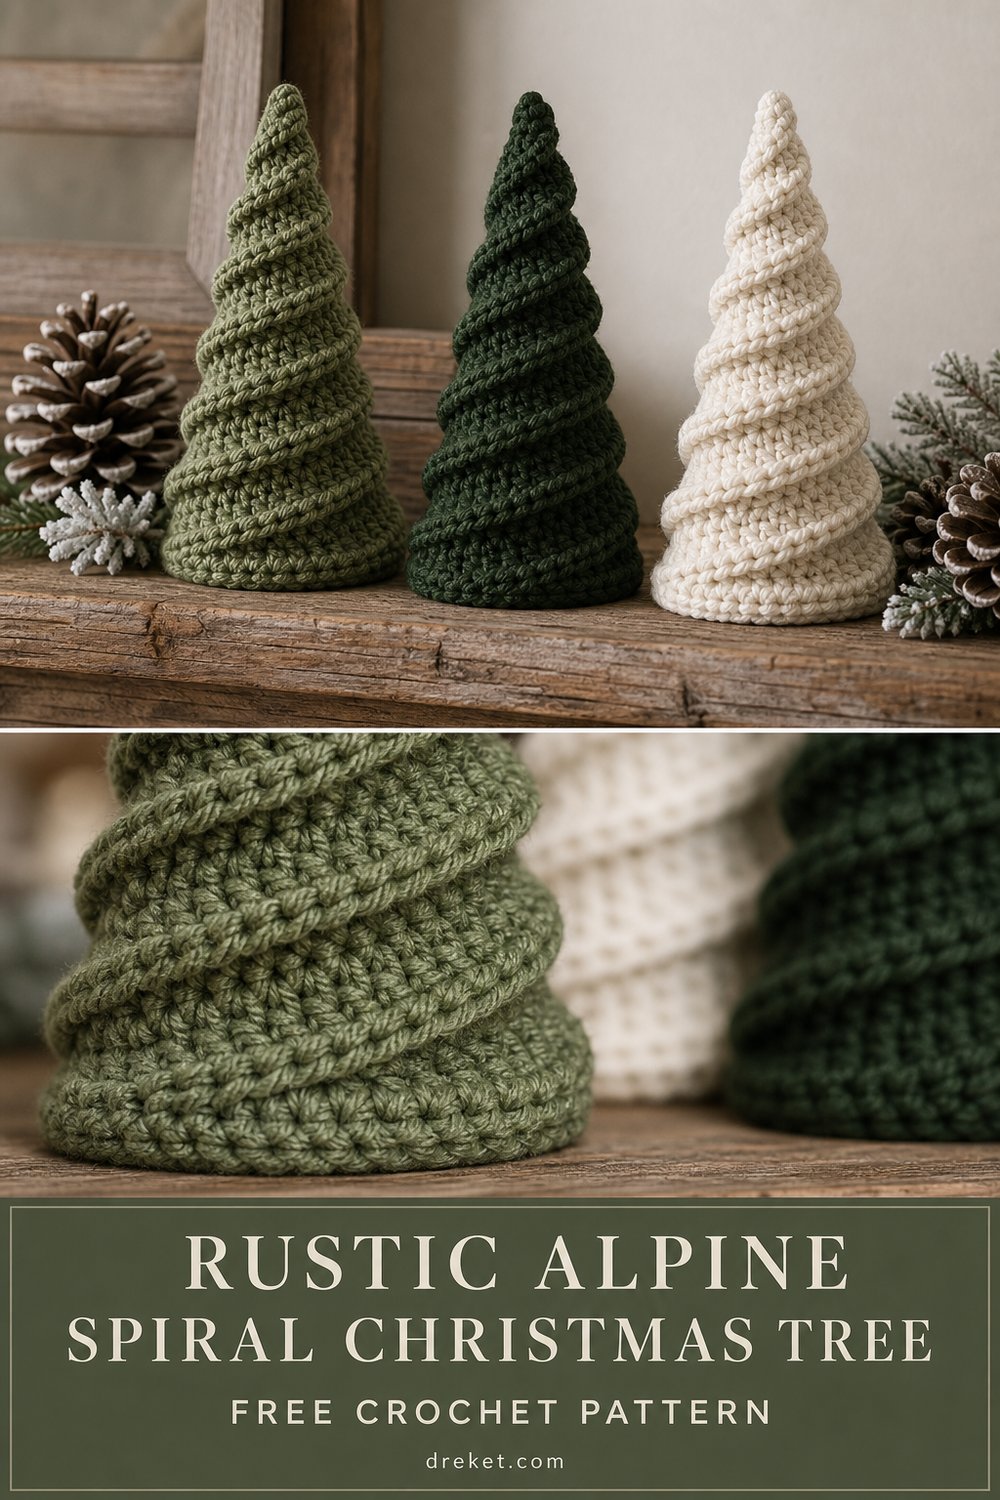
Bring the earthy charm of a winter woodland right onto your mantelpiece with a styled trio of sage, forest green, and ivory trees resting beside frosted pinecones and warm brass lanterns. This project captures the tactile, heirloom quality of classic holiday decor, designed to evoke the serene quiet of a snowy alpine forest.
Rustic Alpine Spiral Christmas Tree Free Crochet Pattern
These decorative trees feature a beginner-friendly yet sophisticated construction using the alpine stitch family and continuous post-stitch ribbing to create a rich, tactile surface texture. Designed as a versatile tabletop decor piece, this project takes just 3 to 4 hours per tree to complete, making it the ultimate quick-make holiday gift or craft-fair favorite.
Sizing customization tips are included later in this article so you can easily adapt your trees into a staggered forest display.
What Makes This Rustic Alpine Spiral Christmas Tree Special
The magic of these trees lies in the marriage of continuous spiral construction and post-stitch texturing. Instead of working in flat rows or traditional vertical panels, this design builds the body of the tree from the base upward in a continuous, uninterrupted spiral. By alternating front post stitches with traditional stitches, the fabric naturally pulls and shifts to create the iconic diagonal ribbed ridges highlighted in our macro imagery. This technique eliminates unsightly seams and gives the finished piece a rigid, self-supporting structure that holds its sculptural cone shape without requiring overly stiff internal plastic armatures.
Skill Level
- Advanced beginner to intermediate
- Proficiency in working in the round
- Familiarity with post stitches (Front Post Double Crochet)
- Ability to read continuous spiral patterns using a stitch marker
If you are comfortable with basic amigurumi shaping and eager to learn post-stitch texturing, you have all the skills needed to create a stunning forest of your own.
Finished Measurements
- Height: 9 inches (23 cm) from base to tip
- Base Diameter: 5 inches (12.5 cm) across the widest part of the lower tier
Materials You Will Need
- Yarn: Worsted weight (Category 4) wool or wool-blend yarn for optimal stitch definition and structural memory.
- Hook: US H/8 (5.0 mm) crochet hook
- Notions: Stitch marker, yarn needle, locking stitch markers, polyfill stuffing (or clean fabric scraps), heavy-duty cardboard or a small plastic disc for the flat base stability (optional).
| Colorway (Exact Order) | Yarn Shade Name | Approximate Yardage |
|---|---|---|
| Sage | Silver Sage | 65 yds (60 m) |
| Forest Green | Deep Pine | 65 yds (60 m) |
| Ivory | Natural Cream | 65 yds (60 m) |
Yarn Suggestions
- Knit Picks Wool of the Andes Worsted: (110 yds / 50g per skein; 100% Peruvian Highland Wool) — Provides incredible stitch definition and natural spring for structural pieces.
- Lion Brand Wool-Ease: (197 yds / 85g per skein; 80% Acrylic, 20% Wool) — A budget-friendly, washable alternative that holds a rigid spiral shape remarkably well.
- Cascade 220: (220 yds / 100g per skein; 100% Peruvian Highland Wool) — Offers a vast array of earthy green and neutral tones.
Note on yarn to avoid: Avoid slippery 100% bamboo, shiny rayon, or ultra-drapey acrylic blanket yarns. These lack the structural friction and memory required for the tree to maintain its upright, ridged silhouette.
Gauge
- Gauge: 14 sts and 12 rows = 4 inches (10 cm) in pattern stitch (sc, fpdc alternating sequence).
- A reminder to swatch first: While exact sizing isn’t critical for home decor, matching the tight, dense gauge ensures your tree will stand firmly without collapsing under the weight of the polyfill.
Abbreviations
- ch: chain
- sc: single crochet
- hdc: half double crochet
- dc: double crochet
- fpdc: front post double crochet
- inc: increase (work 2 sc in the same stitch)
- invdec: invisible decrease (insert hook into front loops of next 2 stitches, yo, pull through both, yo, pull through remaining loops)
- st(s): stitch(es)
- rnd(s): round(s)
- sl st: slip stitch
- FO: fasten off
Special Stitches Explained
- Front Post Double Crochet (fpdc): Yarn over, insert hook from front to back to front around the post of the specified stitch two rows below, yarn over, pull up a loop, (yarn over, pull through 2 loops) twice.
- Spiral Ribbing Sequence (SRS): Working in a continuous spiral without joining rounds, alternate 1 sc in the next stitch, followed by 1 fpdc around the stitch directly below the next sc two rows down. This naturally shifts the texture one stitch to the left every round, producing the signature spiral ridge.
Pattern Instructions
Section 1: The Foundation Base
Working from the bottom up, begin with a magic ring in your chosen colorway (Sage, Forest Green, or Ivory).
- Rnd 1: Work 6 sc into the magic ring. Do not join; place stitch marker in the first st of the round and move it up with each round. (6 sts)
- Rnd 2: [Inc] 6 times. (12 sts)
- Rnd 3: [1 sc, inc] 6 times. (18 sts)
- Rnd 4: [2 sc, inc] 6 times. (24 sts)
- Rnd 5: [3 sc, inc] 6 times. (30 sts)
- Rnd 6: [4 sc, inc] 6 times. (36 sts)
- Rnd 7: [5 sc, inc] 6 times. (42 sts)
- Rnd 8: [6 sc, inc] 6 times. (48 sts)
- Rnd 9: [7 sc, inc] 6 times. (54 sts)
- Rnd 10: [8 sc, inc] 6 times. (60 sts)
Section 2: Building the Spiral Body
Now transition into the texturized spiral stitch pattern. From this point forward, you will maintain a 6-stitch increase frequency every 6 rounds to taper the cone smoothly while keeping the spiral ridge angle intact.
- Rnd 11: [1 sc in next 8 sts, 1 fpdc around st 2 rows below] repeat around. (60 sts)
- Rnd 12: [1 sc in next 9 sts, inc in next st] repeat around. (66 sts)
- Rnd 13: [1 sc, 1 fpdc] working the pattern sequence around the entire circumference. (66 sts)
- Rnd 14: [1 sc in next 10 sts, inc in next st] repeat around. (72 sts)
- Rnd 15: [1 sc, 1 fpdc] working the pattern sequence around. (72 sts)
- Rnd 16: [1 sc in next 11 sts, inc in next st] repeat around. (78 sts)
- Rnd 17: [1 sc, 1 fpdc] working the pattern sequence around. (78 sts)
- Rnd 18: [1 sc in next 12 sts, inc in next st] repeat around. (84 sts)
- Rnd 19: [1 sc, 1 fpdc] working the pattern sequence around. (84 sts)
Checkpoint
At this stage, your tree base should measure approximately 5 inches across. If you wish to insert a flat cardboard circle inside the base for added stability on your mantel, slide it in now before the opening narrows further.
Section 3: Tapering and Shaping the Tip
- Rnd 20: [1 sc in next 10 sts, invdec] repeat around. (77 sts)
- Rnd 21: [1 sc, 1 fpdc] working the pattern sequence around. (77 sts)
- Rnd 22: [1 sc in next 9 sts, invdec] repeat around. (70 sts)
- Rnd 23: [1 sc, 1 fpdc] working the pattern sequence around. (70 sts)
- Rnd 24: [1 sc in next 8 sts, invdec] repeat around. (63 sts)
- Rnd 25: [1 sc, 1 fpdc] working the pattern sequence around. (63 sts)
Checkpoint
Begin firmly stuffing your tree with polyfill, pushing fiber all the way into the outer edges of the base to ensure a clean, smooth cone shape. Continue adding stuffing as you work the final decrease rounds.
- Rnd 26: [1 sc in next 7 sts, invdec] repeat around. (56 sts)
- Rnd 27: [1 sc, 1 fpdc] working the pattern sequence around. (56 sts)
- Rnd 28: [1 sc in next 6 sts, invdec] repeat around. (48 sts)
- Rnd 29: [1 sc in next 4 sts, invdec] repeat around. (40 sts)
- Rnd 30: [1 sc in next 3 sts, invdec] repeat around. (32 sts)
- Rnd 31: [1 sc in next 2 sts, invdec] repeat around. (24 sts)
- Rnd 32: [1 sc, invdec] repeat around. (16 sts)
- Rnd 33: [invdec] 8 times. (8 sts)
Top off the stuffing one final time, cut your yarn leaving a 6-inch tail, thread it through a yarn needle, weave through the front loops of the remaining 8 stitches, and pull tightly to close the tip. FO and weave in all ends securely inside the tree body.
Size Customization Tips
- To make a smaller mini tree (6 inches tall): Stop increasing at Rnd 6 (36 sts), work your texture rounds, and begin your decrease sequence earlier. This reduces total height by roughly 3 inches.
- To make a taller statement tree (12 inches tall): Continue increasing out to Rnd 14 (84 base stitches), then work 12 additional pattern rounds without increases before beginning your decrease sequence. This adds approximately 3 inches of height and requires an extra skein of yarn.
Care Instructions
Spot clean gently with a damp cloth and mild wool wash as needed. Do not submerge completely in water if you inserted a cardboard base stabilizer. Reshape while damp and allow to air dry completely on a flat surface.
Rustic Alpine Spiral Christmas Tree
I hope you thoroughly enjoyed making your own little woodland forest! There is nothing quite like styling handmade decor to make a house feel like a home for the holidays.
Be sure to save this pattern to your Pinterest Christmas boards, share your finished trees on Instagram by tagging @dreket, and drop a comment below letting me know which colorway is your favorite—Sage, Forest Green, or Ivory! Happy crocheting!