
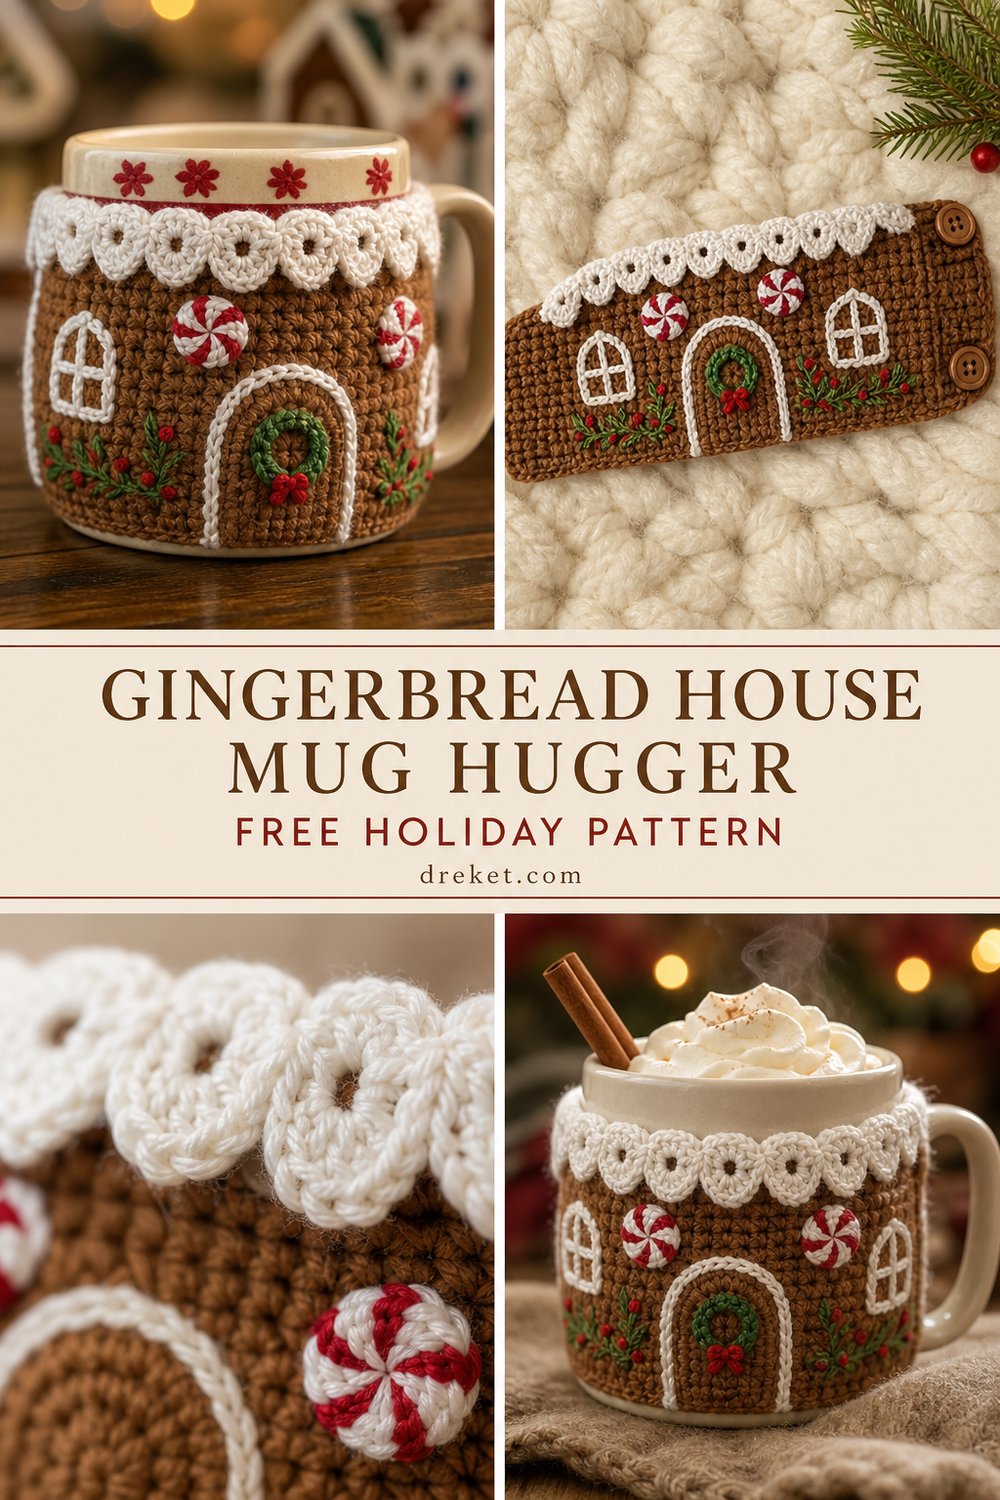
Wrap your hands around a steaming mug of hot cocoa while the winter wind whispers outside, and bring a touch of old-world holiday magic to your coffee table. This delightful accessory turns an ordinary ceramic mug into a frosted confection, complete with scalloped snowy rooflines, candy buttons, and an embroidered wreath door.
Whimsical Gingerbread House Mug Hugger Free Holiday Pattern
Quick Facts
- Stitches Used: Chain (ch), single crochet (sc), half double crochet (hdc), slip stitch (sl st), surface slip stitch, loop stitch (for snow texture), and basic embroidery.
- Size Fit: Designed to fit a standard 12–15 oz ceramic mug with a handle diameter of approximately 3.5 inches (9 cm).
- Estimated Time to Complete: 2 to 3 hours from start to finish.
- Gift-Appeal: A remarkably fast, thoughtful, and charming holiday gift that pairs wonderfully with a bag of gourmet coffee beans or artisanal hot chocolate mix.
Sizing customization tips are included later in this guide to help you adapt the wrap for oversized mugs or travel tumblers.
What Makes This Whimsical Gingerbread House Mug Hugger Special
This mug hugger achieves its tactile, artisanal charm through a thoughtful blend of texture and construction. Rather than working in the round, the base is crocheted flat in rich gingerbread-brown to wrap snugly around the body of the mug, secured cleanly at the handle with a hidden loop and button fastening. The roofline utilizes textured white loop stitches that mimic pillowy drifts of fresh snow, standing out in high relief against the warm brown backdrop. Intricate surface embroidery and embroidered French knot peppermint candies bring the classic gingerbread architecture to life without adding bulky layers of fabric.
Skill Level
- Intermediate: Comfortable with basic crochet shaping, simple embroidery techniques, and working with textured specialty loops.
- Required Skills:
- Working flat in rows and changing colors
- Executing basic surface slip stitches
- Simple embroidery stitches (French knots, straight stitch, and satin stitch)
- Sewing buttons securely to crochet fabric
💡 Designer Tip: If you are new to the loop stitch used for the snowy roof, practice a small 5-stitch swatch first to get into a comfortable rhythm of pulling up consistent loops.
Finished Measurements
| Measurement | Inches | Centimeters |
|---|---|---|
| Total Length (Flat) | 10.5 in | 26.5 cm |
| Height (Base to Roof Peak) | 4.0 in | 10 cm |
| Mug Circumference Fit | 9.0 – 11.0 in | 23.0 – 28.0 cm |
Materials You Will Need
| Color Name in Image Order | Yarn Weight & Fiber | Yardage Needed |
|---|---|---|
| 1. Gingerbread Brown | Worsted Weight (100% Cotton) | 35 yds (32 m) |
| 2. Snow White | Worsted Weight (100% Cotton) | 15 yds (14 m) |
| 3. Crimson Red | Sport Weight Embroidery Floss / Yarn | 3 yds (3 m) |
| 4. Forest Green | Sport Weight Embroidery Floss / Yarn | 3 yds (3 m) |
- Crochet Hook: US G/6 (4.0 mm) hook
- Additional Tools: Tapestry needle for weaving ends, embroidery needle, 1 small wooden or festive button (approx. 0.5 in / 1.2 cm), scissors, and locking stitch markers.
Yarn Suggestions
| Brand & Line Name | Yarn Weight | Skein Yardage | Notes |
|---|---|---|---|
| Kitchen Cotton (Lion Brand) | Worsted (4) | 90 yds / 84 m per skein | Sturdy, holds its shape well around hot mugs. |
| Dishie (WeCrochet) | Worsted (4) | 190 yds / 174 m per skein | Excellent stitch definition for gingerbread texture. |
| Cotton Supreme (Universal Yarn) | Worsted (4) | 180 yds / 165 m per skein | Beautiful soft sheen and vibrant holiday hues. |
⚠️ Note: Avoid using 100% acrylic yarns for mug huggers, as acrylic can melt or warp when exposed to the radiant heat of a very hot ceramic mug. Stick to natural cotton or wool blends.
Gauge
| Measurement Type | Stitches / Rows | Imperial | Metric |
|---|---|---|---|
| Single Crochet Gauge | 16 sts x 18 rows | 4 x 4 inches | 10 x 10 cm |
⚠️ Note: Be sure to check your gauge before beginning. A gauge that is too loose will cause the mug hugger to slip down the sides of your mug.
Abbreviations
| Abbreviation | Full Term |
|---|---|
| ch | chain |
| sc | single crochet |
| hdc | half double crochet |
| sl st | slip stitch |
| st(s) | stitch(es) |
| blo | back loop only |
| lp-st | loop stitch (see special stitches) |
| RS | right side |
| WS | wrong side |
Special Stitches Explained
- Loop Stitch (lp-st): Insert hook into next stitch, wrap working yarn around your index finger behind the working yarn to form a loop of desired height against the back of your work, yarn over, pull loop and working yarn through the stitch, yarn over, pull through both loops on hook. Secure the loop by pushing it to the front of the work as you work the next stitch.
- Surface Slip Stitch: Hold working yarn on the WS of the fabric. Insert hook from RS to WS through the fabric, yarn over on WS, pull loop through to RS, *insert hook a short distance away along your intended line, yarn over, pull loop through fabric and through the loop on your hook (1 surface sl st made); repeat from * for desired line length.
Pattern Instructions
Section 1: Main Gingerbread House Body
Using Gingerbread Brown, ch 38.
Row 1 (RS): Working in the back bumps of the foundation chain, sc in 2nd ch from hook and in each ch across, turn. (37 sc)
Rows 2–12: Ch 1 (does not count as st here and throughout), sc in each st across, turn. (37 sc)
✅ Checkpoint: At the end of Row 12, your rectangular panel should measure approximately 9.25 inches wide by 2.5 inches tall.
Section 2: Roof Shaping & Snow White Icing
Join Snow White yarn at the beginning of Row 13.
Row 13 (RS): Ch 1, working in blo, sc in first 5 sts, hdc in next 4 sts, dc in next 5 sts, hdc in next 4 sts, sc in last 5 sts, fasten off Snow White. (23 sts total, leaving unworked border stitches for roof overhang)
Join Snow White back to the beginning of the roofline for the textured snow effect.
Row 14: Ch 1, working into both loops, work lp-st in each st across the roof ridge, turn. (23 lp-sts)
Row 15: Ch 1, sc in each st across, fasten off. (23 sc)
Section 3: Button Loop & Edging
With Gingerbread Brown, attach yarn to the right side edge of the main body panel.
Round 1: Working evenly around the entire outer perimeter of the mug hugger, work sc down the side edge, across the bottom foundation chain, up the left side edge, and around the roofline. When reaching the top left corner, ch 8 to form the button loop, slip stitch into the base of the chain, and finish working sl st around the remaining edges. Fasten off and weave in all ends.
💡 Designer Tip: Keep your tension even when working the border round so the edges of your gingerbread house stay crisp and flat.
Section 4: Embroidery & Assembly
- The Wreath Door: Using an embroidery needle and Forest Green, embroider a small satin-stitch or detached chain-stitch circle centered in the lower middle of the gingerbread body. Add tiny French knots in Crimson Red around the green wreath to represent berries.
- Peppermint Buttons: Use Snow White and Crimson Red embroidery floss to create French knot peppermint candies arranged in vertical rows on either side of the door.
- Button Attachment: Lay the mug hugger around your ceramic mug to test the fit. Sew the button securely to the right-side edge opposite the chain loop so that the loop fastens snugly around the mug handle.
Size Customization Tips
- For Larger Mugs / Travel Tumblers: Add chains in multiples of 2 at the initial foundation chain step (e.g., start with ch 42 instead of ch 38) and widen the roof section accordingly by 2–4 stitches. This adds approximately 1 inch (2.5 cm) of length to the wrap.
- For Petite Espresso Mugs: Subtract 6 chains from the initial foundation chain (start with ch 32) and narrow the roof section by 4 stitches.
Care Instructions
Hand wash gently in cool water using a mild wool-safe or cotton-safe detergent. Do not wring or twist. Press out excess moisture gently in a clean towel and lay flat to dry in its original shape. Do not iron directly over loop stitches or embroidered embellishments.
Whimsical Gingerbread House Mug Hugger
I hope you had as much fun crocheting this little holiday house as I did designing it! There is nothing quite like wrapping your handmade cozy around a hot mug on a crisp winter afternoon.
If you make one (or a whole village of them!), I would love to see your creations. Please be sure to tag me on social media using #GingerbreadMugHugger and @YourBrandHandle, save this project to your holiday boards on Pinterest, and leave a comment below letting me know which festive details you added! Happy crocheting and happy holidays!