
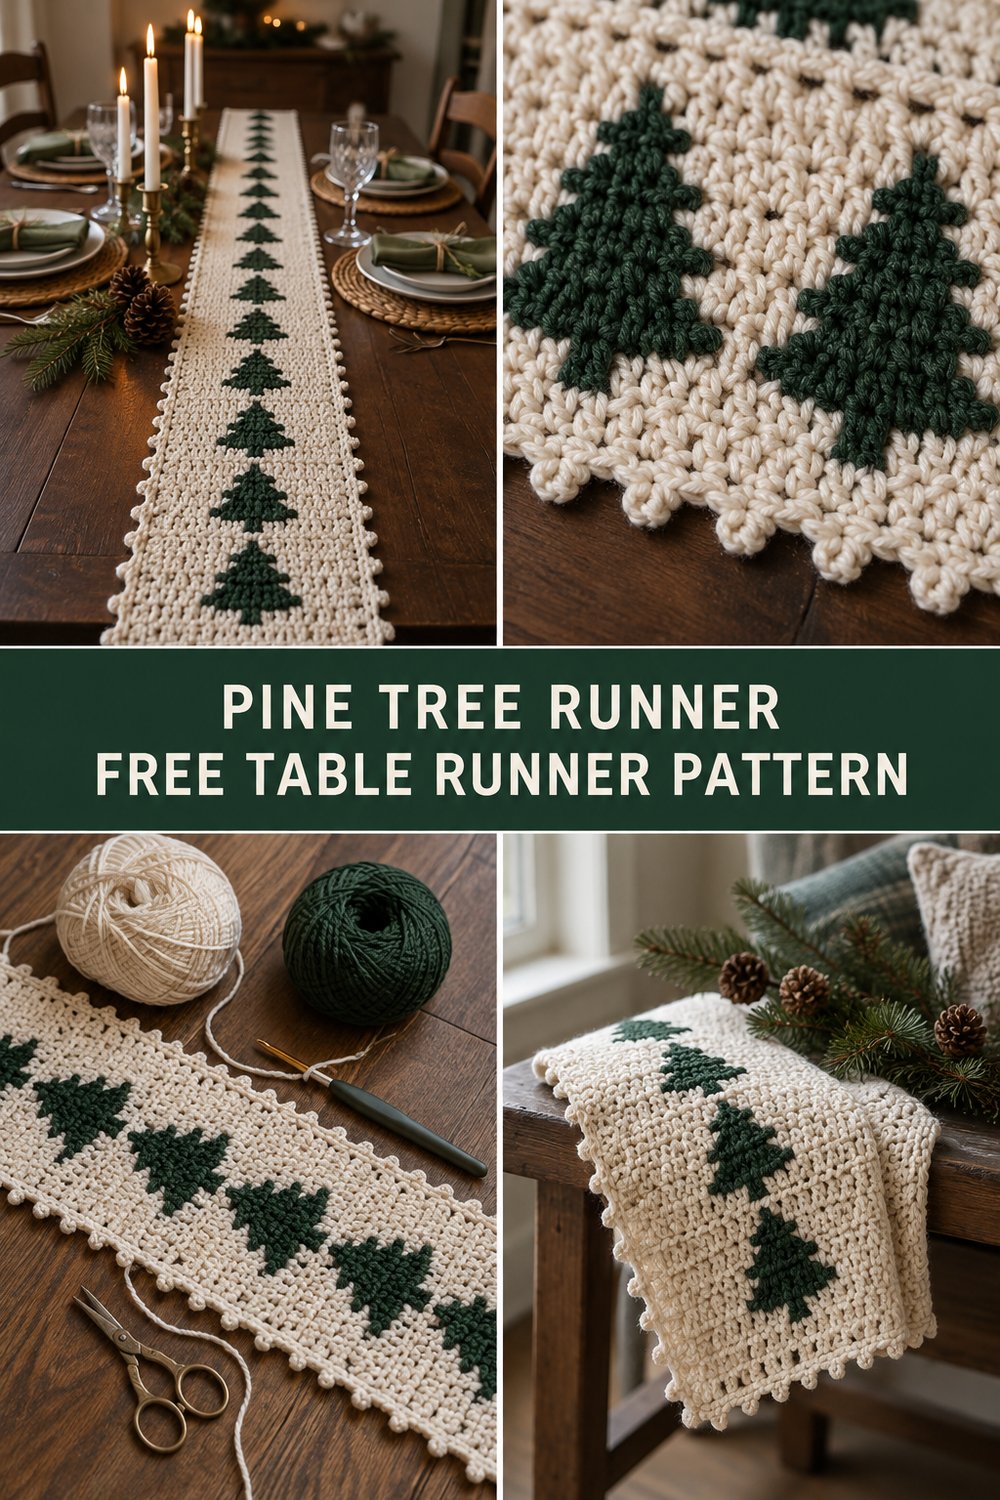
Embrace the cozy charm of winter gatherings with this beautiful crochet pine tree table runner. Perfect for adding a touch of handmade elegance to your festive table, this runner combines classic holiday motifs with a soft, inviting texture that will be cherished for years to come. Imagine it gracing your dining table, filled with the warmth of family and the magic of the season!
Crochet Pine Tree Table Runner — Free Christmas Pattern
This crochet table runner features delightful pine tree motifs, making it a perfect free Christmas crochet pattern. It’s a wonderfully approachable project, utilizing fundamental stitches to create a visually impressive holiday crochet decor piece. Designed for intermediate crocheters, you can expect to complete this festive runner in approximately 8-12 hours, making it an ideal handmade gift that truly speaks from the heart.
Looking to customize the size for your unique table? I’ve included tips on how to easily adjust the length and width of this cotton crochet runner later in the pattern!
What Makes This Pine Tree Runner Special
This pine tree crochet pattern stands out thanks to its integrated design. Instead of appliqués, the charming pine trees are worked directly into the fabric using a combination of textured stitches, creating a beautiful dimensional effect that feels cohesive and high-quality. The creamy background allows the vibrant pine green trees to truly pop, while the delicate picot edging provides a clean, finished look that resists curling and lays beautifully flat. It’s a design that’s both visually appealing and incredibly practical for a piece of crochet holiday decor.
Skill Level
This pattern is designed for an Intermediate crocheter.
- Required Skills:
- Magic Ring (or alternative ch-3 ring)
- Chain (ch)
- Slip Stitch (sl st)
- Single Crochet (sc)
- Half Double Crochet (hdc)
- Double Crochet (dc)
- Working in rows
- Working in the round (for trees)
- Basic counting and stitch placement
- Understanding of gauge
You should be comfortable with basic crochet stitches and following written patterns. Don’t worry if you’re still building your skills; the detailed instructions and special stitch explanations will guide you every step of the way!
Finished Measurements
The finished table runner measures approximately 13 inches (33 cm) wide by 72 inches (183 cm) long.
| Measurement | Inches | Centimeters |
|---|---|---|
| Width | 13 | 33 |
| Length | 72 | 183 |
Materials You Will Need
This christmas table runner crochet project uses a soft, durable Dk weight cotton yarn for its beautiful drape and washability.
| Color | Yarn Weight / Type | Yardage (approx.) |
|---|---|---|
| Cream | DK (Light Worsted) Cotton | 900 yards (825 meters) |
| Pine Green | DK (Light Worsted) Cotton | 100 yards (90 meters) |
- Hook: 3.5mm (E/4) crochet hook
- Additional Tools:
- Yarn needle for weaving in ends
- Scissors
- Stitch markers (optional, but helpful for tree placement)
Yarn Suggestions
Choosing the right yarn is key for your cotton crochet runner. I recommend a smooth, mercerized cotton for excellent stitch definition and durability.
| Yarn Brand/Line | Weight | Yardage per Skein | Notes |
|---|---|---|---|
| WeCrochet Comfy Worsted | DK | 109 yards | Super soft blend, great for home decor. |
| Paintbox Yarns Cotton DK | DK | 137 yards | Wide range of colors, affordable, excellent stitch definition. |
| Lion Brand 24/7 Cotton | DK | 186 yards | Mercerized cotton, strong and lustrous. |
⚠️ Note: Avoid novelty yarns or highly textured yarns for this project, as they can obscure the detail of the pine tree stitches and make the picot edge less defined. A smooth cotton will best showcase the stitch work.
Gauge
Achieving the correct gauge is crucial for your runner to turn out the specified size.
| Stitch / Motif | Measurement (4 inches / 10 cm) |
|---|---|
| sc | 22 sc |
| rows sc | 24 rows |
| Tree Base | 1.5 inches / 4 cm wide |
💡 Designer Tip: Always make a gauge swatch! Crochet a small square (at least 6×6 inches) using the main stitch (sc) and measure. Adjust your hook size up or down until you match the gauge.
Abbreviations
| Abbreviation | Full Meaning |
|---|---|
| ch | Chain |
| sl st | Slip Stitch |
| sc | Single Crochet |
| hdc | Half Double Crochet |
| dc | Double Crochet |
| tr | Treble Crochet |
| yo | Yarn Over |
| st(s) | Stitch(es) |
| rep | Repeat |
| sp | Space |
| R | Row / Round |
| MR | Magic Ring |
| BLO | Back Loop Only |
| FLO | Front Loop Only |
| Picot | Picot Stitch (see special stitches) |
Special Stitches Explained
1. Picot Stitch (Picot)
Ch 3, sl st into the first ch made.
2. Pine Tree Stitch (PTS)
This stitch is worked in the round to create the texture of the tree.
1. MR: Make a Magic Ring.
2. R1: Ch 2 (does not count as st), 10 hdc into MR. Pull tail to close MR. Sl st to first hdc to join. (10 hdc)
3. R2: Ch 2 (does not count as st), 1 dc in next st, ch 1, skip 1 st, rep 5 times around. Sl st to first dc to join. (5 dc, 5 ch-1 sps)
4. R3: Ch 1 (does not count as st), 5 sc into ch-1 sp, rep 5 times around. Sl st to first sc to join. (25 sc)
5. R4: Ch 1 (does not count as st), sl st into first sc, ch 3, 2 dc into same st, 1 tr into next st, 2 dc into next st, ch 3, sl st into same st, skip 2 sc, rep 5 times around. Sl st to first sl st to join. Fasten off. This creates the ruffled tree shape.
Pattern Instructions
This crochet table runner is worked primarily in rows, with the pine tree motifs added directly as you go.
Section 1: Main Runner Body (Cream)
Using Cream yarn.
R1: Ch 66, sc in 2nd ch from hook and in each ch across. Turn. (65 sc)
R2: Ch 1, sc in each st across. Turn. (65 sc)
R3-R10: Rep R2. (65 sc)
✅ Checkpoint: After R10, your piece should be approximately 13 inches (33 cm) wide.
The main body of the runner consists of sections of plain sc rows, separated by rows where the Pine Trees will be incorporated.
Row 11 (Tree Base Row – Cream): Ch 1, sc in first 10 sc, ch 1, skip 1 st, sc in next 9 sc, rep 4 times, ch 1, skip 1 st, sc in last 9 sc. Turn. (55 sc, 6 ch-1 sps)
These ch-1 sps will serve as the base for working the tree trunks.
R12: Ch 1, sc in first 9 sc, sc into ch-1 sp, sc in next 9 sc, rep 4 times, sc into ch-1 sp, sc in last 10 sc. Turn. (65 sc)
R13-R20: Ch 1, sc in each st across. Turn. (65 sc)
💡 Designer Tip: For a longer runner, repeat R12-R20 (9 rows total per plain section) as many times as needed before moving on to the next Tree Base Row.
Repeat Rows 11-20 for a total of 12 times to achieve a runner approximately 72 inches (183 cm) long, or until desired length is reached, ending with R20.
✅ Checkpoint: After repeating R11-R20 twelve times, you should have 12 sections with 6 ch-1 spaces for trees, and 13 sections of plain sc rows.
Final Rows of Runner Body:
R1 (after last tree section): Ch 1, sc in first 10 sc, ch 1, skip 1 st, sc in next 9 sc, rep 4 times, ch 1, skip 1 st, sc in last 9 sc. Turn. (55 sc, 6 ch-1 sps)
R2: Ch 1, sc in first 9 sc, sc into ch-1 sp, sc in next 9 sc, rep 4 times, sc into ch-1 sp, sc in last 10 sc. Turn. (65 sc)
R3-R10: Ch 1, sc in each st across. Turn. (65 sc)
Fasten off Cream yarn, leaving a long tail for weaving.
Section 2: Pine Tree Motifs (Pine Green)
Now we will add the trees into the ch-1 spaces created in the Tree Base Rows (R11 of each repeat).
Join Pine Green yarn into the first ch-1 space of a Tree Base Row.
- Tree Trunk: Ch 3 (counts as 1 dc), 2 dc into same ch-1 sp. (3 dc)
- Tree Top:
- Work R1-R4 of the Pine Tree Stitch (PTS) (see Special Stitches Explained) directly into the top of the last dc made for the trunk, essentially treating the top of the dc as the center for your Magic Ring. Or, alternatively, if preferred, create a MR first and then attach the trunk to the base of the tree.
- The “MR” for the tree can be worked by inserting your hook into the top of the last dc of the trunk, ch 2, and then work the 10 hdc around the ch-2 loop and the top of the dc.
⚠️ Note: For the Pine Tree Stitch, it is worked in the round. When the pattern says “MR” for the tree, you are effectively creating a small ring at the top of your trunk. You can either literally make a MR and sl st it to the top of the trunk, or work your initial stitches of the tree top around the post/top of the trunk stitch for a seamless look.
Repeat for each ch-1 space across the Tree Base Row.
Fasten off Pine Green yarn after each tree, leaving a tail for weaving in.
Work all 6 trees for each Tree Base Row section.
Continue adding trees to all Tree Base Rows along the entire length of the runner.
✅ Checkpoint: All 72 trees (6 trees x 12 sections) should be securely attached and woven in.
Section 3: Picot Edging (Cream)
Using Cream yarn.
Join Cream yarn with a sl st to any corner of the runner.
Round 1: Ch 1, sc evenly around the entire perimeter of the runner, working (sc, ch 1, sc) into each corner st. Sl st to first sc to join.
💡 Designer Tip: When working sc evenly along the sides of the runner, aim for approximately 2 sc per row end to ensure a flat, even edge.
Round 2: Ch 1, sc in next st, Picot (ch 3, sl st into first ch), skip 1 st, rep around the entire perimeter. When you reach a corner ch-1 space, work (sc, Picot, sc) into the ch-1 sp. Sl st to first sc to join.
Fasten off, weave in all remaining ends securely.
Size Customization Tips
This crochet table runner is designed to be easily adaptable!
- To change Length:
- To make it shorter, simply work fewer repeats of Rows 11-20 in Section 1. Each full repeat (R11-R20) adds approximately 4.5 inches (11.5 cm) to the length.
- To make it longer, add more repeats of Rows 11-20. Each additional repeat will add another 4.5 inches (11.5 cm).
- To change Width:
- To make it wider, add an even number of starting chains (2 chs for every 1 sc you wish to add) in R1 of Section 1, ensuring you maintain the pattern for the Tree Base Row (sc in 9, ch 1, skip 1). For every 10 stitches added to the width, you can add another tree. For instance, to add one tree, add 10 stitches (sc in 9, ch 1, skip 1). Each added tree will increase the width by approximately 1.5 inches (4 cm).
- To make it narrower, subtract an even number of starting chains (2 chs for every 1 sc you wish to remove) in R1 of Section 1, while maintaining the tree spacing. Each removed tree reduces the width by approximately 1.5 inches (4 cm).
Care Instructions
This cotton crochet runner is designed for durability and easy care.
* Washing: Machine wash cold on a gentle cycle.
* Drying: Lay flat to dry, reshaping as needed, or tumble dry on low heat.
* Ironing: If desired, iron on a low setting with steam.
* Bleach: Do not bleach.
Crochet Pine Tree Table Runner — Free Christmas Pattern
I truly hope you enjoy creating this festive crochet table runner as much as I enjoyed designing it for you! It’s such a lovely way to bring a touch of handmade warmth to your home this holiday season.
Don’t forget to share your finished runner with me on social media – I’d love to see it! Tag me @[YourSocialHandleHere] and use #PineTreeRunner #ChristmasCrochet #FreeCrochetPattern. And if you loved this pattern, please save it to your Pinterest boards and leave a comment below! Happy crocheting!