
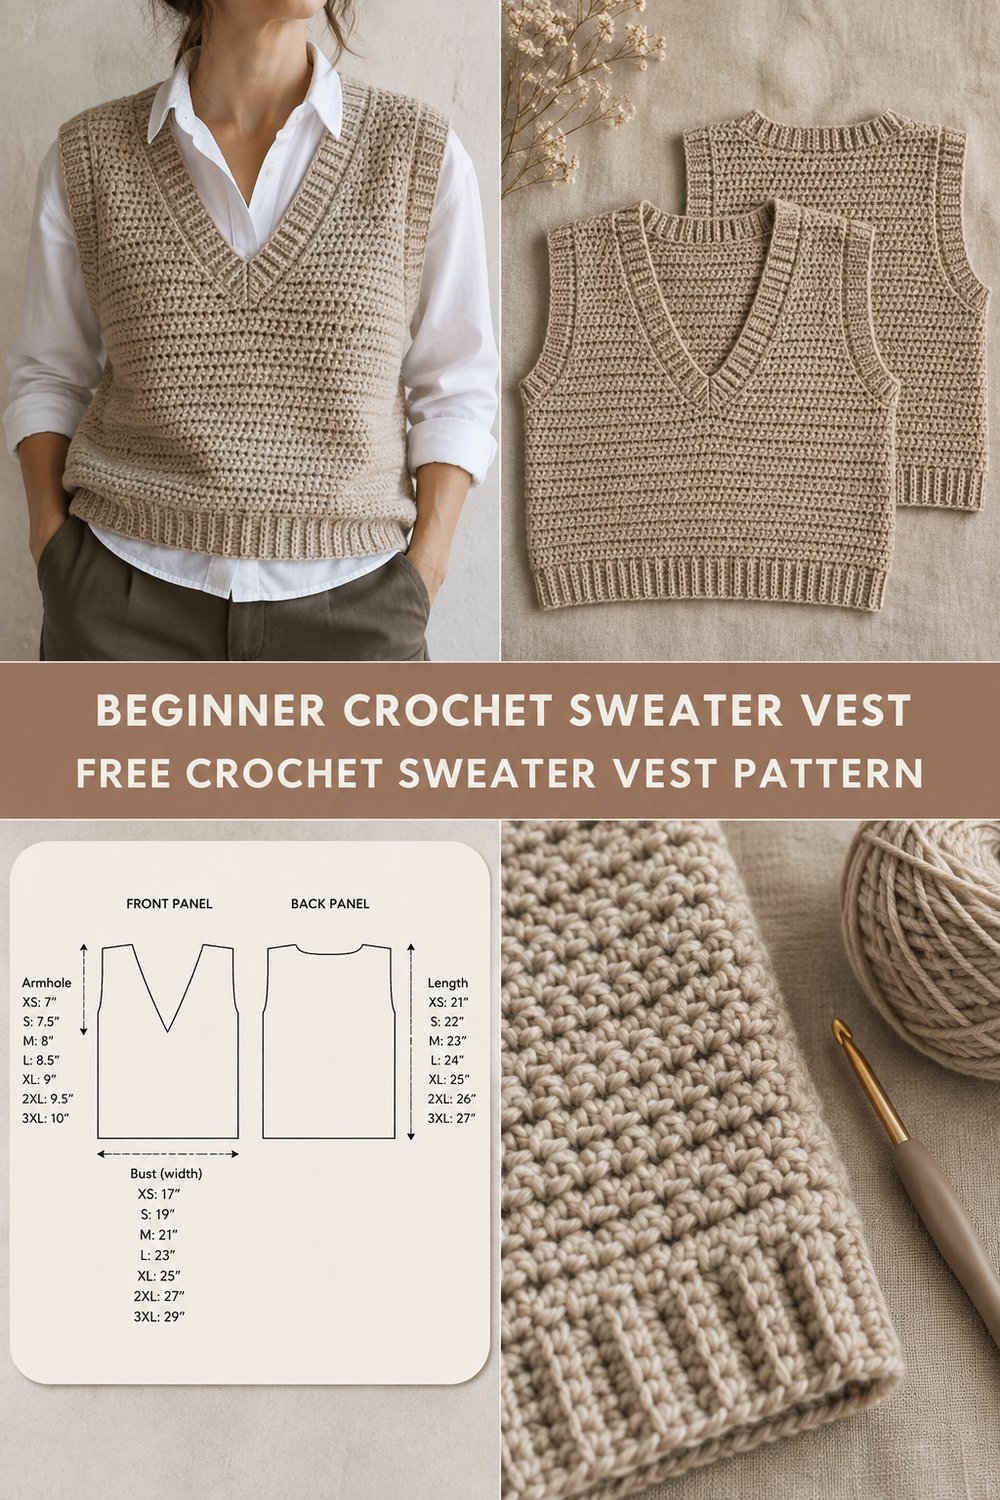
Layering a handmade garment into your daily wardrobe is one of the most rewarding milestones in a maker’s journey. This oatmeal-toned piece offers a gentle, confidence-building entry into garment construction, resting comfortably over crisp shirts as the seasons transition.
Cozy Crochet Sweater Vest for Beginners Free Size Guide
Quick Facts
- Stitches Used: Chain (ch), Half Double Crochet (hdc), Slip Stitch (sl st), Back Loop Only (blo)
- Size Fit: XS to 3XL (Free Size Guide included)
- Estimated Hours to Complete: 12–18 hours
- Gift-Appeal Framing: A universally flattering, timeless layering piece that makes an unforgettable, high-end handmade gift for friends or family.
Sizing customization tips are included later in this article so you can easily adapt the fit to your exact body measurements.
What Makes This Crochet Sweater Vest Special
This beginner-friendly crochet sweater vest relies on simple geometric panels rather than complex shaping, making it the ultimate easy crochet top for your first wearable. The entire body is worked in flat, classic half double crochet rows, creating a dense, tactile fabric with wonderful drape and visible stitch definition. Instead of complicated neck and armhole decreases, the deep V-neck and structured armholes are formed simply by seaming and adding clean 2×1 ribbed edging worked directly in the back loop only. The resulting silhouette is a relaxed, modern rectangular shape that flatters every body type while keeping the construction completely stress-free.
Skill Level
- Skill Level: Confident Beginner
- Required Skills:
- Basic chain, half double crochet, and slip stitch.
- Working evenly into row ends for ribbing bands.
- Basic mattress stitch or whip stitch for shoulder and side seams.
💡 Designer Tip: If you have mastered a basic dishcloth or scarf and want to make your very first garment, this pattern is designed specifically for you. Take your time, trust your gauge, and enjoy the process!
Finished Measurements
| Size | Bust Width (Inches / cm) | Length (Inches / cm) | Armhole Depth (Inches / cm) |
|---|---|---|---|
| XS | 34 in / 86.5 cm | 20 in / 51 cm | 7.5 in / 19 cm |
| S | 38 in / 96.5 cm | 20.5 in / 52 cm | 8 in / 20.5 cm |
| M | 42 in / 106.5 cm | 21.5 in / 54.5 cm | 8.5 in / 21.5 cm |
| L | 46 in / 117 cm | 22 in / 56 cm | 9 in / 23 cm |
| XL | 50 in / 127 cm | 23 in / 58.5 cm | 9.5 in / 24 cm |
| 2XL | 54 in / 137 cm | 24 in / 61 cm | 10 in / 25.5 cm |
| 3XL | 58 in / 147 cm | 25 in / 63.5 cm | 10.5 in / 26.5 cm |
Materials You Will Need
- Yarn Weight: Aran / Worsted Weight (4)
- Hook: 5.0 mm (H-8) crochet hook (or size needed to obtain gauge)
- Additional Tools: Tapestry needle for weaving ends and seaming, stitch markers, measuring tape
| Color Name in Image | Yarn Weight / Type | Yardage Needed (XS–3XL Range) |
|---|---|---|
| Oatmeal | Wool-Blend Aran (80% Acrylic, 20% Wool) | 750 – 1350 yards |
Yarn Suggestions
| Brand & Line Name | Yarn Weight | Yardage per Skein | Notes |
|---|---|---|---|
| Lion Brand Heartland | Aran / Worsted (4) | 251 yds / 230 m | Incredibly soft with a subtle heathered oatmeal look. |
| Knit Picks Wool of the Andes Worsted | Worsted (4) | 110 yds / 100 m | Excellent stitch definition and warmth for a classic wool feel. |
| Caron Simply Soft | Aran / Worsted (4) | 315 yds / 288 m | Budget-friendly option with wonderful sheen and drape. |
⚠️ Note: Avoid heavy 100% cotton yarns for this specific crochet vest pattern, as they lack natural elasticity and can cause the rectangular panels to stretch out and sag over time. Stick to wool blends, acrylics, or wool-linen mixes.
Gauge
- Stitch Gauge: 14 hdc stitches = 4 inches (10 cm)
- Row Gauge: 11 rows = 4 inches (10 cm)
| Gauge Type | Measurement | Stitch / Row Count |
|---|---|---|
| Stitch Gauge | 4 in / 10 cm | 14 hdc |
| Row Gauge | 4 in / 10 cm | 11 rows |
💡 Designer Tip: Always make a swatch! Crochet tension varies wildly between makers. If your swatch has too many stitches per 4 inches, go up a hook size; if you have too few, go down a hook size.
Abbreviations
| Abbreviation | Full Term |
|---|---|
| ch | Chain |
| hdc | Half double crochet |
| sl st | Slip stitch |
| blo | Back loop only |
| st(s) | Stitch(es) |
| rep | Repeat |
| RS | Right Side |
| WS | Wrong Side |
Special Stitches Explained
- Half Double Crochet (hdc): Yarn over, insert hook into designated stitch, yarn over and pull up a loop (3 loops on hook), yarn over and draw through all 3 loops on the hook.
- Back Loop Only (blo): Working into a stitch, insert your hook under the back loop (the loop furthest from you) only, leaving the front loop unworked. This creates ridges essential for the ribbing.
Pattern Instructions
Section 1: Back Panel
The back panel is worked bottom-up as a single solid rectangle in half double crochet.
- Row 1: Chain 60 (66, 74, 80, 88, 94, 100). Working in the 3rd ch from hook (skipped 2 chs count as first hdc), work 1 hdc in each ch across. Turn. (59 [65, 73, 79, 87, 93, 99] hdc)
- Row 2: Ch 2 (does not count as st here and throughout), work 1 hdc in each st across. Turn. (59 [65, 73, 79, 87, 93, 99] hdc)
- Rows 3 to 55 (56, 58, 60, 62, 64, 66): Repeat Row 2 until panel measures desired length. Fasten off, leaving a long tail for shoulder seaming.
✅ Checkpoint: Measure your completed back panel flat on a blocking mat. It should match your target bust width and length from the finished measurements table before proceeding.
Section 2: Front Panel & V-Neck Shaping
The front panel is worked identically to the back panel up to the armhole split, where you divide for the V-neck.
- Rows 1 to 40: Work identical to Back Panel up to Row 40.
- Row 41 (Split for V-Neck): Work hdc across the first 29 (32, 36, 39, 43, 46, 49) sts. Turn, leaving remaining sts unworked for now. (29 [32, 36, 39, 43, 46, 49] hdc)
- Rows 42 to 55: Continue working even rows on this left shoulder strap while decreasing 1 st at the inner V-neck edge every 2nd row until strap height matches back panel. Fasten off.
- Join yarn to the unworked right side stitches, leave the center 1 st unworked, and repeat the shaping symmetrically for the right shoulder strap.
Section 3: Assembly & Seaming
- Lay the back panel flat with the RS facing up. Lay the front panel directly on top with RS facing down.
- Using your tapestry needle and the mattress stitch, seam the top shoulder slopes together for approximately 3.5 to 5 inches on each side, leaving a comfortable head opening.
- Seam the side edges from the bottom hem up, leaving an armhole opening of 7.5 to 10.5 inches (referencing your size in the measurement table).
Section 4: Edging & Ribbing
- Bottom Ribbing: Join yarn at the lower side seam. Ch 7.
- Row 1: Working in blo, sl st in 2nd ch from hook and next 5 chs (6 sl sts total). Sl st into the next 2 sts along the bottom edge of the vest body. Turn.
- Row 2: Skip the 2 sl sts on the body, work 1 sl st in blo of each of the 6 ribbing sts. Turn.
- Row 3: Ch 1, work 1 sl st in blo of each of the 6 ribbing sts, sl st in next 2 body sts along hem. Turn.
- Repeat Rows 2-3 all the way around the bottom hem. Fasten off and weave in ends.
- Repeat the exact same 2×1 ribbing technique around both armhole openings and the V-neck collar opening.
Size Customization Tips
- Adjusting Length: To make this fall crochet top longer or shorter, simply add or subtract rows in the body panels before starting the shoulder splits. Every 11 rows adds approximately 4 inches of length.
- Adjusting Width: To grade this crochet size guide up or down outside the standard range, adjust your starting chain count in multiples of 2 stitches plus 1.
Care Instructions
- Hand wash gently in cool water with mild wool wash, or machine wash on a delicate wool cycle inside a mesh garment bag.
- Do not wring or twist. Roll gently in a clean towel to press out excess moisture.
- Lay flat to dry on a blocking mat, shaping gently to final dimensions. Do not iron.
Cozy Crochet Sweater Vest for Beginners Free Size Guide
I hope you adore making and wearing this staple piece as much as I loved designing it for you! If you whip up your own crochet sweater vest, please snap a picture and share it on social media using the hashtags #CrochetSweaterVest and #BeginnerCrochet. Don’t forget to save this tutorial to your Pinterest boards for your next crafting weekend, and leave a comment below to let me know which color you chose! Happy crocheting!