
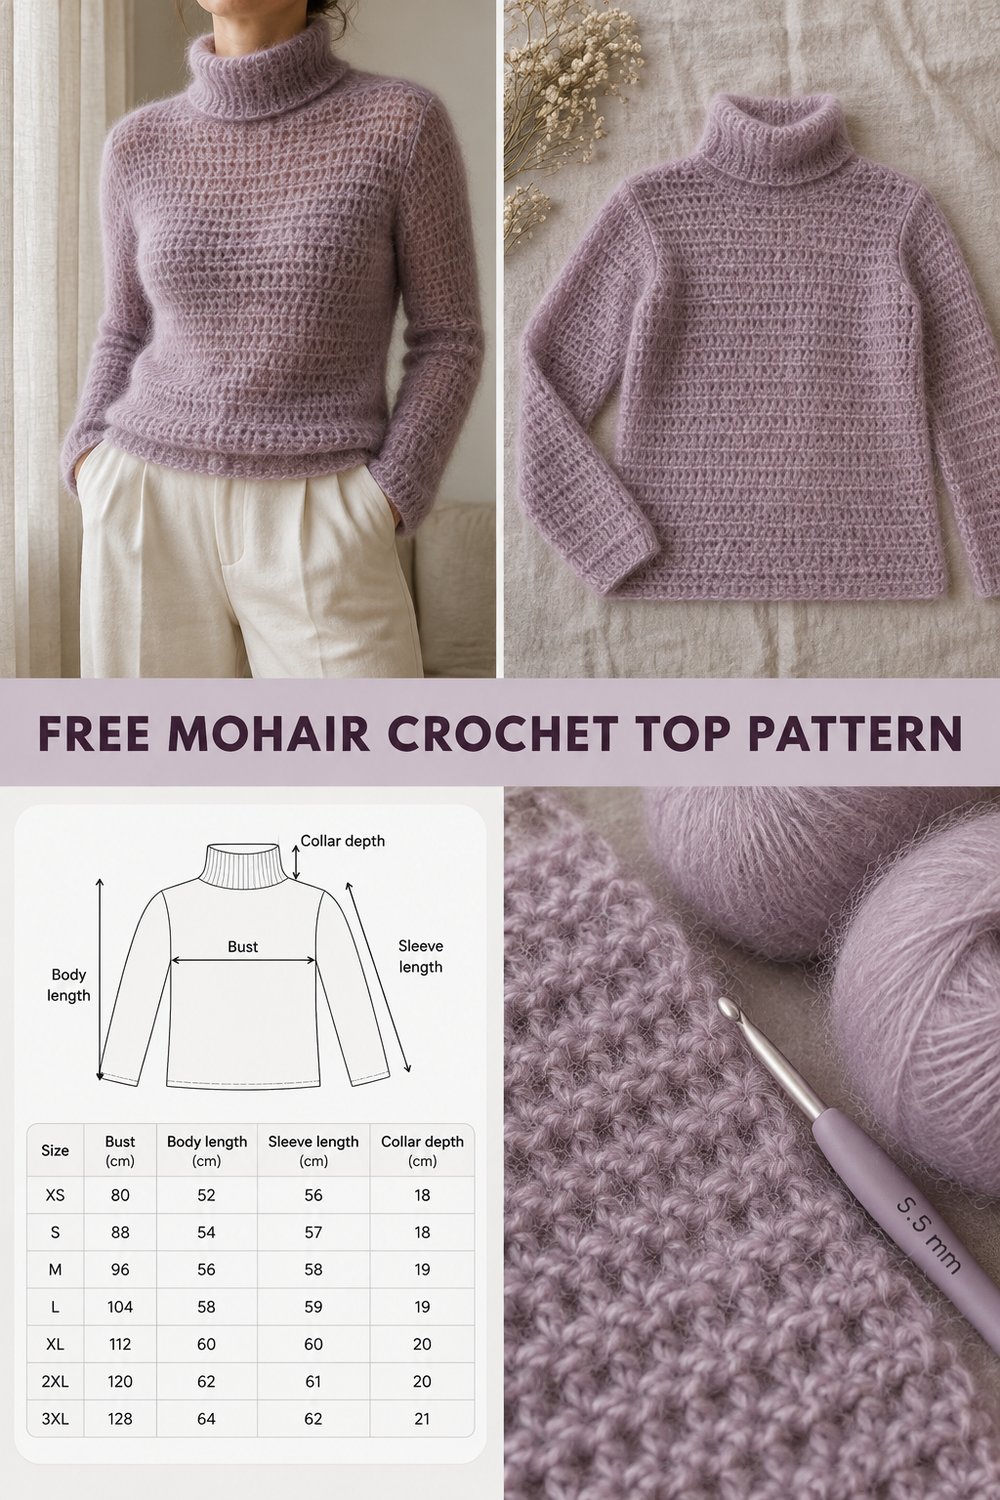
Imagine cozying up in a cloud of softness, feeling effortlessly chic and warm without sacrificing style. This Mohair Crochet Turtleneck Top offers that luxurious experience, blending the delicate halo of mohair with a comfortable, flattering silhouette perfect for cooler days. It’s a wearable piece designed to become a beloved staple in your winter wardrobe.
Mohair Crochet Turtleneck Top Free Size Chart
Quick Facts
This mohair crochet top utilizes the extended single crochet (esc) stitch for its airy, delicate fabric. Designed for a comfortable, relaxed fit across sizes XS to 3XL, it’s estimated to take approximately 15-25 hours to complete, making it a thoughtful, hand-crafted gift for loved ones or a delightful personal project.
💡 Designer Tip: Specific sizing customization tips are included later in the pattern to help you achieve your perfect fit!
What Makes This Mohair Crochet Turtleneck Top Special
This crochet turtleneck stands out due to its unique combination of yarn and stitch. By using a mohair-silk blend and the extended single crochet, we achieve a fabric that is incredibly light, soft, and boasts that signature “halo” effect, giving the garment a luxurious, almost ethereal quality. The body panels are worked flat and seamed, creating a clean, classic silhouette with set-in sleeves for a tailored look. The turtleneck collar is integrated seamlessly into the design, crocheted directly onto the neckline for a smooth, professional finish. This approach avoids bulk and ensures a comfortable, stylish fit.
Skill Level
Intermediate
This pattern is best suited for crocheters who are comfortable with:
* Working flat pieces and seaming
* Basic crochet stitches (ch, sl st, sc, dc)
* Working in rows and understanding row repeats
* Reading a crochet pattern with stitch counts
* Identifying stitch types and working into correct loops
* Working with fine or “hairy” yarns
You should feel confident with basic garment construction and be ready to learn a new stitch or two.
Finished Measurements
All measurements are approximate and taken with the garment laid flat.
| Size | Bust (inches) | Bust (cm) | Body Length (inches) | Body Length (cm) | Sleeve Length (inches) | Sleeve Length (cm) | Collar Depth (inches) | Collar Depth (cm) |
|---|---|---|---|---|---|---|---|---|
| XS | 32 | 81 | 21 | 53 | 17 | 43 | 7 | 18 |
| S | 36 | 91.5 | 21 | 53 | 17 | 43 | 7 | 18 |
| M | 40 | 101.5 | 22 | 56 | 17.5 | 44.5 | 7 | 18 |
| L | 44 | 112 | 22 | 56 | 17.5 | 44.5 | 7 | 18 |
| XL | 48 | 122 | 23 | 58.5 | 18 | 45.5 | 7 | 18 |
| 2XL | 52 | 132 | 23 | 58.5 | 18 | 45.5 | 7 | 18 |
| 3XL | 56 | 142 | 24 | 61 | 18.5 | 47 | 7 | 18 |
Materials You Will Need
| Item | Weight / Type | Yardage (yards) | Meters (m) |
|---|---|---|---|
| Yarn | Lace Weight Mohair/Silk | 1000-1600 | 914-1463 |
| Hook | 5.5mm (US I/9) | N/A | N/A |
| Yarn | Waste yarn (contrasting) | Small amount | Small amount |
| Tapestry needle | N/A | N/A | |
| Scissors | N/A | N/A | |
| Stitch markers | N/A | N/A | |
| Measuring tape | N/A | N/A |
⚠️ Note: The yardage provided for yarn is a general estimate for the entire range of sizes XS to 3XL. Larger sizes will require more yarn.
Yarn Suggestions
Choosing the right yarn for your winter crochet top is crucial for achieving the desired look and feel.
| Brand/Line | Weight | Yardage per skein | Notes |
|---|---|---|---|
| Rowan Kidsilk Haze | Lace (Mohair/Silk) | 229 yds / 210 m | Classic choice for a beautiful halo and drape. |
| Drops Kid-Silk | Lace (Mohair/Silk) | 230 yds / 210 m | Great value, wide color range, lovely halo. |
| Katia Air Lux | Lace (Alpaca/Polyamide) | 273 yds / 250 m | If mohair is too itchy, this offers a similar effect. |
💡 Designer Tip: Avoid superwash merino or highly mercerized cotton for this pattern. The goal is a light, airy fabric with a “hairy” halo, which these yarns typically do not provide. Look for blends with mohair, alpaca, or a brushed effect.
Gauge
13 esc and 9 rows = 4 inches (10 cm), using 5.5mm hook, blocked.
✅ Checkpoint: ALWAYS make a gauge swatch! This is vital for achieving the correct size and drape for your crochet sweater top. Work a swatch larger than 4 inches, then measure the stitches and rows in the center to get an accurate reading.
Abbreviations
| Abbreviation | Meaning |
|---|---|
| ch | Chain |
| sc | Single Crochet |
| esc | Extended Single Crochet |
| sl st | Slip Stitch |
| st(s) | Stitch(es) |
| rep | Repeat |
| RS | Right Side |
| WS | Wrong Side |
| BLO | Back Loop Only |
Special Stitches Explained
Extended Single Crochet (esc):
1. Insert hook into stitch.
2. Yarn over, pull up a loop (2 loops on hook).
3. Yarn over, pull through 1 loop (2 loops on hook).
4. Yarn over, pull through both loops on hook.
This stitch creates a slightly taller and airier fabric than a standard single crochet, perfect for a delicate mohair crochet top.
Pattern Instructions
This crochet top pattern is worked in four main pieces: Front Panel, Back Panel, and two Sleeves. These pieces are worked flat and then seamed together. The turtleneck collar is added by working in the round onto the neckline.
### Section 1: Front Panel
(Make 1)
Using 5.5mm hook, ch 56 (62, 68, 74, 80, 86, 92) for sizes XS (S, M, L, XL, 2XL, 3XL).
Row 1 (RS): Esc in 2nd ch from hook and in each ch across. Ch 1, turn. (55, 61, 67, 73, 79, 85, 91 esc)
Row 2 (WS): Esc in each esc across. Ch 1, turn. (55, 61, 67, 73, 79, 85, 91 esc)
Repeat Row 2 until piece measures 21 (21, 22, 22, 23, 23, 24) inches [53 (53, 56, 56, 58.5, 58.5, 61) cm] from starting chain.
Fasten off.
✅ Checkpoint: Verify the width of your panel matches the bust measurement in the Finished Measurements chart (approximately half the bust measurement, plus seam allowance).
### Section 2: Back Panel
(Make 1)
Work exactly as for the Front Panel.
Fasten off.
### Section 3: Sleeves
(Make 2)
Using 5.5mm hook, ch 40 (40, 42, 42, 44, 44, 46) for sizes XS (S, M, L, XL, 2XL, 3XL).
Row 1 (RS): Esc in 2nd ch from hook and in each ch across. Ch 1, turn. (39, 39, 41, 41, 43, 43, 45 esc)
Row 2 (WS): Esc in each esc across. Ch 1, turn. (39, 39, 41, 41, 43, 43, 45 esc)
Repeat Row 2 until piece measures 17 (17, 17.5, 17.5, 18, 18, 18.5) inches [43 (43, 44.5, 44.5, 45.5, 45.5, 47) cm] from starting chain.
Fasten off.
⚠️ Note: For sleeves, consistent length is more important than exact stitch count if your gauge is slightly off in width. Adjust length as needed to match your desired sleeve length.
### Section 4: Assembly
- Shoulder Seams: Lay Front and Back Panels flat with RS facing each other. Using a tapestry needle and yarn, seam the top edges together for 6 (7, 7.5, 8.5, 9, 10, 10.5) inches [15 (18, 19, 21.5, 23, 25.5, 26.5) cm] in from each outer edge. Leave the central portion unseamed for the neck opening.
- Side Seams: With RS still facing, seam the side edges of the Front and Back Panels together from the bottom up, leaving an armhole opening measuring 8 (8, 8.5, 8.5, 9, 9, 9.5) inches [20.5 (20.5, 21.5, 21.5, 23, 23, 24) cm] from the shoulder seam down.
- Sleeve Seams: Fold each Sleeve lengthwise with RS facing each other. Seam the long edges together.
- Attach Sleeves: Turn the main body of the top right side out. Turn Sleeves right side out. Insert one sleeve into each armhole opening, aligning the sleeve seam with the side seam of the body. Pin or use stitch markers to hold in place. Seam the sleeves into the armholes using a tapestry needle.
💡 Designer Tip: Use a mattress stitch for an invisible seam that lays flat and is perfect for this delicate fabric.
### Section 5: Turtleneck Collar
With RS facing, join yarn with a sl st to any st along the neck opening.
Using 5.5mm hook.
Round 1: Ch 1 (does not count as st), work 68 (68, 72, 72, 76, 76, 80) esc evenly around the neck opening. Join with a sl st to first esc. (68, 68, 72, 72, 76, 76, 80 esc)
Round 2: Ch 1, esc in BLO of each esc around. Join with a sl st to first esc. (68, 68, 72, 72, 76, 76, 80 esc)
Repeat Round 2 until the collar measures 14 inches (35.5 cm) from the base of the neck.
Fasten off, weave in ends.
✅ Checkpoint: After Round 1 of the collar, ensure your stitch count matches the specified number for your size. If it’s slightly off, adjust by working an extra esc or skipping one to reach the correct count.
Size Customization Tips
This free crochet top pattern is designed to be easily adjustable.
- To adjust Bust Width: To make the garment wider or narrower, add or subtract stitches from the initial chain of the Front and Back Panels. Each 2 stitches added/subtracted will change the total bust circumference by approximately 0.75 inches (2 cm). For example, to size down from a S to an XS, you would subtract 6 stitches (12 total, 6 from each panel) from the initial chain, reducing the bust by approximately 4.5 inches (11.5 cm).
- To adjust Body Length: Add or subtract rows from the Front and Back Panels before fastening off. Each row adds approximately 0.4 inches (1 cm) to the length.
- To adjust Sleeve Length: Add or subtract rows from the Sleeves before fastening off. Each row adds approximately 0.4 inches (1 cm) to the length.
- To adjust Collar Depth: Add or subtract rounds from the Turtleneck Collar. Each round adds approximately 0.4 inches (1 cm) to the depth.
💡 Designer Tip: When customizing, always check your work against the finished measurements and gauge to ensure a consistent result.
Care Instructions
To preserve the delicate nature of your mohair crochet top, hand wash gently in cool water with a mild wool-friendly detergent. Do not wring or twist. Roll in a towel to absorb excess water, then lay flat to dry away from direct sunlight. Blocking gently after washing can help maintain the garment’s shape. Do not machine wash or tumble dry.
Mohair Crochet Turtleneck Top Free Size Chart
I hope you adore creating and wearing this beautiful mohair crochet top! It’s such a joy to see how a simple stitch and luxurious yarn can transform into something so elegant and comfortable. Don’t forget to share your finished top with me and the crafting community on social media – tag me and use the hashtags #MohairCrochetTop #CrochetTurtleneck and #WinterCrochet. Save this pattern to your Pinterest boards for future reference, and please leave a comment if you have any questions or just want to share your crafting journey! Happy hooking!