
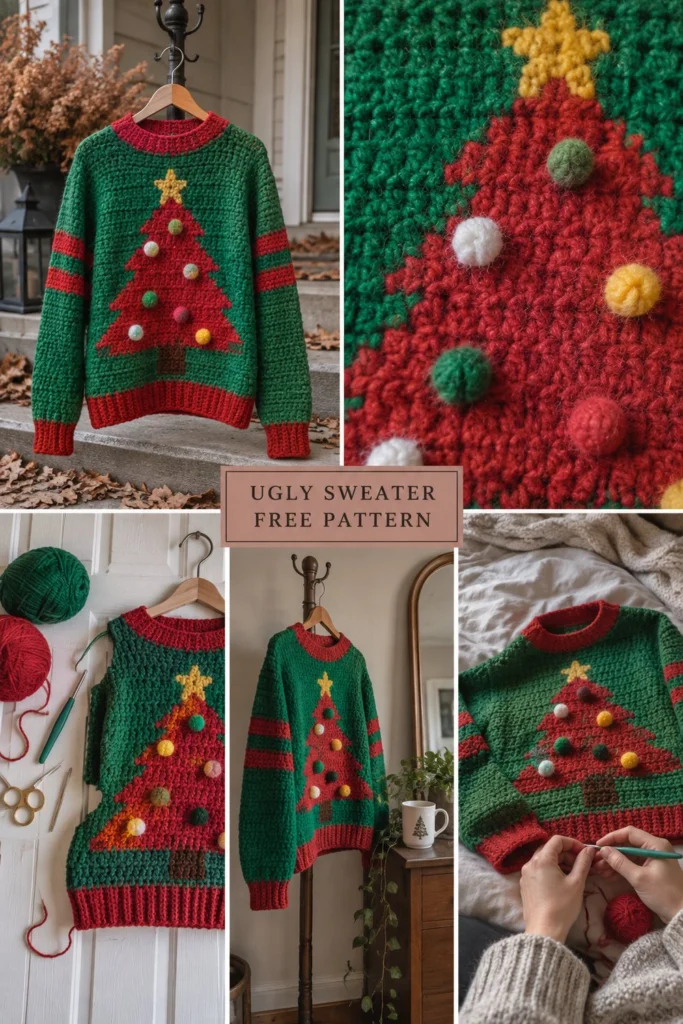
The holiday season is officially upon us, and there is no better way to celebrate than with a handmade garment that is equal parts cozy and delightfully festive! This free crochet ugly Christmas sweater pattern features a classic kelly green base, bold red stripes on the sleeves, a striking red Christmas tree on the front panel, and adorable dimensional pom pom ornaments that will make you the star of any holiday gathering. Designed with comfort and cheer in mind, this pullover is sure to become a cherished winter staple.
Free Crochet Ugly Christmas Sweater Pattern: Party Ready With Pom Poms
Quick Facts
- Skill level: Intermediate
- Finished size: Sizes S (M, L, XL, 2XL)
- Yarn: Worsted weight (Medium #4) yarn in Kelly Green, Cherry Red, Chocolate Brown, Mustard Yellow, Soft White, and various pastel shades for pom poms
- Hook: US J/10 (6.0 mm) crochet hook and US H/8 (5.0 mm) crochet hook
- Stitches used: Ch, sl st, sc, hdc, dc, bobble stitch
- Time to make: Approximately 15 to 20 hours
Size customization tips and adjustments are included further down in this guide.
What Makes This Ugly Christmas Sweater Special
What sets this holiday sweater apart is its clever combination of classic garment construction and whimsical details. The main body is worked using a textured half double crochet stitch that creates a dense, warm fabric perfect for chilly winter days. The front features a vibrant intarsia Christmas tree complete with a brown trunk and a bright yellow star at the peak. To top it all off, handmade fluffy pom poms are sewn onto the tree as ornaments after blocking, giving the sweater a fun 3D texture that truly embraces the “ugly Christmas sweater” spirit!
Skill Level
- Familiarity with reading crochet patterns and working flat panels
- Basic understanding of colorwork / intarsia techniques (carrying or changing yarns across rows)
- Experience seaming shoulder seams and side seams together
- Confidence in working standard stitches and half double crochet rows
Don’t worry if you haven’t tried sweater intarsia before—take it one row at a time and use bobbins to keep your yarn colors organized!
Finished Measurements
| Size | Chest / Bust (in / cm) | Length (in / cm) | Sleeve Length (in / cm) | Ease (in / cm) |
|---|---|---|---|---|
| S | 38 / 96.5 | 24 / 61 | 18 / 45.5 | +4 / +10 |
| M | 42 / 106.5 | 25 / 63.5 | 18.5 / 47 | +4 / +10 |
| L | 46 / 117 | 26 / 66 | 19 / 48 | +4 / +10 |
| XL | 50 / 127 | 27 / 68.5 | 19.5 / 49.5 | +4 / +10 |
| 2XL | 54 / 137 | 28 / 71 | 20 / 51 | +4 / +10 |
Materials You Will Need
| Material | Color / Description | Yardage / Quantity |
|---|---|---|
| Worsted Weight Yarn | Kelly Green (Main Color) | 1,100 (1,200, 1,300, 1,400, 1,500) yds / 1,005 (1,097, 1,189, 1,280, 1,372) m |
| Worsted Weight Yarn | Cherry Red (Contrast Color 1) | 350 (380, 410, 440, 470) yds / 320 (347, 375, 402, 430) m |
| Worsted Weight Yarn | Chocolate Brown (Trunk) | 30 yds / 27 m |
| Worsted Weight Yarn | Mustard Yellow (Star) | 25 yds / 23 m |
| Worsted Weight Yarn | Soft White & Pastels (Pom Poms) | 40 yds / 37 m total |
| Crochet Hook | US J/10 (6.0 mm) | 1 hook |
| Crochet Hook | US H/8 (5.0 mm) | 1 hook (for ribbing) |
| Notions | Tapestry needle, locking stitch markers, measuring tape, scissors | 1 set |
Yarn Suggestions
| Yarn Line | Weight | Skein Yardage | Notes |
|---|---|---|---|
| Lion Brand Vanna’s Choice | Worsted (#4) | 145 yds / 133 m per skein | Great stitch definition, wide color range |
| Red Heart Super Saver | Worsted (#4) | 364 yds / 333 m per skein | Durable, budget-friendly, holds shape well |
| Caron One Pound | Worsted (#4) | 812 yds / 742 m per large skein | Excellent value for solid garment colors |
⚠️ Note: Avoid novelty eyelash yarns or extremely fuzzy yarns for the main sweater body, as they will obscure your stitch definition and make intarsia color changes difficult to manage. Save the texture for the yarn pom poms!
Gauge
- 13 hdc x 10 rows = 4 in / 10 cm using US J/10 (6.0 mm) hook in main stitch pattern.
- Ribbing gauge: 16 sc blo x 18 rows = 4 in / 10 cm using US H/8 (5.0 mm) hook.
Abbreviations
- ch – chain
- sl st – slip stitch
- sc – single crochet
- hdc – half double crochet
- dc – double crochet
- blo – back loop only
- flo – front loop only
- st(s) – stitch(es)
- rep – repeat
- rnd(s) – round(s)
- RS – right side
- WS – wrong side
- inc – increase (work 2 sts in same st)
- dec – decrease (sc2tog)
- sk – skip
UK terms equivalent: sc = dc, hdc = htr, dc = tr.
Special Stitches Explained
- Back Loop Only (BLO) Ribbing: Working single crochet stitches solely into the back loop of the previous row creates a stretchy, ribbed fabric ideal for cuffs, waistbands, and neckbands.
- Intarsia Colorwork: When changing colors across a row, drop the old color to the WS, pick up the new color from underneath, and work the first stitch with the new color to prevent holes. Carry untruthful working yarns loosely across the back or use bobbins.
- Pom Pom Ornament: Wrap yarn around two fingers about 40 times, tie tightly in the center with a secure strand, cut loops open, and trim into a neat round sphere.
Pattern Instructions
Pattern Notes
- The sweater is constructed in four main pieces: Front Panel, Back Panel, and two Sleeves, then seamed together. Ribbing is worked separately or joined directly to edges.
- Ch 2 at the beginning of hdc rows does not count as a stitch unless otherwise specified.
- Use stitch markers to keep track of shaping and seam alignments.
Section 1: Bottom Ribbing (Make 2 – Front and Back)
Using US H/8 (5.0 mm) hook and Cherry Red:
– Row 1: Ch 11, sc in 2nd ch from hook and in each ch across, turn. (10 sc)
– Row 2: Ch 1, working in blo, sc in each st across, turn. (10 sc)
– Rows 68 (76, 84, 92, 100): Rep Row 2. Fasten off, leaving a long tail for joining to the body.
Section 2: Front Panel
Using US J/10 (6.0 mm) hook and Kelly Green:
– Foundation: Join ribbed band edge and work 68 (76, 84, 92, 100) hdc evenly across the top edge of the waistband, turn. (68, 76, 84, 92, 100 hdc)
– Rows 2 to 10: Ch 2, hdc in each st across in Kelly Green, turn. (68, 76, 84, 92, 100 hdc)
– Row 11 (Tree Trunk Starts): Work 32 (36, 40, 44, 48) hdc in Kelly Green, switch to Chocolate Brown and work 4 hdc, switch to Kelly Green and work 32 (36, 40, 44, 48) hdc, turn. (68, 76, 84, 92, 100 sts)
– Rows 12 to 13: Rep Row 11 with same color placement for the trunk. (68, 76, 84, 92, 100 sts)
– Rows 14 to 45 (Tree Body & Star): Continue working upward, centering the tree and widening the red triangle by 2 sts on each side every 2 rows, while filling the outer edges with Kelly Green. At Row 42, introduce Mustard Yellow for 3 sts at the peak center for the star.
– Rows 46 to 52: Work remaining shoulder rows entirely in Kelly Green for sizes S through 2XL. Fasten off.
✅ Checkpoint: Front panel should measure approximately 24 (25, 26, 27, 28) inches tall from the bottom of the red ribbing to the shoulder edge.
Section 3: Back Panel
Using US J/10 (6.0 mm) hook and Kelly Green:
– Foundation: Work 68 (76, 84, 92, 100) hdc across top of second ribbed band, turn. (68, 76, 84, 92, 100 hdc)
– Rows 1 to 50 (52, 54, 56, 58): Ch 2, hdc in each st across in Kelly Green, turn. (68, 76, 84, 92, 100 hdc)
– Fasten off, leaving a long tail for shoulder seams.
Section 4: Sleeves (Make 2)
Using US H/8 (5.0 mm) hook and Cherry Red for Cuff:
– Row 1: Ch 11, sc in 2nd ch from hook and across, turn. (10 sc)
– Rows 18: Work sc blo ribbing. Join ends to form cuff ring.
– Switch to US J/10 (6.0 mm) hook and Kelly Green:
– Rnd 1: Work 36 (38, 40, 42, 44) hdc evenly around the cuff opening, join with sl st. (36, 40, 44, 48, 52 hdc)
– Rnds 2 to 8: Hdc in each st around, join. (36, 40, 44, 48, 52 hdc)
– Rnds 9 to 12: Switch to Cherry Red, hdc in each st around, join. (36, 40, 44, 48, 52 hdc)
– Rnds 13 to 42: Switch back to Kelly Green, working 1 inc at the beginning and end of every 5th rnd to shape the sleeve, join. (46, 50, 54, 58, 62 hdc)
– Fasten off, leaving a long tail for sewing sleeves to body.
Section 5: Neckband
Using US H/8 (5.0 mm) hook and Cherry Red:
– Join yarn at shoulder seam. Work 1 rnd of sc evenly around the neck opening, decreasing slightly at the front corners to pull the neckline in.
– Work 4 rows of sc blo ribbing around the collar, join, and fasten off.
Assembly
- Lay Front and Back panels right sides facing. Sew shoulder seams together using mattress stitch, leaving the center 22 sts unworked for the head opening.
- Align the center of each sleeve with the shoulder seam. Sew sleeve caps to the armhole cutouts on Front and Back panels.
- Fold sweater inside out and sew down each side seam from cuff to waist ribbing in one continuous seam.
- Craft 6 to 8 small pom poms in Soft White, pastel pink, light blue, and yellow. Securely sew them onto the red tree triangle as ornaments.
- Weave in all loose yarn ends securely using your tapestry needle.
Finishing
Block your finished sweater lightly by steaming or wet blocking according to yarn label instructions to even out tension and crisp up the intarsia colorwork edges.
Size Customization Tips
- To adjust the width, add or subtract hdc stitches in multiples of 2 across your foundation chain row (each 2-st change adds or subtracts about 0.3 in / 0.75 cm of width).
- To lengthen the body or sleeves, simply add extra straight hdc rows before starting the shoulder shaping or sleeve increases.
Care Instructions
- Hand wash cold or machine wash on gentle cycle in a mesh laundry bag.
- Do not bleach.
- Lay flat to dry away from direct heat.
- Do not iron directly over yarn pom poms.
FAQ
Can I substitute acrylic yarn with wool for this sweater?
Yes, absolutely! Wool provides fantastic warmth and elasticity, though you should check your gauge swatch first to ensure your stitches match the required dimensions.
How do I make the intarsia tree wider for larger sizes?
For larger sizes (XL and 2XL), you can widen the red triangle by starting the color changes two rows earlier or increasing the tree base width by 4 stitches on either side.
Are the pom pom ornaments safe for children’s sizes?
If making this sweater for young children, we recommend embroidering French knots or small colorful circles instead of attaching yarn pom poms to avoid any potential choking hazards.
Happy Crocheting!
I hope you have so much fun stitching up this festive statement piece! Be sure to save this pin on Pinterest and share your gorgeous color combinations and finished sweater photos in the comments below. Happy hooking!
📄 Your free PDF pattern