











10. Rudolph Reindeer Face
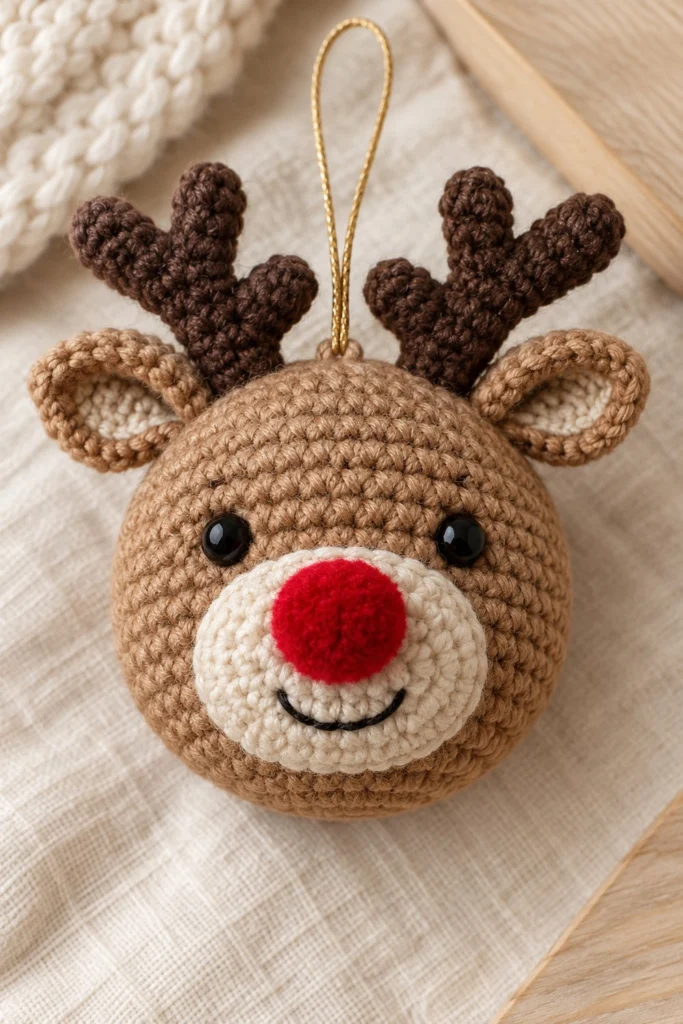
Bring classic holiday cheer to your tree with this sweet Rudolph Reindeer Face ornament. Featuring a warm tan plush head, a distinct cream oval muzzle, a bright 3D red nose, and branched antlers, this design is both nostalgic and fast to finish. It measures approximately 3 in (7.5 cm) wide and takes just 1 hour to make.
Quick Facts
| Skill level | Finished size | Yarn | Hook | Time |
|---|---|---|---|---|
| Easy-Intermediate | 3 in / 7.5 cm wide | DK cotton (Cat. 3) | 2.75 mm (US C/2) | 1 hour |
Materials You Will Need
- Warm Tan Brown yarn: 15 g (38 m) DK weight 100% cotton
- Light Cream yarn: 5 g (13 m) DK weight 100% cotton
- Bright Red yarn: 3 g (8 m) DK weight 100% cotton
- Dark Brown yarn: 5 g (13 m) DK weight 100% cotton
- Crochet hook: 2.75 mm (US C/2)
- Safety eyes: 2 x 6 mm black safety eyes
- Embroidery floss: Black (for embroidered smile)
- Hanging cord: 25 cm metallic gold thread or thin cord
- Stuffing: Polyester fiberfill
- Notions: Tapestry needle, stitch marker, scissors
Gauge
Rnds 1–4 of the Head measure 1.5 in (3.8 cm) across. Exact gauge is not critical, but stitching tightly is essential to prevent fiberfill stuffing from showing through the stitches.
Abbreviations (US Terms)
- ch: chain
- sc: single crochet
- inc: single crochet increase (2 sc in same stitch)
- dec: single crochet decrease (sc2tog)
- sl st: slip stitch
- st(s): stitch(es)
- rnd(s): round(s)
- FLO: front loop only
UK terms: sc = dc, hdc = htr, dc = tr.
Pattern Notes
- The head, nose, and ears are worked in continuous spiral rounds without joining. Do not join rounds unless specified.
- Use a stitch marker to mark the first stitch of every round.
- Stitch counts are shown in brackets
( )at the end of each round. - Stuff the head firmly while closing to retain its round, plump shape.
Instructions
Head – Warm Tan Brown, make 1
Rnd 1: 6 sc in a magic ring (6)
Rnd 2: inc x 6 (12)
Rnd 3: (sc 1, inc) x 6 (18)
Rnd 4: (sc 2, inc) x 6 (24)
Rnd 5: (sc 3, inc) x 6 (30)
Rnd 6: (sc 4, inc) x 6 (36)
Rnds 7–12: sc in each st around (36)
Insert safety eyes between Rnds 8 and 9, spaced 6 stitches apart.
Rnd 13: (sc 4, dec) x 6 (30)
Rnd 14: (sc 3, dec) x 6 (24)
Rnd 15: (sc 2, dec) x 6 (18)
Stuff firmly now.
Rnd 16: (sc 1, dec) x 6 (12)
Rnd 17: dec x 6 (6)
Fasten off, leave a 20 cm tail. Weave tail through FLO of remaining 6 sts, pull tight to close, and weave in end.
Muzzle – Light Cream, make 1
Ch 5.
Rnd 1: Sc in 2nd ch from hook, sc 2, 3 sc in last ch; rotate to work along opposite side of foundation chain: sc 2, inc in last ch (10)
Rnd 2: inc, sc 2, inc x 3, sc 2, inc x 2 (16)
Rnd 3: (sc 1, inc), sc 2, (sc 1, inc) x 3, sc 2, (sc 1, inc) x 2 (22)
Fasten off, leave a 30 cm tail for sewing. Do not stuff.
Nose – Bright Red, make 1
Rnd 1: 6 sc in a magic ring (6)
Rnd 2: (sc 1, inc) x 3 (9)
Rnd 3: sc in each st around (9)
Rnd 4: (sc 1, dec) x 3 (6)
Stuff lightly with a tiny pinch of fiberfill.
Fasten off, leave a 25 cm tail for sewing.
Ears – Warm Tan Brown, make 2
Rnd 1: 6 sc in a magic ring (6)
Rnd 2: (sc 1, inc) x 3 (9)
Rnd 3: (sc 2, inc) x 3 (12)
Rnd 4: sc in each st around (12)
Rnd 5: (sc 2, dec) x 3 (9)
Fasten off, leave a 25 cm tail for sewing. Do not stuff.
Antlers – Dark Brown, make 2
Ch 8.
Row 1: Sl st in 2nd ch from hook, sc in next 2 ch; ch 4 (for side tine), sl st in 2nd ch from hook, sc in next 2 ch of tine; sc in remaining 4 ch of foundation chain (10)
Fasten off, leave a 25 cm tail for sewing.
Assembly
1. Center the Cream Muzzle on the lower front of the Head (overlapping Rnds 9–14) positioned directly below the safety eyes. Sew in place flat using the cream yarn tail.
2. Sew the 3D Red Nose onto the top center of the Cream Muzzle using the red yarn tail.
3. Embroider a simple vertical line and curve for the mouth below the red nose using black embroidery floss.
4. Fold the base of each Ear in half to create a pinched leaf shape, then sew them to either side of the Head at Rnds 5–6.
5. Attach the Dark Brown Antlers to Rnd 3 at the top of the Head, placing them slightly inward from each ear.
Finishing
1. Loop the metallic gold thread through Rnd 1 at the top center of the head.
2. Tie the ends securely into a knot to create a 3 in (7.5 cm) hanging loop.
3. Weave in all remaining yarn ends internally.
Tips and Common Mistakes
- Loose Tension: Use a small 2.75 mm hook so stitches are tight enough to keep stuffing hidden.
- Floppy Antlers: Stitch through both the base of the antler and the head multiple times to ensure the antlers stand upright without leaning.
- Asymmetrical Placement: Pin all facial features in place with sewing pins before stitching them permanently.
- Overstuffing: Stuff the head firmly but avoid stretching out individual stitches.
Frequently Asked Questions
Can I make this ornament safe for a baby or toddler?
Yes! Replace the 6 mm plastic safety eyes with embroidered french knots or small black yarn stitches to avoid any choking hazard.
What yarn can I substitute for DK cotton?
Sport weight or Worsted weight yarns work fine. If using worsted weight yarn, switch to a 3.5 mm hook; your finished ornament will simply turn out slightly larger.
How do I keep the red nose round and popping out?
Insert a small scrap of red yarn or a tiny tuft of fiberfill inside the nose ball before closing it completely onto the muzzle.
How long does this project take?
An experienced crocheter can make this entire ornament in approximately 45 to 60 minutes.
📄 Your free PDF pattern