











3. Mini Christmas Stocking
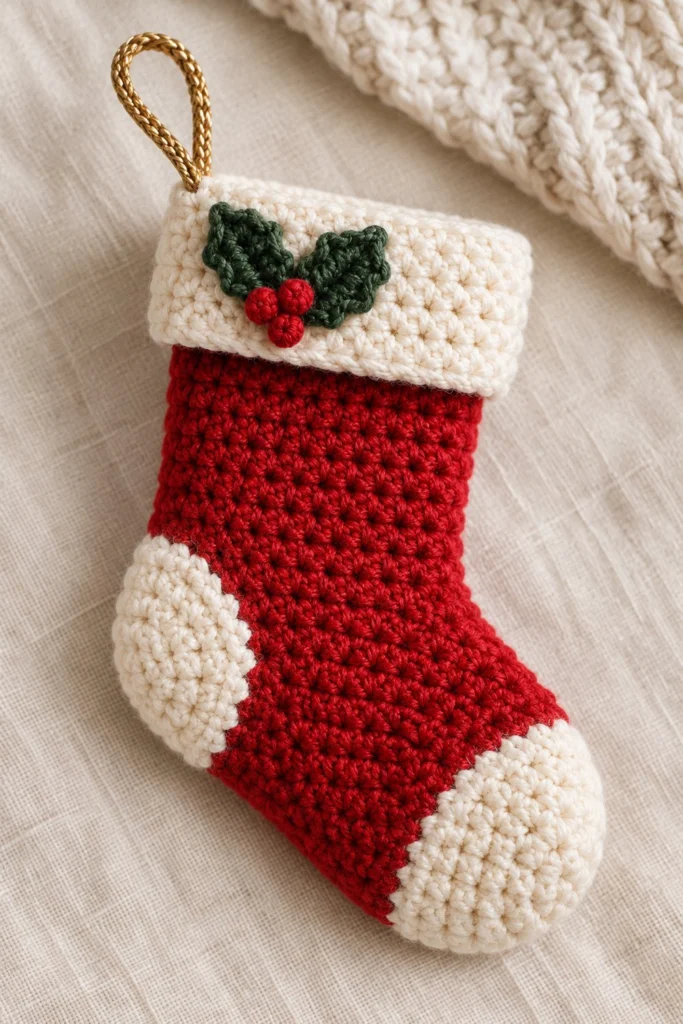
Bring classic handmade charm to your mantelpiece with this delightful miniature Christmas stocking. Featuring a crisp white heel, toe, and folded cuff accented with traditional crocheted holly leaves and berries, it makes a wonderful festive decoration or gift card holder. Finished size is 3.5 inches (9 cm) high, and it takes just 45 minutes to work up.
Quick Facts
| Skill level | Finished size | Yarn | Hook | Time |
|---|---|---|---|---|
| Easy | 3.5 in / 9 cm high | DK cotton (Cat. 3) | 3.0 mm (US D/3) | 45 minutes |
Materials You Will Need
- DK weight 100% cotton yarn: 15 grams (approx. 35 metres) Red, 15 grams (approx. 35 metres) Off-White, 5 grams (approx. 12 metres) Dark Green
- 3.0 mm (US D/3) crochet hook
- Gold metallic cord or string, 12 cm for the hanging loop
- Tapestry needle
- Stitch marker
Gauge
The first round of the toe measures 1.5 cm across. Working with even tension matters more than exact gauge for this small project.
Abbreviations (US Terms)
- ch: chain
- sc: single crochet
- inc: single crochet increase (work 2 sc in the same stitch)
- dec: single crochet decrease (sc 2 stitches together)
- sl st: slip stitch
- st(s): stitch(es)
- Rnd(s): round(s)
- bobble: work 4 dc in the same stitch/space, remove hook, insert hook from front to back through the top of the first dc and through the loop of the last dc, yarn over and pull through all loops on hook
UK terms: sc = dc, hdc = htr, dc = tr.
Pattern Notes
- The stocking is worked in continuous spiral rounds without joining, unless otherwise stated. Use a stitch marker to track the first stitch of each round.
- Stitch counts are shown in brackets at the end of each round.
Instructions
Toe – Off-White, make 1
Rnd 1: 6 sc in a magic ring (6)
Rnd 2: inc x 6 (12)
Rnd 3: (sc in next st, inc) x 6 (18)
Rnds 4-5: sc in each st around (18)
Fasten off, leaving a 15 cm tail.
Foot and Leg – Red, make 1
Rnd 1: Join Red to the open stitches of the Toe, sc in each st around (18)
Rnd 2: (sc in next 8 sts, inc) x 2 (20)
Rnds 3-6: sc in each st around (20)
Rnd 7 (Heel placement): sc in next 10 sts, leave remaining 10 sts unworked for the heel flap, turn (10)
Working in rows for the heel flap:
Row 1: ch 1, sc in next 10 sts, turn (10)
Row 2: ch 1, dec, sc in next 6 sts, dec, turn (8)
Row 3: ch 1, dec, sc in next 4 sts, dec, turn (6)
Fasten off Red, leaving a 20 cm tail to sew heel edges later.
Join Off-White to create the heel bowl in the unworked 10 stitches from Rnd 6:
Rnd 1: sc across the 10 unworked sts and pick up 5 sts along the edge of the heel flap, sc across the top of the heel flap (6 sts), pick up 5 sts along the other edge of the heel flap (26)
Rnd 2: dec, sc in next 8 sts, dec x 2, sc in next 8 sts, dec (22)
Rnd 3: dec, sc in next 7 sts, dec x 2, sc in next 7 sts, dec (18)
Rnd 4: dec x 9 (9)
Fasten off Off-White, pull yarn through remaining 9 sts to close the heel and weave in ends securely.
Join Red to the top of the foot opening:
Rnds 1-10: sc in each st around the leg tube (20)
Fasten off Red.
Cuff – Off-White, make 1
Rnd 1: Join Off-White to the top edge of the leg, sc in each st around (20)
Rnds 2-7: sc in each st around (20)
Fasten off, leaving a 30 cm tail.
Holly Leaves – Dark Green, make 2
Row 1: ch 6, sc in 2nd ch from hook, hdc in next ch, dc in next ch, hdc in next ch, (sc, ch 2, sc) in last ch. Working along the opposite side of the foundation chain: hdc in next ch, dc in next ch, hdc in next ch, sc in last ch, sl st to first st to join (12)
Fasten off, leaving a 15 cm tail.
Holly Berries – Red, make 3
Make a small bobble: work 4 dc into a magic ring, sl st to the first dc to close into a tiny berry.
Fasten off, leaving a 10 cm tail.
Assembly
Fold the Off-White cuff down over the top 3 rounds of the Red leg so the fold sits neatly on the outside. Sew down any loose heel edges using the Off-White tail.
Position the two Dark Green holly leaves diagonally overlapping on the front centre of the folded white cuff. Sew them securely in place.
Cluster the three red bobble berries tightly where the two holly leaves overlap at their bases. Stitch them firmly to the cuff.
Finishing
Fold the 12 cm gold metallic cord in half to form a loop. Securely stitch the ends of the loop to the inside top back corner of the stocking cuff. Weave in all remaining yarn ends securely on the inside of the work.
Tips and Common Mistakes
- Count your stitches at the end of every round on the foot and leg to ensure you do not accidentally increase or decrease.
- When working the heel flap rows, make sure to turn your work rather than working in a spiral.
- Keep your tension even when switching between Red and Off-White yarns to prevent gaps from forming at colour change points.
- Attach the hanging loop securely to the inner lining stitches so the stocking can safely hold small treats.
Frequently Asked Questions
How do I keep the colour change between the red leg and white cuff looking neat?
Working continuous spiral rounds naturally creates a slight step at colour changes. To minimize this, simply start your first round of the white cuff in the stitch directly above the last red stitch.
Can I make this stocking larger using worsted weight yarn?
Yes, switching to a heavier yarn and a 4.0 mm hook will result in a larger stocking. Keep in mind you will need to adjust your yarn amounts accordingly.
What is the best way to attach the tiny holly berries so they stay round?
Pull the starting and ending tails of each berry tightly together after forming the bobble, knot them securely, and use those tails to anchor the berry flat against the center of the leaves.
📄 Your free PDF pattern