










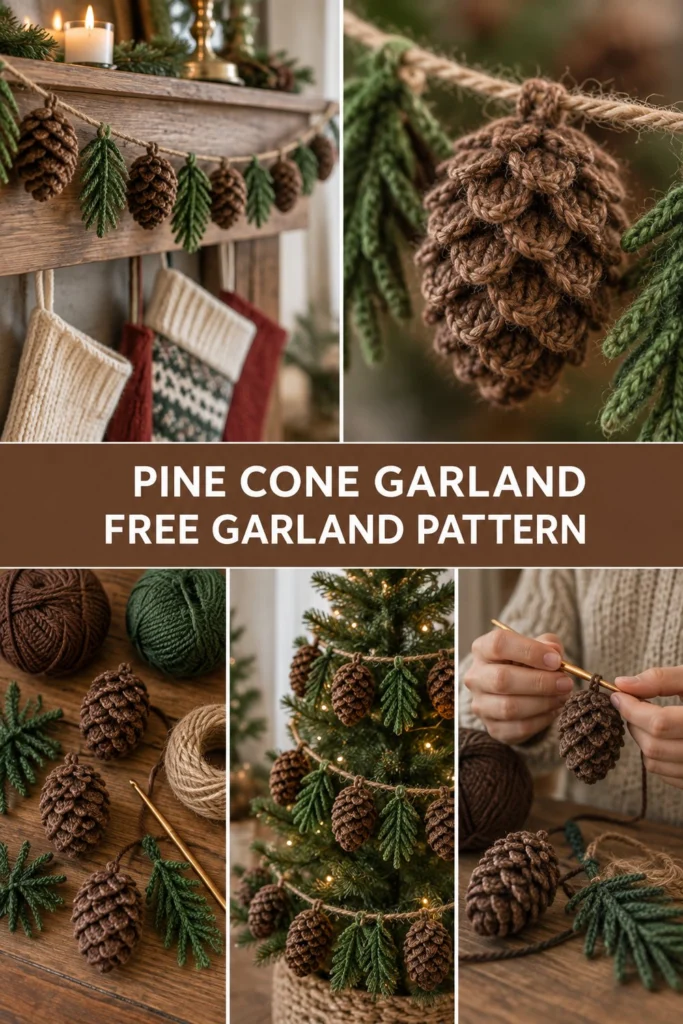
Add rustic charm to your holiday decor with a festive garland of textured crochet pine cones and delicate pine sprigs, designed to bring nature indoors without the mess of shedding needles. This beginner-friendly project works up quickly using simple stitches combined with clever front-loop texture techniques, making it the perfect farmhouse decoration to drape across your fireplace mantel or wrap around your Christmas tree.
Quick Facts
- Skill level: Easy / Intermediate
- Finished size: Each pine cone is approximately 3.5 in (9 cm) long and 2.5 in (6.5 cm) wide. The garland length is fully customizable; standard instructions create a 5-foot (1.5 m) garland with 5 pine cones and 4 pine sprigs.
- Yarn: Worsted weight (Category 4) yarn in brown and green, plus jute twine for stringing.
- Hook: US G/6 (4.0 mm) crochet hook.
- Stitches used: ch, sl st, sc, inc, dec, FLO.
- Time to make: Approximately 1 to 2 hours per pine cone and 30 minutes per sprig.
Size tips and garland length adjustments are included further down.
What Makes This Pine Cone Garland Special
Unlike real pine cones that drop seeds and dry out, these crocheted versions last for years. The secret to their realistic, overlapping texture lies in working small stacked rounds into leftover front loops (FLO), creating natural rows of scales that cup outward. Interspersed with slender green pine sprigs and strung on rustic jute twine, this piece captures the exact cozy farmhouse aesthetic shown in the holiday photos.
Skill Level
- Working in the round (spiral)
- Working in front loops only (FLO)
- Basic shaping with increases and decreases
- Simple assembly and stringing
Don’t worry if you haven’t made amigurumi-style textures before—the step-by-step instructions below guide you through every single scale row.
Finished Measurements
| Part | Width / Diameter | Length / Height |
|---|---|---|
| Single Pine Cone | 2.5 in (6.5 cm) | 3.5 in (9 cm) |
| Pine Sprig | 1.5 in (3.8 cm) | 4.0 in (10 cm) |
| Complete Garland | 3.0 in (7.5 cm) | 60.0 in (152 cm) |
Materials You Will Need
| Material / Notion | Color / Type | Quantity / Yardage |
|---|---|---|
| Brown Yarn | Worsted / Category 4 (e.g., Walnut) | 40 yds (37 m) per pine cone |
| Green Yarn | Worsted / Category 4 (e.g., Pine) | 15 yds (14 m) per sprig |
| Jute Twine | 3-ply natural jute twine | 6 ft (1.8 m) |
| Crochet Hook | US G/6 (4.0 mm) | 1 hook |
| Polyfill Stuffing | Standard toy stuffing | Small handful per cone |
| Tapestry Needle | Yarn needle with large eye | 1 needle |
| Stitch Markers | Locking stitch markers | 2 markers |
Yarn Suggestions
| Yarn Line | Weight | Notes |
|---|---|---|
| Lion Brand Vanna’s Choice | Worsted (4) | Excellent stitch definition, firm texture |
| Caron One Pound | Worsted (4) | Durable, great range of earthy browns and greens |
| Red Heart Super Saver | Worsted (4) | Budget-friendly, holds shape well for stuffed items |
⚠️ Note: Avoid fuzzy or brushed novelty yarns for the pine cones, as they obscure the detailed scale rows that give the pine cones their realistic look.
Gauge
- Pine Cone Base: Rnds 1 to 5 of the pine cone base measure 2.0 in (5 cm) across.
- Exact gauge is not critical for this decorative garland, but keeping your tension snug and consistent ensures the stuffing does not show through the stitches.
Abbreviations
- ch: chain
- sl st: slip stitch
- sc: single crochet
- inc: single crochet increase (2 sc in same st)
- dec: single crochet decrease (invisible sc2tog)
- BLO: back loop only
- FLO: front loop only
- st(s): stitch(es)
- Rnd: round
- Row: row
- rep: repeat
- [ ]: work instructions within brackets as directed
UK: sc = dc, hdc = htr, dc = tr.
Special Stitches Explained
- Magic Ring: Wrap yarn around your index finger twice to create a ring, insert hook under strands, pull up a loop, ch 1, and work starting stitches into the center of the ring.
- Invisible Decrease (dec): Insert hook into the front loop of the first stitch, then into the front loop of the second stitch (3 loops on hook). Yarn over and pull through first 2 loops, yarn over and pull through remaining 2 loops.
Pattern Instructions
Section 1: Pine Cone (Brown Yarn, make 5)
The pine cone is worked in continuous spiral rounds from the top down. Stuff firmly before closing.
Rnd 1: Start 6 sc in a magic ring (6 sc).
Rnd 2: [inc] x 6 (12 sc).
Rnd 3: [1 sc, inc] x 6 (18 sc).
Rnd 4: [2 sc, inc] x 6 (24 sc).
Rnd 5: Working in BLO, sc in each st around (24 sc).
(Note: The leftover front loops from Rnd 5 will be used later for Scale Row 1).
Rnd 6: [3 sc, inc] x 6 (30 sc).
Rnds 7 to 11: sc in each st around (30 sc) for 5 rounds.
Rnd 12: Working in BLO, [3 sc, dec] x 6 (24 sc).
(Note: Leftover front loops from Rnd 12 will be used for Scale Row 2).
Rnd 13: [2 sc, dec] x 6 (18 sc).
Rnd 14: Working in BLO, [1 sc, dec] x 6 (12 sc).
(Note: Leftover front loops from Rnd 14 will be used for Scale Row 3).
Rnd 15: Stuff the pine cone firmly with polyfill.
Rnd 16: [dec] x 6 (6 sc).
Fasten off, leaving an 8 in (20 cm) tail. Thread tail through remaining 6 front loops and pull tight to close the bottom tip. Weave in end.
Adding the Scales
To create the overlapping pine cone scales, attach brown yarn to the leftover front loops (FLO) left exposed during Rnds 5, 12, and 14. Work each scale row as follows:
- Scale Row 1 (attached to Rnd 5 FLO): Join brown yarn with a sl st in any front loop of Rnd 5. Working around the cone from top to bottom: (ch 2, 2 dc in same FLO, sl st in next FLO) rep around all 24 front loops, ending with a sl st to the first st. Fasten off and weave in ends (24 scales).
- Scale Row 2 (attached to Rnd 12 FLO): Join brown yarn in any front loop of Rnd 12: (ch 2, 2 dc in same FLO, sl st in next FLO) rep around all 24 front loops. Fasten off and weave in ends (24 scales).
- Scale Row 3 (attached to Rnd 14 FLO): Join brown yarn in any front loop of Rnd 14: (ch 1, 2 hdc in same FLO, sl st in next FLO) rep around all 12 front loops. Fasten off and weave in ends (12 scales).
✅ Checkpoint: You should have a plump, rounded brown cone covered in ruffled, overlapping scale layers pointing toward the bottom tip.
Section 2: Pine Sprig (Green Yarn, make 4)
Pine sprigs are worked flat in rows with a central spine and side needles.
Row 1: Ch 16. Working in the 2nd ch from hook, sl st in first 2 chs (stem base). [Ch 5, working down the ch: sl st in 2nd ch from hook, sc in next 3 chs, skip 1 ch on main stem] repeat along the chain to create 6 side needles. Sl st in remaining chain stitches to the end. Fasten off, leaving a 6 in (15 cm) tail for attaching.
Assembly and Stringing
- Lay out your jute twine on a flat surface.
- Alternating between pine cones and pine sprigs, attach each piece securely to the twine using the yarn tails, spacing them approximately 8 inches (20 cm) apart.
- Ensure all pine cones hang naturally with their scale tips pointing downward.
- Trim any excess yarn ends cleanly.
Finishing
Block or steam the pine sprig needles slightly with your fingers so they fan out realistically. Your garland is now ready to hang on your mantelpiece or wind around your holiday tree!
Size Customization Tips
- Longer Garland: For every additional 2 feet of garland, simply crochet 2 more pine cones and 2 more pine sprigs, spacing them evenly along a longer length of jute twine.
- Mini Garland: Use sport-weight yarn and a US C/2 (2.75 mm) hook to create miniature pine cones for a smaller tabletop tree.
Care Instructions
- Spot clean gently with a damp cloth and mild soap if needed.
- Do not submerge in water or machine wash to protect the polyfill stuffing and jute twine structure.
- Store flat in a breathable holiday storage box wrapped in tissue paper between seasons.
FAQ
Can I use cotton yarn instead of wool or acrylic?
Yes! Cotton yarn works wonderfully and gives the pine cone scales a very crisp, defined structure, though it is slightly heavier than acrylic.
How do I adjust the size of the pine cones?
To make a larger pine cone, continue increase rounds past Rnd 6 (e.g., Rnd 7: [4 sc, inc] x 6), then add extra straight rounds before beginning your decrease rows.
Is this garland safe for homes with toddlers?
The garland is safe for holiday display, but because it includes small stuffed pieces and jute twine, keep it hung securely out of reach of very young children who might pull on dangling items.
Happy Crocheting!
I hope you love making this rustic pine cone garland as much as I did designing it. Save this pattern to your Pinterest holiday board so it is ready when you are, and leave a comment below letting me know what colors you used for your farmhouse Christmas setup!
📄 Your free PDF pattern