











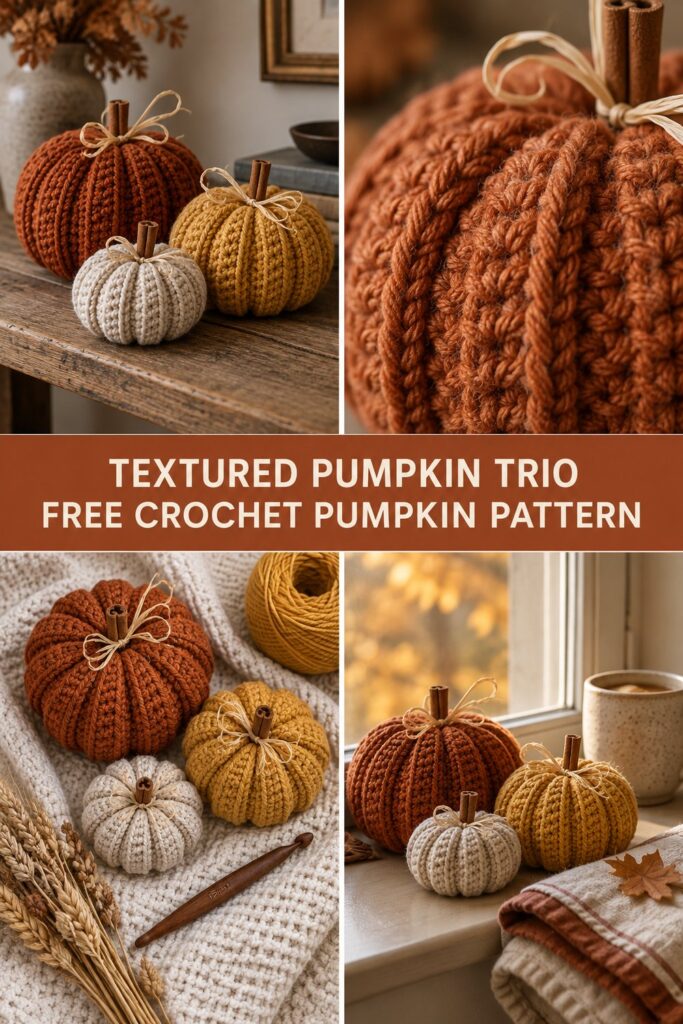
There is nothing quite like pulling out handmade fall crochet decor when the autumn air finally turns crisp and the leaves start to fall. Imagine styling your reclaimed oak console or autumn windowsill with a rustic trio of pumpkins, complete with real cinnamon-stick stems and deep, satisfying vertical ribbing. This textured crochet pumpkin trio is the ultimate easy crochet project to welcome the season, combining cozy farmhouse charm with quick, rewarding stitches.
Quick Facts
- Stitches Used: Chain (ch), Single Crochet (sc), Front Post Double Crochet (fpdc), Slip Stitch (sl st)
- Size Fit: Small, Medium, and Large trio set
- Estimated Hours to Complete: 2 to 4 hours for the complete trio
- Gift-Appeal Framing: An exquisite, quick-to-make handmade autumn gift that brings instant warmth and cozy farmhouse style to any home decor setting.
💡 Designer Tip: Keep sizing customization tips in mind if you want to scale your pumpkins up into chunky statement floor pillows or down into miniature table accents later!
What Makes This Crochet Pumpkin Trio Special
The secret to this stunning crochet home decor piece lies in working simple, flat rectangles using alternating rows of single crochet and front-post double crochet. This technique creates a rich, squishy fabric that naturally pulls into deep vertical ridges when seamed into a tube and cinched at the top and bottom. Unlike stuffed circles that require complex shaping, this rectangular construction method makes shaping effortless while highlighting the authentic tactile qualities of chunky yarn.
Skill Level
- Beginner-Friendly Intermediate: Familiarity with basic crochet stitches (ch, sc, sl st)
- Basic understanding of post stitches (specifically front-post double crochet)
- Willingness to seam and cinch yarn ends securely
✅ Checkpoint: If you can work a standard double crochet and feel comfortable inserting your hook around the post of a stitch rather than into the top loops, you are fully prepared to tackle this autumn crochet project!
Finished Measurements
| Pumpkin Size | Circumference | Height (excluding stem) |
|---|---|---|
| Small | 12 inches (30.5 cm) | 3.5 inches (9 cm) |
| Medium | 16 inches (40.6 cm) | 4.5 inches (11.5 cm) |
| Large | 20 inches (50.8 cm) | 6 inches (15 cm) |
Materials You Will Need
- Yarn: Bulky (Weight 5) or Super Bulky (Weight 6) yarn
- Hook: US J/10 (6.0 mm) crochet hook
- Notions: Tapestry needle, locking stitch markers, polyester fiberfill stuffing
- Embellishments: Real cinnamon sticks (cut to size), dried raffia curls, hot glue gun (optional)
| Color Name | Yarn Weight | Approximate Yardage |
|---|---|---|
| Rust | Bulky / Weight 5 | 50 yds (45.7 m) |
| Mustard | Bulky / Weight 5 | 75 yds (68.6 m) |
| Oatmeal | Bulky / Weight 5 | 110 yds (100.6 m) |
Yarn Suggestions
| Yarn Brand & Line | Weight | Yardage per Skein | Notes |
|---|---|---|---|
| Lion Brand Hue + Me | Bulky (5) | 137 yds (125 m) | Gorgeous stitch definition, rustic palette |
| Bernat Wool-Up Bulky | Bulky (5) | 122 yds (112 m) | Soft, warm wool blend with great bounce |
| Caron Cinnamon Cakes | Bulky (5) | 250 yds (228 m) | Excellent yardage value for making all three |
⚠️ Note: Avoid novelty fuzzy yarns (like eyelash or fur yarns) for this project, as they obscure the front-post texture and make counting your rows and stitches nearly impossible.
Gauge
| Measurement Type | Stitch / Row Count Over 4 Inches (10 cm) |
|---|---|
| Stitch Gauge | 11 sts x 8 rows in pattern ribbing |
| Row Gauge | 8 rows = 4 inches (10 cm) |
💡 Designer Tip: Always make a quick gauge swatch before starting your crochet pumpkin. If your stitches are too loose, the polyfill stuffing may peek through the ridges!
Abbreviations
| Abbreviation | Full Term |
|---|---|
| ch | Chain |
| sc | Single crochet |
| dc | Double crochet |
| fpdc | Front post double crochet |
| sl st | Slip stitch |
| st(s) | Stitch(es) |
| rep | Repeat |
| RS | Right side |
| WS | Wrong side |
Special Stitches Explained
- Front Post Double Crochet (fpdc): Yarn over, insert your hook from the front to the back and to the front again around the post of the designated stitch two rows below (or the stitch directly below in current row patterning), yarn over, pull up a loop, [yarn over, pull through 2 loops] twice.
- Cinching Seam: A secure gathering technique where a long tail of yarn is woven back and forth through the edge stitches of a flat panel, then pulled tight like a drawstring to close an opening.
Pattern Instructions
Section 1: Small Pumpkin (Oatmeal)
Row 1: Using Oatmeal yarn, ch 15, sc in 2nd ch from hook and in each ch across, turn. (14 sc)
Row 2 (RS): Ch 1, sc in first st, *fpdc around next st, sc in next st; rep from * across, turn. (14 sts)
Row 3 (WS): Ch 1, sc in each st across, turn. (14 sts)
Rows 4–20:* Rep Rows 2 and 3 alternately, ending with a WS row. Do not fasten off; leave a long tail for seaming.
✅ Checkpoint: Count your vertical rows to ensure you have 20 rows total before moving on to seaming.
Section 2: Medium Pumpkin (Mustard)
Row 1: Using Mustard yarn, ch 19, sc in 2nd ch from hook and in each ch across, turn. (18 sc)
Row 2 (RS): Ch 1, sc in first st, *fpdc around next st, sc in next st; rep from * across, turn. (18 sts)
Row 3 (WS): Ch 1, sc in each st across, turn. (18 sts)
Rows 4–26:* Rep Rows 2 and 3 alternately, ending with a WS row. Fasten off, leaving a generous 24-inch tail for seaming and cinching.
Section 3: Large Pumpkin (Rust)
Row 1: Using Rust yarn, ch 25, sc in 2nd ch from hook and in each ch across, turn. (24 sc)
Row 2 (RS): Ch 1, sc in first st, *fpdc around next st, sc in next st; rep from * across, turn. (24 sts)
Row 3 (WS): Ch 1, sc in each st across, turn. (24 sts)
Rows 4–32:* Rep Rows 2 and 3 alternately, ending with a WS row. Fasten off, leaving a long tail for seaming.
Section 4: Assembly & Finishing (All Sizes)
- Side Seam: Fold your crocheted rectangle in half with RS facing out, bringing the first and last rows together. Using your long yarn tail and tapestry needle, whipstitch the short edges together to form a seamless cylinder. Securely fasten off and weave in the initial tail.
- Bottom Cinch: Thread your long working tail onto your tapestry needle. Weave the needle in and out evenly around the bottom edge of the cylinder. Pull the yarn tail tightly to cinch the bottom closed completely. Secure with multiple tight knots and hide the tail inside the pumpkin cavity.
- Stuffing: Stuff the pumpkin firmly with polyester fiberfill, making sure to fill out the sides evenly while keeping the top opening accessible.
- Top Cinch: Thread a separate 18-inch length of yarn, weave in and out around the top edge, and pull tightly to close the top opening, leaving a small central hole.
- Deep Indentations (Optional Sculpting): For an authentic pumpkin look, take a long strand of matching yarn, anchor it at the bottom centre, pull it straight up the outside through the top centre, and pull firmly to create deep wedge indentations. Repeat 4 to 6 times around the pumpkin circumference.
- Stem & Raffia: Insert a thick cinnamon stick into the top central hole, securing with a dot of hot glue if needed. Tie a small curl of dried raffia around the base of the cinnamon stick.
Size Customization Tips
- To Make a Squatty, Wider Pumpkin: Add chains to your starting foundation chain in multiples of 2, and work fewer total rows to keep the panel square or slightly rectangular.
- To Make a Tall, Gourd-Style Pumpkin: Reduce your starting chain length by 4 to 6 stitches, and work additional pattern rows to stretch the overall height.
Care Instructions
Spot clean gently with a damp cloth and mild soap as needed. Do not submerge in water if using real cinnamon stick stems. Air dry flat away from direct sunlight.
I hope you had an absolute blast crafting this cozy autumn trio for your home! If you make your own crochet pumpkin trio, please share your photos, tag me on social media, save this tutorial to your Pinterest fall boards, and leave a comment below letting me know which colorway is your favorite! Happy crocheting!
📄 Your free PDF pattern