
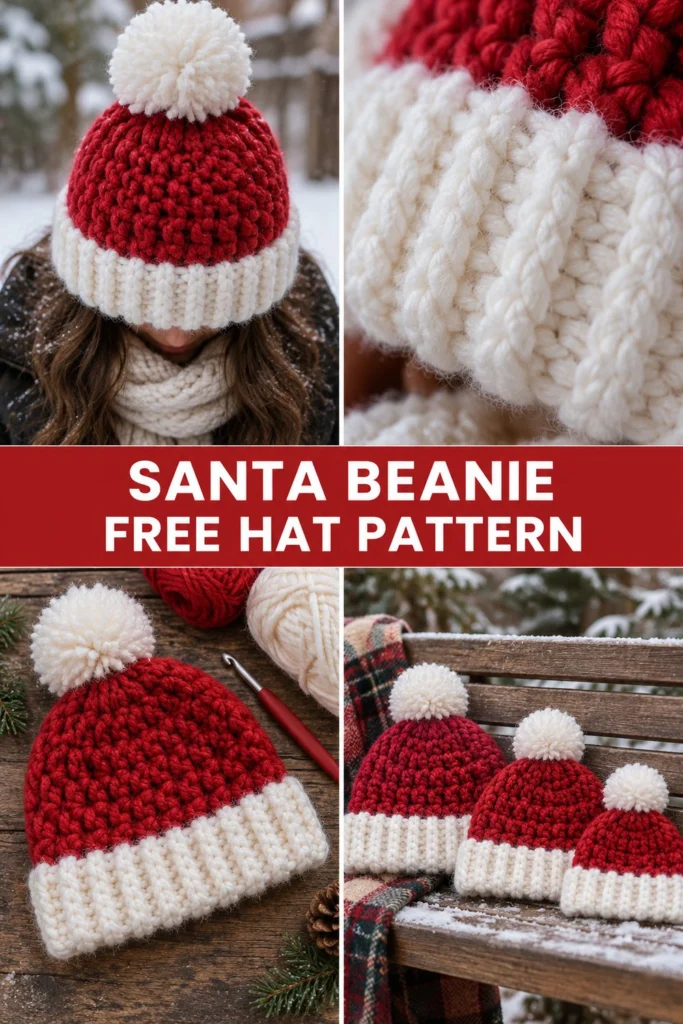
Whether you are prepping your home for the holidays or searching for a matching set for family photo cards, this chunky santa hat crochet pattern is a joyful and fast make. Featuring a plush white ribbed brim and rich red body topped with a fluffy pompom, it captures all the magic of the season.
Chunky Pom Pom Santa Crochet Beanie Free Christmas Pattern
Quick Facts
- Skill level: Easy / Beginner-Friendly
- Finished size: Baby, Child, Adult (3 sizes)
- Yarn: Super bulky (Category 6) in Red and White
- Hook: 9.0 mm (US M/13) crochet hook
- Stitches used: ch, sl st, hdc, third-loop hdc (camel stitch), blo
- Time to make: 2 to 3 hours per hat
What Makes This Crochet Santa Beanie Special
This hat uses a clever combination of textures to get that classic holiday look. The main body is worked in sturdy, warm half double corchets using rich crimson yarn. The folded brim is worked in super chunky white yarn using the third-loop half double crochet technique (often called the waistcoat look or knit-stitch ribbing), which gives it that stretchy, professional ribbed texture seen in the close-up photo. Topped off with a handmade yarn pompom, it has all the style of a boutique store find with none of the hassle.
Skill Level
- Basic crochet knowledge (chaining, slipping, half double crochet)
- Working in rows and rounds
- Basic sewing to attach the pompom
Don’t worry if you are new to chunky yarn—it’s wonderfully forgiving and works up in a flash!
Finished Measurements
| Size | Head Circumference | Hat Height (Brim Unfolded) | Hat Height (Brim Folded) |
|---|---|---|---|
| Baby | 16–18 in / 41–46 cm | 8 in / 20 cm | 6.5 in / 16.5 cm |
| Child | 19–21 in / 48–53 cm | 9.5 in / 24 cm | 8 in / 20 cm |
| Adult | 22–24 in / 56–61 cm | 11 in / 28 cm | 9.5 in / 24 cm |
Materials You Will Need
| Material | Details / Color | Quantity |
|---|---|---|
| Yarn A (Main Color) | Super Bulky (6) Red | 1 (1, 2) skein(s) / approx. 60–120 yds (55–110 m) |
| Yarn B (Contrast Color) | Super Bulky (6) White | 1 skein / approx. 40–60 yds (36–55 m) |
| Crochet Hook | 9.0 mm (US M/13) | 1 |
| Notions | Yarn needle, scissors, stitch markers, pompom maker (optional) | As needed |
Yarn Suggestions
- Lion Brand Wool-Ease Thick & Quick: A classic choice with great stitch definition and a wonderful range of reds and whites.
- Bernat Softee Chunky: Super soft and machine washable, ideal for sensitive skin and children’s sizes.
- Caron Anniversary Cakes (Super Bulky): Budget-friendly and widely available.
Gauge
8 hdc x 6 rows = 4 in / 10 cm using a 9.0 mm hook with super bulky yarn.
Abbreviations
- ch: chain
- sl st: slip stitch
- hdc: half double crochet
- blo: back loop only
- flo: front loop only
- 3rd loop hdc: work hdc in the third loop (horizontal bar behind the top loops) of the previous row’s hdc
- st(s): stitch(es)
- rnd(s): round(s)
- rep: repeat
- inv-dec: invisible half double crochet decrease (optional) or standard hdc2tog
UK: sc = dc, hdc = htr, dc = tr.
Special Stitches Explained
- Third-Loop Half Double Crochet (Camel Stitch): When working hdc in rows or rounds, look at the back of the stitch just under the top V loops. There is a horizontal loop facing you (the 3rd loop). Working your hdc into this loop pushes the top V’s forward, creating a gorgeous knit-like ribbed texture.
- Invisible Decrease (hdc2tog): Yo, insert hook in front loop only of next st, insert hook in front loop only of following st, yo, pull through all loops on hook.
Pattern Instructions
Section 1: The Ribbed Brim (White, Make 1 for all sizes)
Using Yarn B (White) and 9.0 mm hook, ch 7 (7, 9).
* Row 1: Working in the back bumps of the chain, hdc in 3rd ch from hook and in each ch across, turn. (5 (5, 7) hdc)
* Row 2: Ch 2 (does not count as st here and throughout), working in blo, hdc in each st across, turn. (5 (5, 7) hdc)
* Rows 21 (25, 29): Rep Row 2.
(Adjust the row count if necessary to match your desired head circumference: Baby 21 rows, Child 25 rows, Adult 29 rows).
Bring the two short ends of the ribband together and sl st through both thicknesses to join into a band. Do not cut yarn. Turn the band right-side out so the seam is on the inside.
Section 2: The Red Hat Body
Switch to Yarn A (Red). You will now work along the raw edge of the brim band.
- Rnd 1: Ch 2, work evenly spaced hdc around the raw edge of the brim band (work approximately 1 hdc per row-end). Join with sl st to top of first hdc.
- Baby: (36 hdc)
- Child: (42 hdc)
- Adult: (48 hdc)
- Rnd 2: Ch 2, hdc in each st around, join. (36 (42, 48) hdc)
- Rnd 3: Rep Rnd 2. (36 (42, 48) hdc)
- Rnds 4 to 6 (7, 8): Rep Rnd 2. (36 (42, 48) hdc)
- Rnd 7 (8, 9): Ch 2, (hdc in next 4 sts, hdc2tog) around, join.
- Baby: (30 hdc)
- Child: (35 hdc)
- Adult: (40 hdc)
- Rnd 8 (9, 10): Ch 2, (hdc in next 3 sts, hdc2tog) around, join.
- Baby: (24 hdc)
- Child: (28 hdc)
- Adult: (32 hdc)
- Rnd 9 (10, 11): Ch 2, (hdc in next 2 sts, hdc2tog) around, join.
- Baby: (18 hdc)
- Child: (21 hdc)
- Adult: (24 hdc)
- Rnd 10 (11, 12): Ch 2, (hdc in next st, hdc2tog) around, join.
- Baby: (12 hdc)
- Child: (14 hdc)
- Adult: (16 hdc)
Fasten off, leaving a long 10-inch tail for cinching. Thread the tail through a yarn needle, weave in and out of the remaining stitches around the top hole, and pull firmly to close the crown. Secure tightly with a knot.
Section 3: The Pompom and Assembly
- Pompom: Using White Yarn B, make a large pompom (about 3.5 to 4 inches in diameter) using a pompom maker or the classic cardboard ring method. Leave long tail strings attached.
- Attachment: Thread the pompom tails through the closed top of the hat and tie them securely on the inside of the crown. Weave in all loose ends.
Size Customization Tips
- To make it slouchier: Add 2 to 3 more straight hdc rounds right after the brim before starting the crown decreases. Each extra round adds about 0.75 inches of height.
- To adjust width: Because the brim is ribbed horizontally, you can simply add or subtract rows of 2 stitches to the brim foundation chain and matching round counts to fit any custom head size.
Care Instructions
Remove pompom if detachable, or spot clean gently. Hand wash the hat in cool water with mild wool detergent. Lay flat on a towel to dry, reshaping the brim ribbing as it dries. Do not tumble dry.
FAQ
Can I use medium worsted weight yarn instead?
Yes, but you will need to adjust your hook size down to a 5.0 mm (H/8) and significantly increase your stitch and row counts, as worsted weight yarn is much thinner than the super bulky yarn specified here.
How do I make the ribbed brim stretchier?
Make sure you are working strictly into the back loops only (BLO) on the brim rows. This creates natural elasticity that hugs the head comfortably without losing shape.
Are these hats safe for newborns?
Wool and super bulky acrylic hats are warm and cozy, but always remove hats when babies are sleeping. For infants under age 3, ensure any handmade pompoms are tied with extreme security so they cannot be pulled loose.