













What You Need for the Whole Collection
- Yarn: Worsted weight or bulky wool-blend yarn in shades of mustard yellow
- Hooks: US J/10 (6 mm) and US K/10.5 (6.5 mm) crochet hooks
- Notions: Tapestry needle, measuring tape, locking stitch markers, and optional buttons
- Skill level: Advanced beginner to intermediate
All 15 Patterns in This Collection
| # | Pattern | Finished size | Time | Skill |
|---|---|---|---|---|
| 1 | Granny Square Cardigan | 53 cm length x 50 cm width | 18 hours | Intermediate |
| 2 | Puff Sleeve Cardigan | 54 cm length x 52 cm width | 15 hours | Easy-Intermediate |
| 3 | Cropped V-Neck Cardigan | 48 cm length x 48 cm width | 12 hours | Easy |
| 4 | Bobble Stitch Cardigan | 54 cm length x 52 cm width | 16 hours | Intermediate |
| 5 | Oversized Chunky Cardigan | 60 cm length x 62 cm width | 10 hours | Easy |
| 6 | Lace Panel Cardigan | 50 cm length x 50 cm width | 14 hours | Intermediate |
| 7 | Button Front Cardigan | 50 cm length x 50 cm width | 14 hours | Easy |
| 8 | Shawl Collar Cardigan | 50 cm length x 52 cm width | 16 hours | Easy-Intermediate |
| 9 | Hooded Cardigan | 50 cm length x 52 cm width | 18 hours | Intermediate |
| 10 | Patchwork Cardigan | 54 cm length x 52 cm width | 20 hours | Intermediate |
| 11 | Shell Stitch Cardigan | 50 cm length x 50 cm width | 15 hours | Easy-Intermediate |
| 12 | Waffle Stitch Cardigan | 58 cm length x 52 cm width | 16 hours | Easy-Intermediate |
| 13 | Raglan Cardigan | 56 cm length x 52 cm width | 14 hours | Easy-Intermediate |
| 14 | Belted Cardigan | 56 cm length x 52 cm width | 18 hours | Intermediate |
| 15 | Longline Cardigan | 70 cm length x 52 cm width | 22 hours | Easy-Intermediate |
1. Granny Square Cardigan
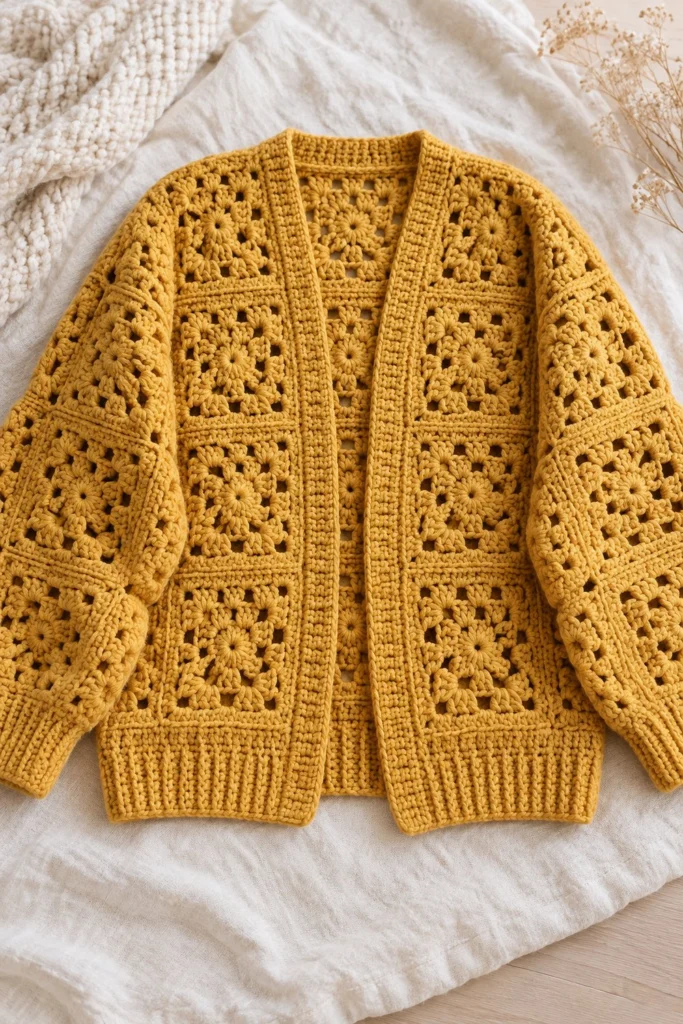
Wrap yourself in pure comfort with this heirloom-style granny square cardigan, featuring a rich textured marigold hue and cozy drop-shoulder sleeves. Designed with classic sunburst motifs and structured ribbed edgings, it is a timeless layering piece that takes about 18 hours to complete.
Quick Facts
| Skill level | Finished size | Yarn | Hook | Time |
|---|---|---|---|---|
| Intermediate | 53 cm length x 50 cm width | Worsted weight acrylic yarn (Cat. 4) | 5.0 mm (US H-8) | 18 hours |
Materials You Will Need
- Worsted weight acrylic yarn (Category 4) in Mustard Gold: 800 (880, 960, 1040) grams, approximately 1440 (1584, 1728, 1872) metres
- 5.0 mm (US H-8) crochet hook
- Tapestry needle for weaving in ends and seaming
- Stitch markers
- Measuring tape
Gauge
20 sts x 24 rows = 10 x 10 cm in sc.
One completed granny square measures 10 cm x 10 cm using a 5.0 mm hook. Gauge is important to ensure the cardigan meets the target finished measurements.
Sizes
| Size | To fit bust | Finished bust | Length | Sleeve |
|---|---|---|---|---|
| S | 76-86 cm | 100 cm | 53 cm | 45 cm |
| M | 91-102 cm | 110 cm | 55 cm | 46 cm |
| L | 107-117 cm | 120 cm | 57 cm | 47 cm |
| XL | 122-132 cm | 130 cm | 59 cm | 48 cm |
Ease: 14-24 cm positive ease. The photographed piece is size S.
Abbreviations (US Terms)
- ch = chain
- dc = double crochet
- hdc = half double crochet
- sc = single crochet
- sl st = slip stitch
- sp = space
- st = stitch
- BLO = back loop only
- dec = decrease (sc 2 together)
- inc = increase (2 sc in same st)
- Cluster = 3-dc cluster (work 3 dc together in same st or ch-sp)
UK terms: sc = dc, hdc = htr, dc = tr.
Pattern Notes
- Cardigan is constructed from individual granny squares joined together, followed by ribbed edgings worked directly onto the body.
- Stitch counts for rounds are listed in brackets at the end of each line.
- Ch 3 at the beginning of a round counts as a dc unless otherwise stated.
- Use stitch markers to keep track of square placement during assembly.
Instructions
Granny Squares – Mustard Gold, make 34 (38, 42, 46)
Rnd 1: Ch 4, join with sl st to form a ring, ch 3 (counts as dc here and throughout), work 11 dc into ring, join with sl st to top of ch-3 (12 dc)
Rnd 2: Ch 3, dc in same st, ch 1, (2-dc cluster, ch 1) in each st around, join with sl st to top of first cluster (12 clusters, 12 ch-1 sps)
Rnd 3: Sl st into ch-1 sp, ch 3, (2 dc, ch 2, 3 dc) in same ch-1 sp, *(3 dc, ch 1, 3 dc) in next ch-1 sp, repeat from * around, working corner shells (3 dc, ch 2, 3 dc) in every 3rd ch-1 sp, join with sl st to top of ch-3 (4 corners, 8 side clusters)
Rnd 4: Sl st across to ch-2 corner sp, ch 3, (2 dc, ch 2, 3 dc) in same corner sp, *[3 dc in space between clusters to next corner, (3 dc, ch 2, 3 dc) in corner sp] twice, repeat from * around, join with sl st to top of ch-3, fasten off leaving a 20 cm tail for joining (64 (64) 64 (64) dc total per square)
Bottom Ribbing – Mustard Gold
Row 1: Working directly across the bottom edge of the joined front and back panels, attach yarn at right front corner, ch 8, hdc in 2nd ch from hook and in each ch across (7 hdc), sl st into the next 2 sts along the square edge, turn (7 (7) 7 (7) hdc)
Row 2: Skip 2 sl sts, working in BLO, hdc in each hdc across, turn (7 (7) 7 (7) hdc)
Row 3: Ch 1, working in BLO, hdc in each hdc across, sl st into next 2 sts of square edge, turn (7 (7) 7 (7) hdc)
Repeat Rows 2-3 all the way across the bottom edge, fasten off.
Front Edging and Collar – Mustard Gold
Row 1: Attach yarn at bottom right front corner, work sc evenly up the right front opening, around the back neck, and down the left front opening, turn (120 (120) 120 (120) sts)
Row 2: Ch 1, hdc in each st across, turn (120 (120) 120 (120) sts)
Row 3: Working in rib pattern (alternating front post dc and back post dc) across the entire collar band, fasten off (120 (120) 120 (120) sts)
Sleeve Cuffs – Mustard Gold
Row 1: Attach yarn to sleeve wrist opening, ch 7, hdc in 2nd ch from hook and across (6 hdc), sl st to next 2 sts on sleeve edge, turn (6 (6) 6 (6) hdc)
Row 2: Skip 2 sl sts, working in BLO, hdc across, turn (6 (6) 6 (6) hdc)
Row 3: Ch 1, working in BLO, hdc across, sl st to next 2 sts, turn (6 (6) 6 (6) hdc)
Repeat around the cuff opening, join seam, fasten off.
Assembly
Arrange squares into panels following the photo layout: Back panel (2×3 squares), Front panels (2×2 squares each), Sleeves (2×2 squares each).
Using the yarn tails and whip stitch through the back loops only, seam the square panels together.
Join front panels to the back panel at the shoulder seams, leaving the middle back unjoined for the neck opening.
Attach sleeves to the armhole openings, centering the top sleeve seam at the shoulder.
Seam the underarm and side seams from wrist to lower hem.
Finishing
Weave in all remaining yarn ends securely using a tapestry needle.
Block the finished cardigan lightly by pinning to measurements and steaming gently, taking care not to flatten the textured clusters.
Allow to dry completely before wearing.
Tips and Common Mistakes
- Check your square dimensions frequently; tension can tighten up when working multiple rounds of clusters.
- Count your stitches carefully along the ribbed edgings to prevent the collar from flaring or pulling too tight.
- When joining squares, use the mattress stitch or an overcast whip stitch through the back loops for a flat, neat seam.
- Ensure you leave long enough tails when finishing squares to make the seaming process smooth.
Frequently Asked Questions
Can I adjust the length of the cardigan?
Yes, you can add an extra round to each granny square during construction to increase the overall dimensions, or add extra rows of ribbing at the bottom.
What is the best method for joining the granny squares?
A flat slip-stitch join or an invisible whip stitch worked through the back loops only will give you a neat, sturdy connection that matches the cardigan’s texture.
How should I wash and care for this cardigan?
Hand wash gently in cool water with mild wool detergent, press out excess water in a towel, and lay flat to dry in the shade to maintain shape.
What should I do if my stitch count on the collar band doesn’t match?
Simply adjust your single crochet spacing slightly on the first foundation row of the collar to ensure the ribbing sits flat without puckering.
📄 Your free PDF pattern