












12. Waffle Stitch Cardigan
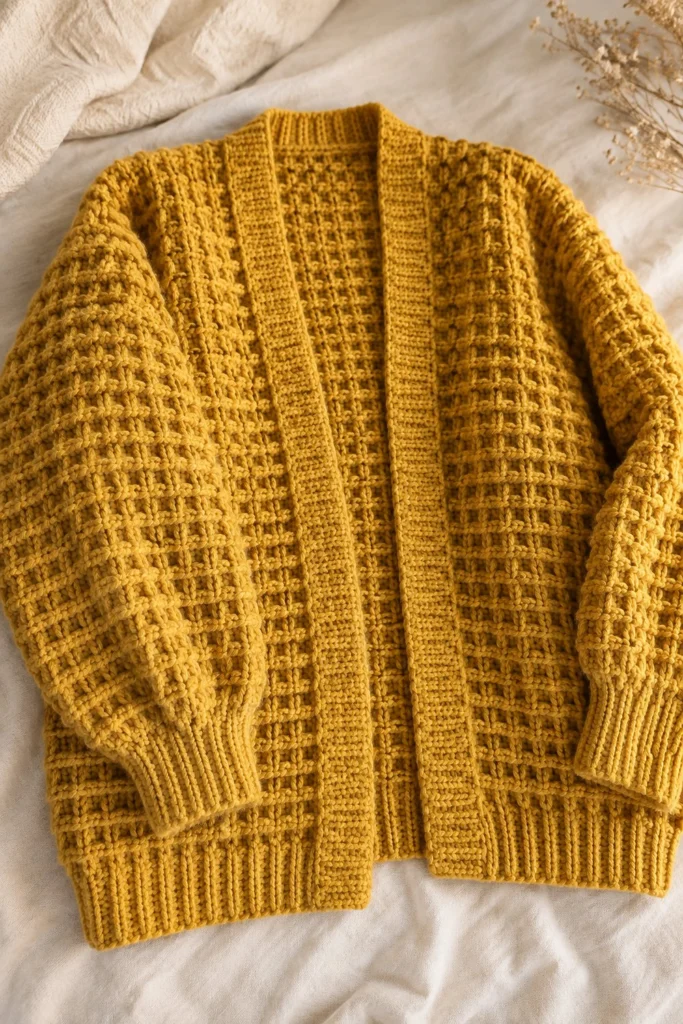
Wrap yourself in the ultimate cozy luxury with this gorgeous mustard-yellow waffle stitch cardigan, featuring beautifully textured raised squares and generous balloon sleeves. Perfect for brisk autumn mornings, this intermediate-friendly layering piece measures 58 cm in length and 52 cm in width, taking approximately 16 hours to complete from start to finish.
Quick Facts
| Skill level | Finished size | Yarn | Hook | Time |
|---|---|---|---|---|
| Easy-Intermediate | 58 cm length x 52 cm width | Aran weight wool yarn (Cat. 4) | 5.5 mm (US I-9) | 16 hours |
Materials You Will Need
- Aran weight wool yarn (Category 4) in Mustard Yellow: 750 grams (approx. 1,350 metres)
- 5.5 mm (US I-9) crochet hook
- Tapry needle for weaving in ends
- Stitch markers
- Measuring tape
Gauge
14 sts x 10 rows = 10 x 10 cm in waffle stitch pattern using a 5.5 mm hook. Checking your gauge ensures your cardigan matches the desired finished measurements and drape.
Sizes
| Size | To fit bust | Finished bust | Length | Sleeve |
|---|---|---|---|---|
| S | 82-86 cm | 104 cm | 58 cm | 45 cm |
| M | 90-94 cm | 112 cm | 58 cm | 45 cm |
| L | 98-102 cm | 120 cm | 60 cm | 46 cm |
| XL | 106-110 cm | 128 cm | 60 cm | 46 cm |
Ease: 18-20 cm positive ease. The photographed piece is size M.
Abbreviations (US Terms)
- ch: chain
- sc: single crochet
- dc: double crochet
- fpdc: front post double crochet
- sl st: slip stitch
- st(s): stitch(es)
- rep: repeat
- RS: right side
- WS: wrong side
- Waffle Stitch: A textured stitch pattern created by alternating double crochets and front post double crochets to form raised waffle squares.
UK terms: sc = dc, hdc = htr, dc = tr.
Pattern Notes
- The cardigan is worked in separate pieces (Back Panel, Left Front Panel, Right Front Panel, and two Sleeves) and then seamed together.
- The ribbing is worked in rows of front post and back post double crochet or single crochet ribbed texture, then joined to the main panels.
- Turning chain 3 at the beginning of rows counts as a double crochet unless stated otherwise.
- Use stitch markers to keep track of row edges and armhole shaping.
Instructions
Back Panel – Mustard Yellow, make 1
Ch 75 (81) 87 (93).
Row 1 (RS): 1 dc in 4th ch from hook (skipped 3 ch count as first dc), dc in each ch across, turn. (73 [79] 85 [91] sts)
Row 2 (WS): Ch 3 (counts as first dc here and throughout), *fpdc around next st, 1 dc in each of next 2 sts; rep from * to last 2 sts, fpdc around next st, 1 dc in turning chain, turn. (73 [79] 85 [91] sts)
Row 3: Ch 3, *1 dc in next st, fpdc around next 2 sts; rep from * to last 2 sts, 1 dc in next st, 1 dc in turning chain, turn. (73 [79] 85 [91] sts)
Row 4: Rep Row 2. (73 [79] 85 [91] sts)
Row 5: Rep Row 3. (73 [79] 85 [91] sts)
Row 6: Rep Row 2. (73 [79] 85 [91] sts)
Row 7: Rep Row 3. (73 [79] 85 [91] sts)
Row 8: Rep Row 2. (73 [79] 85 [91] sts)
Row 9: Rep Row 3. (73 [79] 85 [91] sts)
Row 10: Rep Row 2. (73 [79] 85 [91] sts)
Row 11: Rep Row 3. (73 [79] 85 [91] sts)
Row 12: Rep Row 2. (73 [79] 85 [91] sts)
Row 13: Rep Row 3. (73 [79] 85 [91] sts)
Row 14: Rep Row 2. (73 [79] 85 [91] sts)
Row 15: Rep Row 3. (73 [79] 85 [91] sts)
Row 16: Rep Row 2. (73 [79] 85 [91] sts)
Row 17: Rep Row 3. (73 [79] 85 [91] sts)
Row 18: Rep Row 2. (73 [79] 85 [91] sts)
Row 19: Rep Row 3. (73 [79] 85 [91] sts)
Row 20: Rep Row 2. (73 [79] 85 [91] sts)
Row 21: Rep Row 3. (73 [79] 85 [91] sts)
Row 22: Rep Row 2. (73 [79] 85 [91] sts)
Row 23: Rep Row 3. (73 [79] 85 [91] sts)
Row 24: Rep Row 2. (73 [79] 85 [91] sts)
Row 25: Rep Row 3. (73 [79] 85 [91] sts)
Row 26: Rep Row 2. (73 [79] 85 [91] sts)
Row 27: Rep Row 3. (73 [79] 85 [91] sts)
Row 28: Rep Row 2. (73 [79] 85 [91] sts)
Row 29: Rep Row 3. (73 [79] 85 [91] sts)
Row 30: Rep Row 2. (73 [79] 85 [91] sts)
Row 31: Rep Row 3. (73 [79] 85 [91] sts)
Row 32: Rep Row 2. (73 [79] 85 [91] sts)
Row 33: Rep Row 3. (73 [79] 85 [91] sts)
Row 34: Rep Row 2. (73 [79] 85 [91] sts)
Row 35: Rep Row 3. (73 [79] 85 [91] sts)
Row 36: Rep Row 2. (73 [79] 85 [91] sts)
Row 37: Rep Row 3. (73 [79] 85 [91] sts)
Row 38: Rep Row 2. (73 [79] 85 [91] sts)
Row 39: Rep Row 3. (73 [79] 85 [91] sts)
Row 40: Rep Row 2. (73 [79] 85 [91] sts)
Row 41: Rep Row 3. (73 [79] 85 [91] sts)
Row 42: Rep Row 2. (73 [79] 85 [91] sts)
Row 43: Rep Row 3. (73 [79] 85 [91] sts)
Row 44: Rep Row 2. (73 [79] 85 [91] sts)
Row 45: Rep Row 3. (73 [79] 85 [91] sts)
Row 46: Rep Row 2. (73 [79] 85 [91] sts)
Row 47: Rep Row 3. (73 [79] 85 [91] sts)
Row 48: Rep Row 2. (73 [79] 85 [91] sts)
Row 49: Rep Row 3. (73 [79] 85 [91] sts)
Row 50: Rep Row 2. (73 [79] 85 [91] sts)
Row 51: Rep Row 3. (73 [79] 85 [91] sts)
Row 52: Rep Row 2. (73 [79] 85 [91] sts)
Fasten off, leave a 40 cm tail for shoulder seaming.
Left Front Panel – Mustard Yellow, make 1
Ch 37 (40) 43 (46).
Row 1 (RS): 1 dc in 4th ch from hook, dc in each ch across, turn. (35 [38] 41 [44] sts)
Row 2 (WS): Ch 3, *fpdc around next st, 1 dc in each of next 2 sts; rep from * to last 2 sts, fpdc around next st, 1 dc in turning chain, turn. (35 [38] 41 [44] sts)
Row 3: Ch 3, *1 dc in next st, fpdc around next 2 sts; rep from * to last 2 sts, 1 dc in next st, 1 dc in turning chain, turn. (35 [38] 41 [44] sts)
Row 4: Rep Row 2. (35 [38] 41 [44] sts)
Row 5: Rep Row 3. (35 [38] 41 [44] sts)
Row 6: Rep Row 2. (35 [38] 41 [44] sts)
Row 7: Rep Row 3. (35 [38] 41 [44] sts)
Row 8: Rep Row 2. (35 [38] 41 [44] sts)
Row 9: Rep Row 3. (35 [38] 41 [44] sts)
Row 10: Rep Row 2. (35 [38] 41 [44] sts)
Row 11: Rep Row 3. (35 [38] 41 [44] sts)
Row 12: Rep Row 2. (35 [38] 41 [44] sts)
Row 13: Rep Row 3. (35 [38] 41 [44] sts)
Row 14: Rep Row 2. (35 [38] 41 [44] sts)
Row 15: Rep Row 3. (35 [38] 41 [44] sts)
Row 16: Rep Row 2. (35 [38] 41 [44] sts)
Row 17: Rep Row 3. (35 [38] 41 [44] sts)
Row 18: Rep Row 2. (35 [38] 41 [44] sts)
Row 19: Rep Row 3. (35 [38] 41 [44] sts)
Row 20: Rep Row 2. (35 [38] 41 [44] sts)
Row 21: Rep Row 3. (35 [38] 41 [44] sts)
Row 22: Rep Row 2. (35 [38] 41 [44] sts)
Row 23: Rep Row 3. (35 [38] 41 [44] sts)
Row 24: Rep Row 2. (35 [38] 41 [44] sts)
Row 25: Rep Row 3. (35 [38] 41 [44] sts)
Row 26: Rep Row 2. (35 [38] 41 [44] sts)
Row 27: Rep Row 3. (35 [38] 41 [44] sts)
Row 28: Rep Row 2. (35 [38] 41 [44] sts)
Row 29: Rep Row 3. (35 [38] 41 [44] sts)
Row 30: Rep Row 2. (35 [38] 41 [44] sts)
Row 31: Rep Row 3. (35 [38] 41 [44] sts)
Row 32: Rep Row 2. (35 [38] 41 [44] sts)
Row 33: Rep Row 3. (35 [38] 41 [44] sts)
Row 34: Rep Row 2. (35 [38] 41 [44] sts)
Row 35: Rep Row 3. (35 [38] 41 [44] sts)
Row 36: Rep Row 2. (35 [38] 41 [44] sts)
Row 37: Rep Row 3. (35 [38] 41 [44] sts)
Row 38: Rep Row 2. (35 [38] 41 [44] sts)
Row 39: Rep Row 3. (35 [38] 41 [44] sts)
Row 40: Rep Row 2. (35 [38] 41 [44] sts)
Row 41: Rep Row 3. (35 [38] 41 [44] sts)
Row 42: Rep Row 2. (35 [38] 41 [44] sts)
Row 43: Rep Row 3. (35 [38] 41 [44] sts)
Row 44: Rep Row 2. (35 [38] 41 [44] sts)
Row 45: Rep Row 3. (35 [38] 41 [44] sts)
Row 46: Rep Row 2. (35 [38] 41 [44] sts)
Row 47: Rep Row 3. (35 [38] 41 [44] sts)
Row 48: Rep Row 2. (35 [38] 41 [44] sts)
Row 49: Rep Row 3. (35 [38] 41 [44] sts)
Row 50: Rep Row 2. (35 [38] 41 [44] sts)
Row 51: Rep Row 3. (35 [38] 41 [44] sts)
Row 52: Rep Row 2. (35 [38] 41 [44] sts)
Fasten off, leave a 30 cm tail.
Right Front Panel – Mustard Yellow, make 1
Work identically to Left Front Panel for 52 rows.
Fasten off, leave a 30 cm tail.
Sleeves – Mustard Yellow, make 2
Ch 43 (45) 49 (53).
Row 1 (RS): 1 dc in 4th ch from hook, dc in each ch across, turn. (41 [43] 47 [51] sts)
Row 2 to 40: Work waffle stitch pattern (alternating Rows 2 and 3 of back panel), increasing 1 st at each end every 8 rows to shape the balloon sleeve. (49 [51] 55 [59] sts at end of Row 40)
Fasten off, leave a 40 cm tail for seaming.
Bottom Ribbing and Front Band – Mustard Yellow, make 1 continuous piece or attach separately
Work a ribbed band along the bottom edge by picking up sts evenly and working 8 rows of alternating front post and back post double crochet ribbing, then continue up the front opening edges to form the wide front placket as seen in the photo.
Assembly
Sew shoulder seams of Front Panels to Back Panel using mattress stitch. Sew sleeves to armhole openings, aligning the center of the sleeve cap with the shoulder seam. Seam the underarms and side seams from the hem up to the underarm pivot point.
Finishing
Weave in all loose yarn ends securely using a tapestry needle. Block the cardigan lightly by pinning to measurements and steaming gently, taking care not to flatten the raised waffle texture.
Tips and Common Mistakes
- Count your stitches at the end of every row to avoid accidentally dropping or adding stitches in the waffle pattern.
- Make sure your front post stitches wrap clearly around the post of the stitch two rows below when required by the pattern sequence.
- Do not over-stretch the fabric during blocking, as wool naturally relaxes and expands slightly when worn.
- When working the balloon sleeves, uniform increases ensure an even, beautiful gather at the cuff.
Frequently Asked Questions
How do I fix a dropped stitch in the waffle texture?
Use a crochet hook matching your working size to pull the dropped loop back up through the corresponding rows, locking it into the waffle grid.
Can I adjust the length of the cardigan?
Yes, simply work more or fewer pattern repeats before starting the shoulder shaping, ensuring you adjust the front and back panels equally.
Why do my waffle squares look flat?
Ensure you are working front post double crochets around the designated stitches rather than standard double crochets into the top loops.
How should I wash this wool cardigan?
Hand wash gently in cool water with a wool-safe detergent, press out excess water without wringing, and dry flat on a towel.
📄 Your free PDF pattern