












15. Longline Cardigan
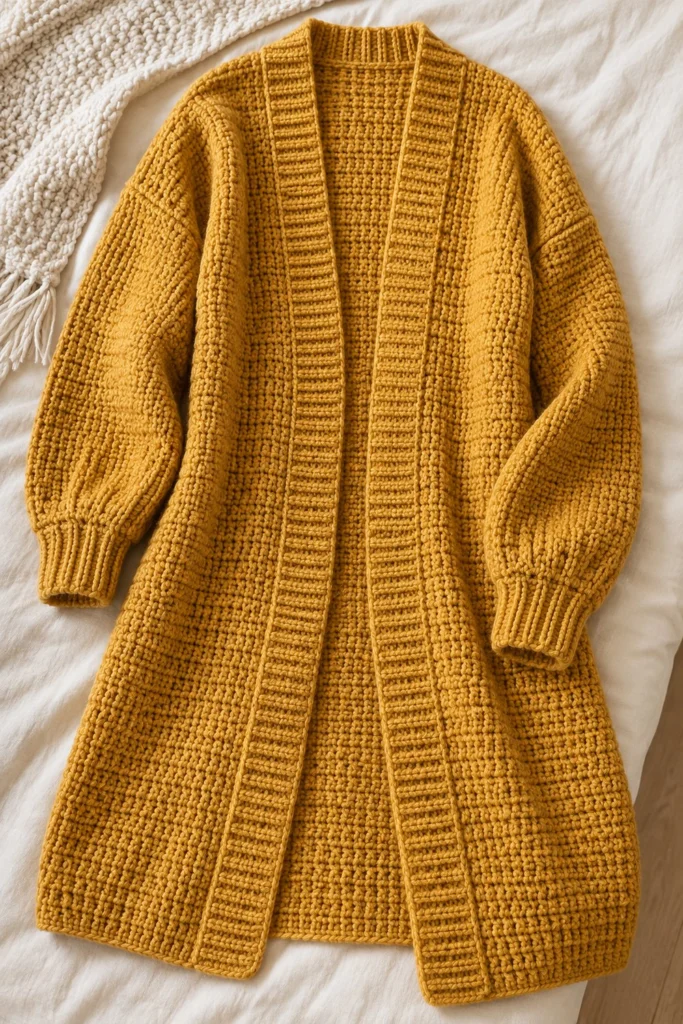
Wrap yourself in warmth and texture with this stunning mustard yellow longline cardigan, featuring classic ribbed trim and a cozy, oversized fit. Designed for comfort and effortless style, this statement layering piece takes approximately 22 hours to complete and measures 70 cm in length by 52 cm in width.
Quick Facts
| Skill level | Finished size | Yarn | Hook | Time |
|---|---|---|---|---|
| Easy-Intermediate | 70 cm length x 52 cm width | Worsted weight acrylic yarn (Cat. 4) | 5.5 mm (US I-9) | 22 hours |
Materials You Will Need
- Worsted weight acrylic yarn (Cat. 4), mustard yellow, approximately 1,100 grams (2,200 metres)
- 5.5 mm (US I-9) crochet hook
- Tapestry needle for weaving in ends
- Stitch markers
- Measuring tape
Gauge
12 sts x 10 rows = 10 x 10 cm in half double crochet in the back loop only. Gauge is important to ensure the cardigan meets the target measurements and drapes correctly.
Sizes
| Size | To fit bust | Finished bust | Length | Sleeve |
|---|---|---|---|---|
| S | 82-86 cm | 104 cm | 70 cm | 48 cm |
| M | 90-94 cm | 108 cm | 70 cm | 48 cm |
| L | 98-102 cm | 112 cm | 72 cm | 50 cm |
| XL | 106-110 cm | 116 cm | 72 cm | 50 cm |
Ease: +16 to +18 cm of positive ease. The photographed piece is size M.
Abbreviations (US Terms)
- ch = chain
- sl st = slip stitch
- sc = single crochet
- hdc = half double crochet
- dc = double crochet
- blo = back loop only
- flo = front loop only
- st = stitch
- sts = stitches
- rep = repeat
- inc = increase (work 2 hdc in the same st)
- dec = decrease (work 2 hdc together)
UK terms: sc = dc, hdc = htr, dc = tr.
Pattern Notes
- The cardigan is worked in separate flat pieces (Back, Fronts, and Sleeves) and then seamed together, with ribbed bands added along the front opening and cuffs.
- Ch 2 at the beginning of rows does not count as a stitch unless otherwise specified.
- Stitch counts for each row are listed in brackets at the end of the line.
- Use stitch markers to keep track of row edges during seaming.
Instructions
Back Panel – Mustard Yellow, make 1
Ch 64 (66) 68 (70)
Row 1: Working in the back bump of the foundation chain, hdc in 3rd ch from hook and in each ch across, turn (62 (64) 66 (68) sts)
Row 2: Ch 2 (does not count as st here and throughout), working in blo, hdc in each st across, turn (62 (64) 66 (68) sts)
Rows 3 to 60 (60) 62 (62): Rep Row 2 (62 (64) 66 (68) sts)
Fasten off, leaving a 40 cm tail for shoulder seaming.
Left Front Panel – Mustard Yellow, make 1
Ch 32 (33) 34 (35)
Row 1: Working in the back bump of the foundation chain, hdc in 3rd ch from hook and in each ch across, turn (30 (31) 32 (33) sts)
Row 2: Ch 2, working in blo, hdc in each st across, turn (30 (31) 32 (33) sts)
Rows 3 to 60 (60) 62 (62): Rep Row 2 (30 (31) 32 (33) sts)
Fasten off, leaving a 40 cm tail.
Right Front Panel – Mustard Yellow, make 1
Ch 32 (33) 34 (35)
Row 1: Working in the back bump of the foundation chain, hdc in 3rd ch from hook and in each ch across, turn (30 (31) 32 (33) sts)
Row 2: Ch 2, working in blo, hdc in each st across, turn (30 (31) 32 (33) sts)
Rows 3 to 60 (60) 62 (62): Rep Row 2 (30 (31) 32 (33) sts)
Fasten off, leaving a 40 cm tail.
Sleeves – Mustard Yellow, make 2
Ch 44 (44) 48 (48)
Row 1: Working in the back bump of the foundation chain, hdc in 3rd ch from hook and in each ch across, turn (42 (42) 46 (46) sts)
Row 2: Ch 2, working in blo, hdc in each st across, turn (42 (42) 46 (46) sts)
Row 3: Ch 2, inc in first st, hdc to last st, inc in last st, turn (44 (44) 48 (48) sts)
Rows 4 to 42 (42) 44 (44): Rep Rows 2 and 3 alternately every 4 rows to shape the sleeve, ending with a straight row (52 (52) 56 (56) sts)
Fasten off, leaving a 40 cm tail for seaming.
Front Ribbed Band – Mustard Yellow, make 1
Ch 13
Row 1: Sc in 2nd ch from hook and in each ch across, turn (12 sts)
Row 2: Ch 1, working in blo, sc in each st across, turn (12 sts)
Rows 3 to 170 (170) 176 (176): Rep Row 2, measuring against the entire front opening edge to ensure a snug fit (12 (12) 12 (12) sts).
Fasten off, leaving a 50 cm tail.
Assembly
Lay the Back Panel flat. Place the Left and Right Front Panels on top, aligning the outer shoulder edges. Seam the shoulders together across 15 (16) 17 (18) sts on each side, leaving the center 20 sts open for the back neckline. Fold the sleeves in half lengthwise and sew the top center of each sleeve to the shoulder seam. Seam the underarm edges from the cuff up to the armpit, then seam the side edges of the front and back panels from the bottom hem up to the armpit. Sew the long Front Ribbed Band evenly along the entire front opening and back neckline edge.
Finishing
Weave in all remaining yarn ends securely using a tapestry needle. Block the cardigan lightly by pinning to the finished dimensions on a flat surface and steaming gently with an iron set on low, taking care not to press directly onto the yarn.
Tips and Common Mistakes
- Keep your tension even throughout the rows to prevent the cardigan panels from flaring or pulling inward.
- Count your stitches at the end of every row, especially on the sleeve increase rows, to maintain symmetrical shaping.
- When attaching the front ribbed band, pin it in place every 10 centimeters first to distribute the stretch evenly.
- Do not skip blocking your finished pieces, as it relaxes the acrylic fibers and ensures crisp edges.
Frequently Asked Questions
How can I adjust the length of the cardigan?
You can easily modify the length of the back and front panels by adding or subtracting foundation chain rows at the very beginning of each piece before starting the pattern rows.
What should I do if my stitch count does not match at the end of a row?
Count back to find where an extra stitch was added or missed, and gently frog back to that point. Maintaining the exact stitch count ensures your side seams align properly during assembly.
Can I machine wash this cardigan?
Yes, provided you use worsted weight acrylic yarn. Wash on a gentle cycle in cold water and lay flat to dry to preserve the shape and texture of the ribbed stitches.
Why are my sleeves wider at the top than the cuff?
This is intentional shaping created by working increases every few rows, which gives the sleeves their cozy, slightly ballooned silhouette shown in the photograph.
You Made It Through All 15
📄 Your free PDF pattern