










6. Lace Panel Cardigan
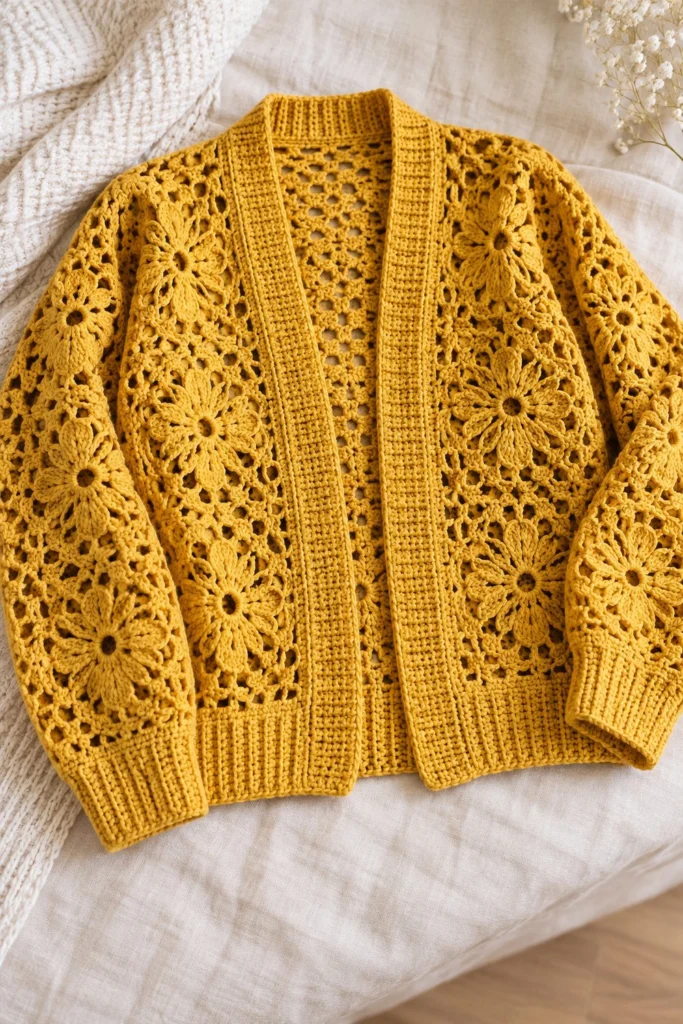
Wrap yourself in handmade elegance with this gorgeous mustard cardigan, featuring large join-as-you-go floral lace motifs and textured ribbed borders. Perfect for cooler evenings and transitional seasons, this heirloom-quality garment features structured sizing options and takes about 14 hours to complete.
Quick Facts
| Skill level | Finished size | Yarn | Hook | Time |
|---|---|---|---|---|
| Intermediate | S (M) L (XL) | Sport weight acrylic (Cat. 2) | 3.5 mm (US E-4) | 14 hours |
Materials You Will Need
- Sport weight acrylic yarn (Category 2) in Mustard Gold: 750 (800) 850 (900) grams (approx. 2100 – 2500 metres)
- Crochet hook size 3.5 mm (US E-4)
- Yarn needle for weaving in ends
- Stitch markers
- Measuring tape
Gauge
20 sts x 14 rows = 10 x 10 cm in half double crochet ribbing. Each completed square motif measures 10 cm x 10 cm blocked. Gauge is critical to achieving the final garment dimensions; adjust hook size if necessary to match motif and gauge measurements.
Sizes
| Size | To fit bust | Finished bust | Length | Sleeve |
|---|---|---|---|---|
| S | 80-85 cm | 100 cm | 50 cm | 45 cm |
| M | 90-95 cm | 110 cm | 50 cm | 45 cm |
| L | 100-105 cm | 120 cm | 50 cm | 45 cm |
| XL | 110-115 cm | 130 cm | 50 cm | 45 cm |
Ease: 15 cm. The photographed piece is size S.
Abbreviations (US Terms)
- ch = chain
- sl st = slip stitch
- sc = single crochet
- hdc = half double crochet
- dc = double crochet
- tr = treble crochet
- BLO = back loop only
- dec = decrease (sc 2 together)
- inc = increase (2 sc in same st)
- sp = space
- st(s) = stitch(es)
UK terms: sc = dc, hdc = htr, dc = tr.
Pattern Notes
- Motifs are joined together on the final round using slip stitches as indicated in instructions.
- Stitch counts are provided in brackets at the end of every round or row.
- Turning chains (ch 1 for sc, ch 2 for hdc, ch 3 for dc) do not count as stitches unless specifically noted.
- Ribbing rows are worked in back loop only (BLO) to create horizontal ridges.
Instructions
Flower Motif – Mustard, make 50 (54) 58 (62) total
Rnd 1: Ch 6, join with sl st to form ring, ch 1, work 16 sc into ring, join with sl st to first sc (16 sc)
Rnd 2: Ch 4 (counts as 1 dc and ch 1), [1 dc in next sc, ch 1] repeat around, join with sl st to 3rd ch of beg ch-4 (16 dc, 16 ch-1 sps)
Rnd 3: (Sl st, ch 3, 2 dc, ch 2, 3 dc) in first ch-1 sp, skip next sp, *(3 dc, ch 2, 3 dc) in next ch-1 sp, skip next sp; repeat from * around, join with sl st to top of beg ch-3 (8 petal groups)
Rnd 4: Ch 1, *work 5 sc over petal group, 1 sc in skipped sp of Rnd 2; repeat from * around, join with sl st to first sc (48 sc)
Rnd 5: Ch 5 (counts as 1 tr and ch 1), *(skip 2 sc, 1 tr, ch 3, 1 tr in next sc, ch 1) twice, skip 2 sc, 1 tr in next sc, ch 1; repeat from * around, join with sl st to 4th ch of beg ch-5 (24 ch spaces)
Rnd 6: Ch 1, work [3 sc in ch-1 sp, 5 sc in ch-3 sp] around, join with sl st to first sc, fasten off, leave a 20 cm tail (96 sc)
Sleeve Cuff – Mustard, make 2
Row 1: Ch 13, 1 hdc in 3rd ch from hook and in each ch across, turn (11 hdc)
Row 2: Ch 2, working in BLO, 1 hdc in each st across, turn (11 hdc)
Rows 3-24 (26) 28 (30): Repeat Row 2, fasten off, leave a 30 cm tail to seam cuff edges together into a tube (11 hdc)
Bottom Ribbing Band – Mustard, make 2 (Front and Back)
Row 1: Ch 13, 1 hdc in 3rd ch from hook and in each ch across, turn (11 hdc)
Row 2: Ch 2, working in BLO, 1 hdc in each st across, turn (11 hdc)
Rows 3-48 (52) 56 (60): Repeat Row 2, fasten off (11 hdc)
Front Placket and Neckband – Mustard, make 1 continuous piece
Row 1: Working directly along the open front edge and back neck opening, attach yarn at bottom right corner, ch 2, work hdc evenly spaced around the entire opening edge, turn (180 (190) 200 (210) hdc)
Row 2: Ch 2, working in BLO, 1 hdc in each st across, turn (180 (190) 200 (210) hdc)
Rows 3-6: Repeat Row 2, fasten off, leave a 30 cm tail (180 (190) 200 (210) hdc)
Assembly
Arrange motifs into panels: Front Left (1 column of 4 motifs), Front Right (1 column of 4 motifs), Back (2 columns of 4 motifs each, joined down the center), and Sleeves (1 column of 4 motifs joined into a tube). Join adjacent motifs along their outer edges using slip stitches through corresponding loops. Sew sleeve tubes to armhole openings. Sew bottom ribbing bands to the lower edges of the front and back panels. Sew cuffs to the ends of the sleeve tubes. Attach the front placket and neckband along the cardigan opening.
Finishing
Weave in all remaining yarn ends securely using the yarn needle. Block the completed cardigan lightly by pinning to measurements and steaming gently, taking care not to flatten the textured floral motifs and ribbing.
Tips and Common Mistakes
- Check motif counts carefully before joining to ensure symmetrical front and back panels.
- Maintain consistent tension when working the ribbed bands so they do not flare or warp.
- Block individual motifs before joining to keep panel edges straight and even.
- Ensure sleeve tubes are properly aligned before attaching them to the armholes.
Frequently Asked Questions
How do I adjust the cardigan length?
You can add or remove one full row of motifs to each vertical panel before attaching the bottom ribbing.
Can I modify the sleeve width?
Sleeves are built from single motif columns; adjusting the sleeve width requires changing the motif design, which is not recommended.
How should I wash this handmade cardigan?
Hand wash gently in cool water with mild wool detergent, lay flat to dry in shade, and never tumble dry.
What should I do if my stitch count on the placket is off?
Simply adjust the spacing of your hdc stitches slightly on the first row of the placket to match the required count.
📄 Your free PDF pattern