










8. Shawl Collar Cardigan
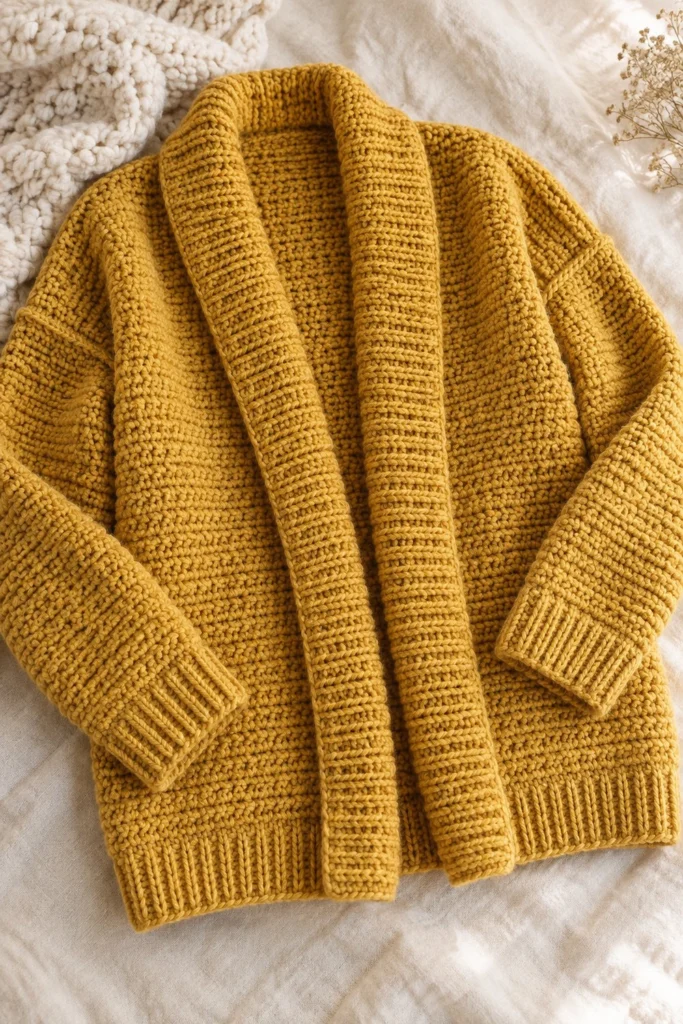
Wrap yourself in the cozy elegance of this mustard yellow shawl collar cardigan, featuring a rich textured stitch and a seamless continuous collar. Perfect for cool days, this timeless layering piece takes around 16 hours to complete and measures 50 cm in length by 52 cm in width for the photographed size.
Quick Facts
| Skill level | Finished size | Yarn | Hook | Time |
|---|---|---|---|---|
| Easy-Intermediate | 50 cm length x 52 cm width | Chunky acrylic yarn (Cat. 5) | 6.5 mm (US K-10.5) | 16 hours |
Materials You Will Need
- Chunky acrylic yarn (Category 5): Mustard Yellow, 700 grams (approx. 560 metres)
- 6.5 mm (US K-10.5) crochet hook
- Tapestry needle for weaving in ends
- Stitch markers
- Measuring tape
Gauge
11 sts x 12 rows = 10 x 10 cm in half double crochet worked in the back loop only. Gauge is important to ensure the cardigan fits to the specified dimensions.
Sizes
| Size | To fit bust | Finished bust | Length | Sleeve |
|---|---|---|---|---|
| S | 82-86 cm | 100 cm | 50 cm | 45 cm |
| M | 90-94 cm | 108 cm | 52 cm | 46 cm |
| L | 98-102 cm | 116 cm | 54 cm | 47 cm |
| XL | 106-110 cm | 124 cm | 56 cm | 48 cm |
Ease: 14-16 cm positive ease. The photographed piece is size M.
Abbreviations (US Terms)
- ch: chain
- sl st: slip stitch
- sc: single crochet
- hdc: half double crochet
- blo: back loop only
- flo: front loop only
- inc: increase (work 2 hdc in the same stitch)
- dec: decrease (work 2 hdc together)
- st(s): stitch(es)
UK terms: sc = dc, hdc = htr, dc = tr.
Pattern Notes
- The cardigan is worked in separate panels (Back, Left Front, Right Front, and two Sleeves) from the bottom up, then seamed together.
- The shawl collar is worked directly onto the front openings after assembly.
- The turning chain 2 at the start of rows counts as a hdc unless stated otherwise.
- Always place a stitch marker in the first and last stitches of rows to maintain straight edges.
- Stitch counts are shown in brackets at the end of every row.
Instructions
Back Panel – Mustard Yellow, make 1
Ch 56 (60, 64, 68)
Row 1: Working in the back bumps of the foundation chain, work 1 hdc in each ch across, turn. [55 (59, 63, 67) sts]
Row 2: Ch 2, working in blo, work 1 hdc in each st across, turn. [55 (59, 63, 67) sts]
Rows 3 to 48: Repeat Row 2. [55 (59, 63, 67) sts]
Fasten off, leave a 40 cm tail for shoulder seaming.
Left Front Panel – Mustard Yellow, make 1
Ch 28 (30, 32, 34)
Row 1: Working in the back bumps of the foundation chain, work 1 hdc in each ch across, turn. [27 (29, 31, 33) sts]
Row 2: Ch 2, working in blo, work 1 hdc in each st across, turn. [27 (29, 31, 33) sts]
Rows 3 to 48: Repeat Row 2. [27 (29, 31, 33) sts]
Fasten off, leave a 30 cm tail.
Right Front Panel – Mustard Yellow, make 1
Ch 28 (30, 32, 34)
Row 1: Working in the back bumps of the foundation chain, work 1 hdc in each ch across, turn. [27 (29, 31, 33) sts]
Row 2: Ch 2, working in blo, work 1 hdc in each st across, turn. [27 (29, 31, 33) sts]
Rows 3 to 48: Repeat Row 2. [27 (29, 31, 33) sts]
Fasten off, leave a 30 cm tail.
Sleeves – Mustard Yellow, make 2
Ch 34 (36, 38, 40)
Row 1: Working in the back bumps of the foundation chain, work 1 hdc in each ch across, turn. [33 (35, 37, 39) sts]
Row 2: Ch 2, working in blo, work 1 hdc in each st across, turn. [33 (35, 37, 39) sts]
Row 3: Ch 2, inc in first st, hdc across to last st, inc in last st, turn. [35 (37, 39, 41) sts]
Rows 4 to 36: Repeat Row 2 and Row 3, increasing every 4th row, until you reach 45 (47, 49, 51) sts. [45 (47, 49, 51) sts]
Fasten off, leave a 40 cm tail for seaming.
Assembly
Lay the back panel flat. Place the left and right front panels on top of the back panel, aligning the shoulder seams at the outer edges and leaving the central 20 cm unseamed for the back neck opening. Whipstitch the shoulder seams using the yarn tails.
Sew the top of each sleeve to the armhole edge of the front and back panels, centering the sleeve midpoint at the shoulder seam. Fold the cardigan in half lengthwise and seam the sleeve undersides and side seams from the cuff to the bottom hem.
Finishing
Attach yarn at the bottom right front corner, work hdc evenly up the right front edge, around the back neck, and down the left front edge to create the shawl collar over 12 rows of ribbing. Work front post and back post double crochet ribbing for the bottom hem (5 rows) and sleeve cuffs (6 rows). Weave in all loose ends securely with a tapestry needle. Block lightly with steam if needed to even out stitches.
Tips and Common Mistakes
- Do not skip the turning chain count; always treat the starting ch-2 as your first stitch unless instructed otherwise.
- Count your stitches at the end of every panel row to prevent accidental increases or decreases at the edges.
- Ensure you leave long enough yarn tails during assembly to complete sturdy mattress stitches or whipstitches.
- Block your panels before seaming to ensure clean edges and precise alignment.
Frequently Asked Questions
How do I adjust the length of the cardigan?
You can easily add or subtract rows from the bottom of the Back, Left Front, and Right Front panels before shaping the shoulders, making sure to adjust your yarn quantity accordingly.
Can I make the sleeves wider?
Yes, add more increase rows evenly spaced throughout the sleeve construction, ensuring both sleeves match in stitch count before seaming.
What is the best way to seam the panels together invisibly?
Use the mattress stitch on the right side of the fabric for a flat, nearly invisible seam that holds up well with chunky yarn.
What should I do if my collar is rolling inward?
Ensure you work enough rows for the shawl collar and block the finished edging flat with steam to set the ribbing in place.
📄 Your free PDF pattern