












5. Oversized Chunky Cardigan
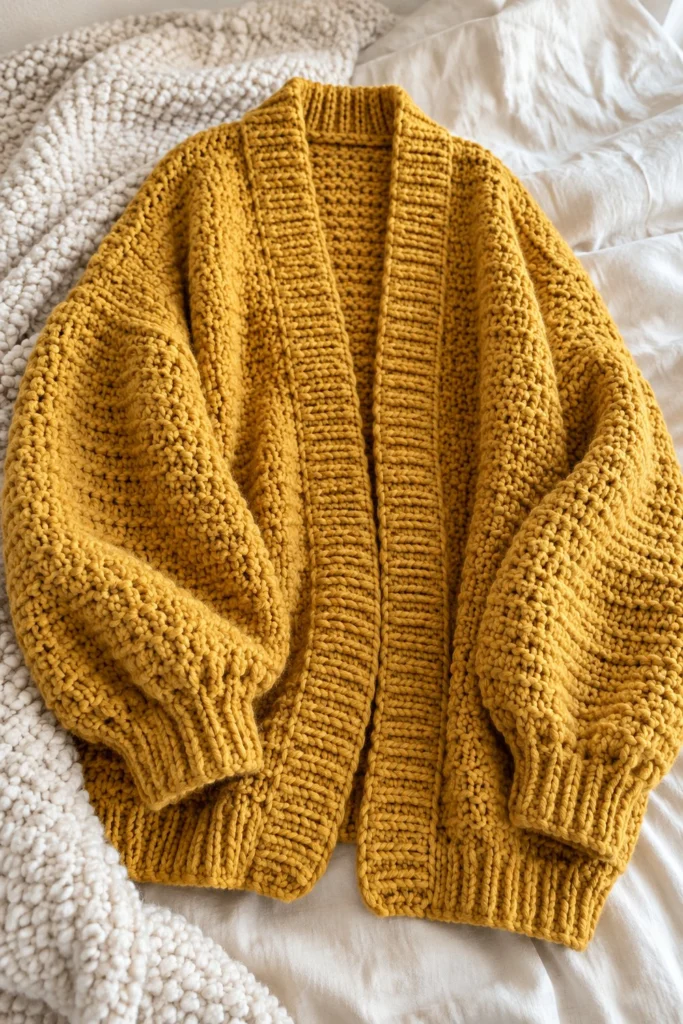
Wrap yourself in pure comfort with this stunning, oversized chunky cardigan featuring a rich mustard hue and dramatic balloon sleeves. Worked in a cozy textured stitch with deep ribbed edgings, it measures 62 cm in width and 60 cm in length, taking about 10 hours to complete.
Quick Facts
| Skill level | Finished size | Yarn | Hook | Time |
|---|---|---|---|---|
| Easy | 60 cm length x 62 cm width | Super bulky (Cat. 6) | 8.0 mm (US L-11) | 10 hours |
Materials You Will Need
- Super bulky yarn (Category 6) in Mustard: 1,200 grams (approx. 780 metres)
- 8.0 mm (US L-11) crochet hook
- Tapestry needle for weaving in ends
- Stitch markers
- Measuring tape
Gauge
8 sts x 7 rows = 10 x 10 cm in main textured stitch using an 8.0 mm hook. Gauge is crucial to achieve the correct oversized drape and fit.
Sizes
| Size | To fit bust | Finished bust | Length | Sleeve |
|---|---|---|---|---|
| S (M) L (XL) | 82-88 (92-98) 102-108 (112-118) cm | 110 (120) 130 (140) cm | 58 (60) 62 (64) cm | 45 (46) 47 (48) cm |
Ease: +22 to +25 cm of positive ease. The photographed piece is size M.
Abbreviations (US Terms)
- ch = chain
- sc = single crochet
- hdc = half double crochet
- hdcblo = half double crochet in back loop only
- sl st = slip stitch
- st = stitch
- sts = stitches
- rep = repeat
- inc = increase (work 2 hdc in the same st)
- dec = decrease (work 2 hdc together)
UK terms: sc = dc, hdc = htr, dc = tr.
Pattern Notes
- The cardigan is worked in six separate pieces: Back Panel, Left Front Panel, Right Front Panel, and two Sleeves, then seamed together. Ribbing is worked directly onto edges or separately and attached.
- Turning chains do not count as a stitch throughout.
- Use stitch markers to keep track of row edges and shaping.
- Stitch counts for each row are listed in brackets at the end of the line.
Instructions
Back Panel – Mustard, make 1
Ch 45 (49) 53 (57)
Row 1: Working in the back bump of the foundation chain, hdc in 3rd ch from hook and in each ch across, turn (43 (47) 51 (55) hdc)
Row 2: Ch 2, hdc in each st across, turn (43 (47) 51 (55) hdc)
Rows 3 to 38: Rep Row 2 (43 (47) 51 (55) hdc)
Row 39: Ch 2, hdc in first 12 (13) 14 (15) sts, work dec across next 2 sts, hdc in next 17 (19) 21 (23) sts, work dec across next 2 sts, hdc in last 12 (13) 14 (15) sts, turn (41 (45) 49 (53) hdc)
Rows 40 to 42: Ch 2, hdc in each st across, turn (41 (45) 49 (53) hdc)
Fasten off, leaving a 40 cm tail for shoulder seaming.
Left Front Panel – Mustard, make 1
Ch 23 (25) 27 (29)
Row 1: Working in the back bump of the foundation chain, hdc in 3rd ch from hook and in each ch across, turn (21 (23) 25 (27) hdc)
Row 2: Ch 2, hdc in each st across, turn (21 (23) 25 (27) hdc)
Rows 3 to 35: Rep Row 2 (21 (23) 25 (27) hdc)
Row 36 (Neck shaping): Ch 2, hdc in each st across to last 4 sts, dec, hdc in last 2 sts, turn (20 (22) 24 (26) hdc)
Rows 37 to 42: Rep Row 2 for length matching back panel (20 (22) 24 (26) hdc)
Fasten off, leaving a 30 cm tail.
Right Front Panel – Mustard, make 1
Ch 23 (25) 27 (29)
Row 1: Working in the back bump of the foundation chain, hdc in 3rd ch from hook and in each ch across, turn (21 (23) 25 (27) hdc)
Row 2: Ch 2, hdc in each st across, turn (21 (23) 25 (27) hdc)
Rows 3 to 35: Rep Row 2 (21 (23) 25 (27) hdc)
Row 36 (Neck shaping): Ch 2, hdc in first 2 sts, dec, hdc to end, turn (20 (22) 24 (26) hdc)
Rows 37 to 42: Rep Row 2 for length matching back panel (20 (22) 24 (26) hdc)
Fasten off, leaving a 30 cm tail.
Sleeves – Mustard, make 2
Ch 19 (21) 23 (25)
Row 1: Working in the back bump of the foundation chain, hdc in 3rd ch from hook and in each ch across, turn (17 (19) 21 (23) hdc)
Row 2: Ch 2, inc, hdc across to last st, inc, turn (19 (21) 23 (25) hdc)
Row 3: Ch 2, hdc across, turn (19 (21) 23 (25) hdc)
Rows 4 to 29: Rep Rows 2 and 3 alternately, increasing every alternate row until you reach 35 (37) 39 (41) sts (35 (37) 39 (41) hdc)
Rows 30 to 34: Ch 2, hdc across, turn (35 (37) 39 (41) hdc)
Fasten off, leaving a 40 cm tail for seaming.
Bottom Ribbing – Mustard
Working directly along the bottom edge of the joined front and back panels:
Row 1: Join yarn at right front corner, ch 7, working in back bump, sc in 2nd ch from hook and across to base, sl st into next 2 panel sts, turn (6 sc)
Row 2: Skip 2 sl sts, working in hdcblo, sc in each of the 6 sts, turn (6 sc)
Row 3: Ch 1, scblo in 6 sts, sl st into next 2 panel sts, turn (6 sc)
Rep Rows 2 and 3 all along the bottom hem. Fasten off.
Front Band and Collar Ribbing – Mustard
Join yarn at bottom right front edge, work ribbing rows (ch 9, sc in 2nd ch from hook and across, sl st into next 2 edge sts) all the way up the right front edge, around the back neck shaping, and down the left front edge. Fasten off.
Cuffs – Mustard (worked directly onto sleeve ends)
Row 1: Join yarn at sleeve seam, ch 6, sc in 2nd ch from hook and across (5 sc), sl st in next 2 sleeve sts, turn. (5 sc)
Row 2: Skip sl sts, scblo in 5 sts, turn. (5 sc)
Row 3: Ch 1, scblo in 5 sts, sl st in next 2 sleeve sts, turn. (5 sc)
Rep Rows 2 and 3 around entire cuff opening. Fasten off.
Assembly
Lay Back Panel flat. Place Left and Right Front Panels on top, aligning shoulder seams. Seam shoulders using mattress stitch across top 12 (13) 14 (15) sts on each side, leaving the central back neck ribbing free. Fold sleeves in half lengthwise and seam side edges. Sew sleeve caps to armhole openings, centering sleeve seam with side seam of cardigan. Seam side and sleeve underarms from cuff to lower hem.
Finishing
Weave in all loose yarn ends securely using a tapestry needle. Block the cardigan lightly with steam, avoiding pressing down hard on the texture to maintain the puffy, oversized look of the super bulky yarn.
Tips and Common Mistakes
- Do not pull your starting chains too tight; use a slightly larger hook for the foundation chain if your natural tension is tight.
- Count your stitches at the end of every increase row on the sleeves to ensure symmetry.
- When working the ribbed bands, make sure your slip-stitch anchor points are evenly spaced into the edge stitches so the ribbing does not ripple.
- Store your cardigan folded rather than hung on a hanger, as the heavy super bulky yarn can cause the shoulders to stretch out of shape over time.
Frequently Asked Questions
Can I adjust the length of the cardigan?
Yes, you can easily add or subtract rows on the back and front panels before starting the neck shaping, making sure to adjust both front and back panels by the exact same number of rows.
What is the best way to join the panels together?
The mattress stitch is recommended because it creates a flat, nearly invisible seam that holds the heavy super bulky yarn securely without adding bulky ridges.
How do I wash and care for this chunky cardigan?
Hand wash gently in cool water with mild wool detergent. Lay flat on a clean towel to dry in its original shape. Never tumble dry or hang wet.
My stitch count on the sleeve increases doesn’t match. What should I do?
Ensure you are placing your increases in the very first and very last stitches of the increase rows, and double-check that you are counting turning chains correctly since they do not count as stitches.
📄 Your free PDF pattern