
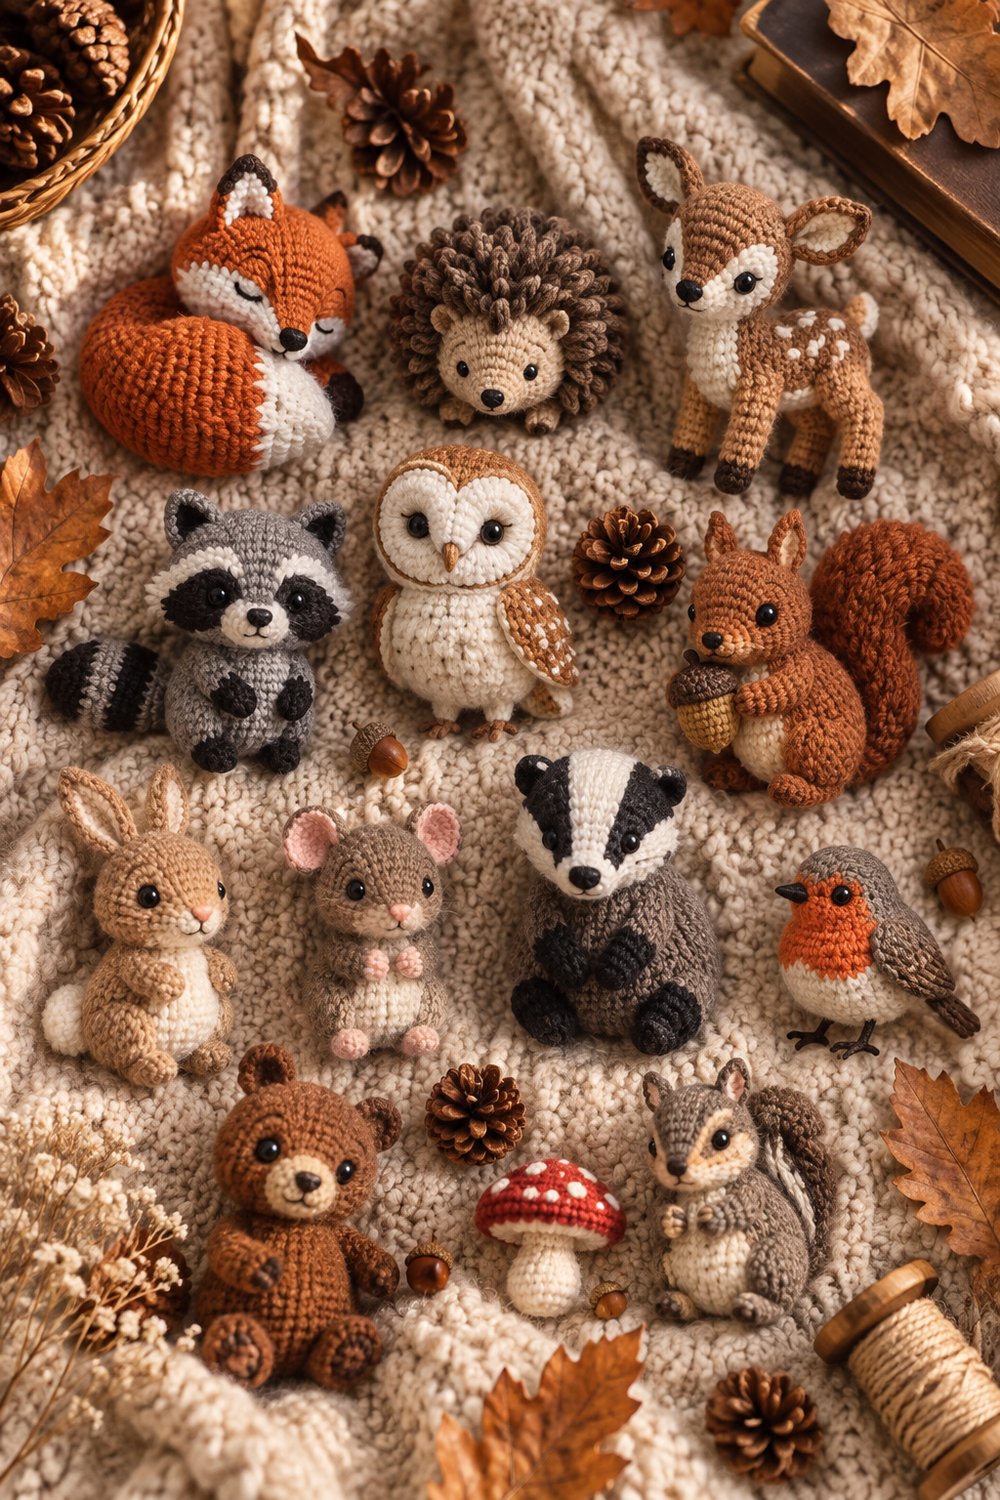
Fall in love with these adorable miniature woodland amigurumi animals, perfectly suited for crafting by the cozy glow of afternoon window light. This collection of sweet crochet toys brings the cottagecore aesthetic right to your fingertips using rich, earthy autumnal yarn shades.
25+ Cute Woodland Amigurumi Patterns for Beginners
Quick Facts
- Stitches Used: Single crochet (sc), increase (inc), decrease (dec), loop stitch (lp-st), chain (ch), slip stitch (sl st)
- Size Fit: Miniature amigurumi plushies, perfect for nursery decor, keychains, or handheld toys
- Estimated Hours to Complete: 2 to 4 hours per individual animal
- Gift Appeal: Perfect handmade baby shower gifts, holiday stocking stuffers, or delightful keepsakes for nature lovers
💡 Designer Tip: Sizing customization tips are included later in this article to help you scale these patterns up or down using different yarn weights.
What Makes This Woodland Amigurumi Special
This curated selection of woodland amigurumi animals combines simple construction methods with clever textural details to achieve an authentic cottagecore aesthetic. Each pattern is designed with beginner-friendly amigurumi techniques in mind, working primarily in continuous spiral rounds (spiral rnds) using basic single crochet stitches.
To create the signature lifelike textures seen in the collection—such as the hedgehog’s quills or the fox’s fluffy chest—the patterns incorporate specialized touches like the loop stitch and simple surface embroidery. Safety eyes add a polished, professional finish, while minimal sewing ensures that assembly remains frustration-free for crafters new to toy-making.
Skill Level
- Skill Level: Advanced Beginner / Easy
- Required Skills:
- Working in the round (magic ring)
- Basic single crochet stitches and invisible decreases
- Changing yarn colors seamlessly
- Basic embroidery for facial features and details
- Simple sewing to attach limbs and ears
⚠️ Note: If you are entirely new to amigurumi, we recommend practicing the magic ring and single crochet in a spiral a few times before diving into the individual animal patterns.
Finished Measurements
| Animal Component | Imperial (Inches) | Metric (Centimeters) |
|---|---|---|
| Red Fox (Length/Height) | 4.5 inches tall | 11.5 cm tall |
| Brown Hedgehog (Length) | 3.5 inches long | 9.0 cm long |
| Fawn / Baby Deer (Height) | 5.0 inches tall | 12.5 cm tall |
| Barn Owl (Height) | 3.0 inches tall | 7.5 cm tall |
| Brown Squirrel (Height) | 4.0 inches tall | 10.0 cm tall |
Materials You Will Need
- Yarn Weight: Sport or DK weight cotton yarn (see specific color breakdown below)
- Crochet Hook: US C/2 (2.75 mm) or US B/1 (2.25 mm) to maintain tight stitches with no gaps
- Notions: Polyester fiberfill stuffing, 6mm or 8mm safety eyes with washers, tapestry needle, stitch markers, embroidery floss for facial details
| Color Name | Yarn Weight / Type | Yardage / Meters Needed |
|---|---|---|
| Burnt Rust Red | DK Weight / 100% Cotton | Approx. 35 yds / 32 m |
| Crisp White | DK Weight / 100% Cotton | Approx. 15 yds / 14 m |
| Textured Chocolate Brown | DK Weight / 100% Cotton | Approx. 40 yds / 37 m |
| Oatmeal Beige | DK Weight / 100% Cotton | Approx. 30 yds / 27 m |
| Warm Fawn Tan | DK Weight / 100% Cotton | Approx. 35 yds / 32 m |
| Charcoal Black | DK Weight / 100% Cotton | Approx. 10 yds / 9 m |
Yarn Suggestions
| Yarn Brand & Line Name | Yarn Weight | Skein Yardage | Notes |
|---|---|---|---|
| Schachenmayr Catania | Sport / Fine (2) | 137 yds (125 m) per 50g | Exceptional stitch definition, wide range of earthy amigurumi colors. |
| Dk Weight Cotton Blend | DK / Light (3) | 120 yds (110 m) per 50g | Great for durable, washable toys with minimal fuzzing. |
| Knit Picks CotLin | DK / Light (3) | 123 yds (112 m) per 50g | Linen-cotton blend providing a rustic, matte organic look. |
⚠️ Note: Avoid using super-fuzzy novelty yarns or loosely spun single-ply wools for these beginner amigurumi patterns, as they make it difficult to see your stitches and tend to trap fiber stuffing.
Gauge
- Gauge: 6 sc x 6 rows = 1 inch (2.5 cm) square using a 2.75 mm hook.
- Swatch Note: Exact gauge is not critical for amigurumi toys, but your stitches must be tight enough to prevent the polyester fiberfill stuffing from showing through. Always drop down a hook size if you notice large gaps between your stitches.
| Measure Type | Stitches / Rows | Dimension |
|---|---|---|
| Stitch Gauge | 24 sc | 4 inches (10 cm) |
| Row Gauge | 24 rows | 4 inches (10 cm) |
Abbreviations
| Abbreviation | Full Term |
|---|---|
| ch | Chain |
| sc | Single Crochet |
| inc | Single Crochet Increase (work 2 sc in same stitch) |
| dec | Invisible Single Crochet Decrease (join next 2 stitches into one) |
| hdc | Half Double Crochet |
| dc | Double Crochet |
| sl st | Slip Stitch |
| lp-st | Loop Stitch (special technique for hedgehog texture) |
| st(s) | Stitch(es) |
| rnd(s) | Round(s) |
| FO | Fasten Off |
Special Stitches Explained
- Invisible Single Crochet Decrease (inv-dec): Insert hook into the front loop only of the next stitch, then insert hook into the front loop only of the following stitch. Yarn over, pull through both front loops on the hook (2 loops remaining), yarn over, and pull through both remaining loops on the hook.
- Loop Stitch (lp-st): Wrap the working yarn around your index finger to create a loop of desired size behind your work. Insert hook into the designated stitch, catch the working yarn (holding the loop in place), pull up a loop, yarn over, and pull through all 2 loops on the hook.
- Magic Ring (mr): Form an adjustable loop with the yarn tail, insert hook into center of ring, yarn over, pull up a loop, and ch 1 to secure. Work initial stitches directly into the ring.
Pattern Instructions
Section 1: Sleeping Red Fox Body & Head
Working in continuous spiral rnds without joining, using Burnt Rust Red and Crisp White yarn.
- Rnd 1: Start 6 sc in a mr with Burnt Rust Red. (6 sc)
- Rnd 2: Work inc in each st around. (12 sc)
- Rnd 3: (sc in next st, inc in next st) repeat 6 times. (18 sc)
- Rnd 4: sc in next 2 sts, inc in next st; repeat around. (24 sc)
- Rnd 5 to Rnd 10: sc evenly in each st around. (24 sc)
- Rnd 11: sc in next 2 sts, dec; repeat around. (18 sc)
✅ Checkpoint: At the end of Rnd 11, stuff the body firmly with polyester fiberfill before continuing the decrease rounds for the head.
- Rnd 12: (sc in next st, dec) repeat 6 times. (12 sc)
- Rnd 13: Work dec 6 times. (6 sc)
- FO, weave in tail securely, and embroider closed sleeping eyes using Charcoal Black thread.
Section 2: Brown Hedgehog Body (Textured)
Using Textured Chocolate Brown and Oatmeal Beige yarn.
- Rnd 1: Start 6 sc in a mr with Oatmeal Beige for the face. (6 sc)
- Rnd 2: inc in each st around. (12 sc)
- Rnd 3: (sc in next st, inc) repeat 6 times. (18 sc)
- Rnd 4: Switch to Textured Chocolate Brown yarn; work lp-st in each st around to create quills. (18 sts)
- Rnd 5 to Rnd 9: Work lp-st evenly in each st around. (18 sts)
- Rnd 10: (sc in next st, dec) repeat 6 times switching back to regular sc. (12 sc)
✅ Checkpoint: Stuff the hedgehog firmly with fiberfill and ensure loop stitches remain uniform across the back before closing.
- Rnd 11: Work dec 6 times. (6 sc)
- FO and close the remaining opening.
Section 3: Fawn / Baby Deer
Using Warm Fawn Tan and Crisp White yarn.
- Rnd 1: Start 6 sc in a mr with Warm Fawn Tan. (6 sc)
- Rnd 2: inc in each st around. (12 sc)
- Rnd 3 to Rnd 8: sc evenly in each st around. (12 sc)
- Rnd 9: (sc in next st, dec) repeat 4 times. (8 sc)
- FO, stuff body, and embroider small white spots along the back using Crisp White thread.
Section 4: Barn Owl
Using Oatmeal Beige and Charcoal Black yarn.
- Rnd 1: Start 6 sc in a mr with Oatmeal Beige. (6 sc)
- Rnd 2: inc in each st around. (12 sc)
- Rnd 3 to Rnd 7: sc evenly in each st around. (12 sc)
- Rnd 8: Work dec 6 times. (6 sc)
- FO, insert 6mm safety eyes, and embroider a tiny triangular beak between the eyes in dark brown.
Section 5: Assembly & Finishing
- Weave in all loose yarn ends across all finished woodland amigurumi animals.
- Attach small felt or embroidered details where required (such as fox ear tips and raccoon eye patches).
- Arrange your finished cute amigurumi collection on a cozy knit oatmeal blanket alongside natural elements like miniature pinecones and dried leaves to achieve the ultimate woodland cottagecore presentation.
Size Customization Tips
- Scaling Up: Switch to a worsted weight yarn (Weight 4) and a US D/3 (3.25 mm) or E/4 (3.5 mm) crochet hook. This will increase the finished height of each woodland animal by approximately 30% to 50%.
- Scaling Down: Use embroidery floss or size 10 crochet cotton thread with a 1.5 mm hook to craft ultra-miniature pocket-sized animals that work wonderfully as charms or pendants.
Care Instructions
- Gently hand wash your finished woodland amigurumi plushies in lukewarm water with mild wool detergent.
- Do not wring or twist the toys; press out excess water gently inside a clean towel.
- Reshape while damp and lay flat to dry completely away from direct sunlight.
- Spot cleaning with a damp cloth is recommended for surface dust.
25+ Cute Woodland Amigurumi Patterns for Beginners
Thank you so much for stitching along with this woodland amigurumi collection! I hope crafting these sweet little forest creatures brought a touch of cozy cottagecore magic to your hook.
If you loved making these cute amigurumi toys, please share your creations on Instagram and tag me [@YourSocialHandle] with the hashtags #AmigurumiLove, #FreeCrochetPattern, and #WoodlandCrochet. Don’t forget to save this pin to your favorite Pinterest boards, and leave a comment below letting me know which woodland animal was your favorite to make! Happy crocheting!