
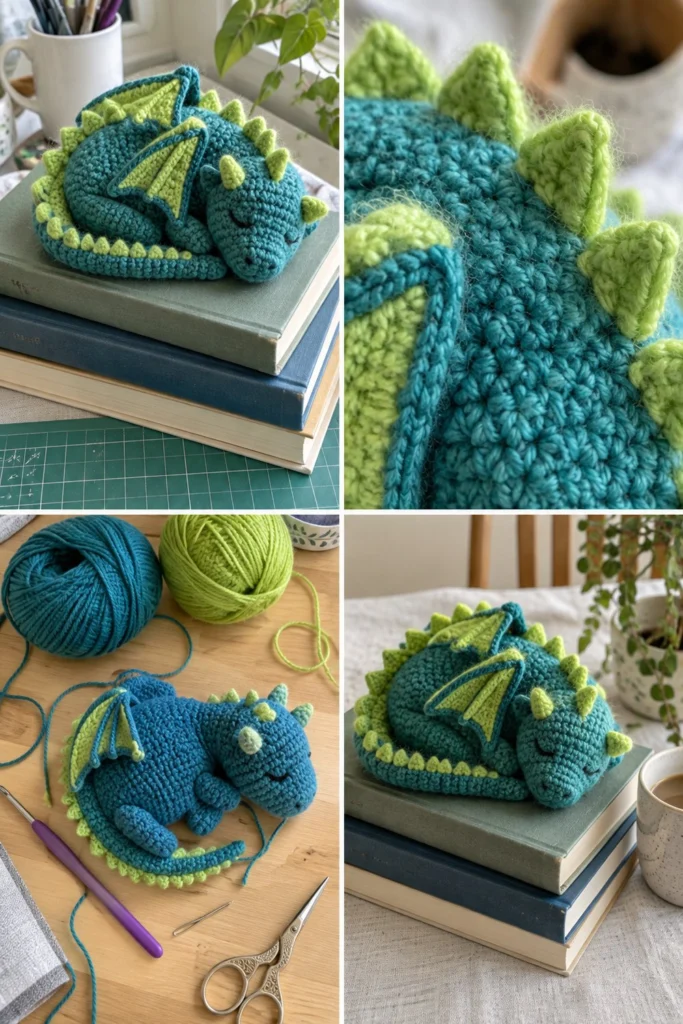
Curled up tight with its tiny wings folded against its side, this sweet dragon is the softest little guard you will ever meet. Crafted in rich teal with vibrant lime green spikes, wings, and belly accents, it makes a wonderful companion for a bedside table or a sleepy afternoon reading nook.
Cute Crochet Sleeping Dragon – Free Low-Sew Amigurumi Pattern
Quick Facts
- Skill level: Easy / Intermediate
- Finished size: Approximately 6 inches (15 cm) long when curled
- Yarn: Worsted weight (Category 4) in Teal and Lime
- Hook: 3.5 mm (US E/4) crochet hook
- Stitches used: US terminology (ch, sc, hdc, dc, sl st, inc, dec)
- Time to make: 4 to 6 hours
💡 Designer Tip: Size tips and gauge adjustments are included further down the page.
What Makes This Crochet Sleeping Dragon Special
This dragon uses a continuous spiral amigurumi body that curls naturally as you work, minimizing sewing and keeping assembly simple. The textured lime spikes are worked directly onto the back or added seamlessly, and the flat tucked-in wings give it a realistic sleeping loaf pose without complex wire armatures.
Skill Level
- Working in the round (spiral)
- Basic shaping with increases and decreases
- Simple sewing to attach wings, horns, and spikes
- Basic embroidery for closed sleeping eyes
🛟 Reassurance: If you can single crochet in the round and work basic increases and decreases, you can make this sleeping dragon!
Finished Measurements
- Length: 6 inches (15 cm)
- Width: 4.5 inches (11.5 cm)
- Height: 3 inches (7.5 cm)
Materials You Will Need
| Material | Details | Quantity |
|---|---|---|
| Yarn (Color A) | Teal, Worsted Weight (Category 4) | Approx. 110 yards (100 meters) |
| Yarn (Color B) | Lime Green, Worsted Weight (Category 4) | Approx. 40 yards (35 meters) |
| Crochet Hook | 3.5 mm (US E/4) | 1 hook |
| Notions | Stitch markers, tapestry needle, sharp scissors | As needed |
| Stuffing | Polyfill toy stuffing | Approx. 30 grams |
Yarn Suggestions
| Brand & Line | Weight | Skein Yardage | Notes |
|---|---|---|---|
| Red Heart Super Saver | Worsted (4) | 364 yards / 333 meters | Affordable, sturdy, wide color range (Teal / Paddy Green) |
| Caron Simply Soft | Worsted (4) | 315 yards / 288 meters | Slightly shiny drape, very soft (Dark Sage / Lime) |
| Lion Brand Vanna’s Choice | Worsted (4) | 170 yards / 156 meters | Classic amigurumi yarn, firm stitches (Teal / Kiwi) |
⚠️ Note: Avoid novelty fuzzy yarns or extremely split-prone single-ply yarns, as they make amigurumi stitch counts difficult to track and won’t hold the dragon’s curled shape.
Gauge
- Amigurumi Gauge: Rnds 1 to 6 of the flat circle base = 2 inches (5 cm) across using a 3.5 mm hook.
- Exact gauge is not critical for amigurumi, but work stitches tightly so the polyfill stuffing does not show through.
Abbreviations
- ch = chain
- sc = single crochet
- hdc = half double crochet
- dc = double crochet
- sl st = slip stitch
- inc = single crochet 2 in same stitch (increase)
- dec = invisible single crochet 2 together (decrease)
- BLO = back loop only
- FLO = front loop only
- st(s) = stitch(es)
- Rnd(s) = round(s)
- Row(s) = row(s)
- sk = skip
- FO = fasten off
UK conversion note: In UK terms, sc = dc, hdc = htr, dc = tr.
Special Stitches Explained
- Magic Ring: Wrap yarn around your index finger twice, insert hook under loops, pull up a loop, and ch 1 to secure. Work initial stitches into the ring.
- Invisible Decrease (dec): Insert hook into the front loop only of the next stitch, then insert hook into the front loop only of the following stitch. Yarn over and pull through both front loops, yarn over and pull through remaining 2 loops on hook.
- Puff Stitch: Yarn over, insert hook into stitch, pull up a loop (3 loops on hook). Repeat 2 more times in the same stitch (7 loops on hook), yarn over and pull through all 7 loops, ch 1 to close.
Pattern Instructions
Pattern Notes:
– The body is worked in continuous spiral rounds without joining. Use a stitch marker to mark the first stitch of each round.
– Stuff the body and head firmly as you go, leaving the tail lightly stuffed or unstuffed so it can curve smoothly.
Section 1: Body and Head (Teal, make 1)
Rnd 1: Magic ring with Teal, 6 sc in ring (6 sc)
Rnd 2: Inc in each st around (12 sc)
Rnd 3: (1 sc, inc) x 6 (18 sc)
Rnd 4: (2 sc, inc) x 6 (24 sc)
Rnd 5: (3 sc, inc) x 6 (30 sc)
Rnd 6: (4 sc, inc) x 6 (36 sc)
Rnds 7 to 14: Sc in each st around (36 sc)
Rnd 15: (4 sc, dec) x 6 (30 sc)
Rnd 16: Sc in each st around (30 sc)
Rnd 17: (3 sc, dec) x 6 (24 sc)
Rnd 18: Sc in each st around (24 sc)
Rnd 19: (2 sc, dec) x 6 (18 sc)
Begin stuffing the body firmly.
Rnd 20: (1 sc, dec) x 6 (12 sc)
Rnds 21 to 26: Sc in each st around (12 sc)
Stuff the neck and body section further.
Rnd 27: (1 sc, inc) x 6 (18 sc)
Rnd 28: (2 sc, inc) x 6 (24 sc)
Rnd 29: (3 sc, inc) x 6 (30 sc)
Rnds 30 to 35: Sc in each st around (30 sc)
Rnd 36: (3 sc, dec) x 6 (24 sc)
Rnd 37: (2 sc, dec) x 6 (18 sc)
Stuff the head section.
Rnd 38: (1 sc, dec) x 6 (12 sc)
Rnd 39: Dec x 6 (6 sc)
FO, leaving a long tail. Thread needle through front loops of remaining 6 stitches and pull tight to close the snout. Curve the body into a sleeping loaf shape and secure with a few anchoring stitches.
Section 2: Tail (Teal, make 1)
Rnd 1: Magic ring with Teal, 4 sc in ring (4 sc)
Rnd 2: (1 sc, inc) x 2 (6 sc)
Rnd 3: Sc in each st around (6 sc)
Rnd 4: (2 sc, inc) x 2 (8 sc)
Rnds 5 to 6: Sc in each st around (8 sc)
Rnd 7: (3 sc, inc) x 2 (10 sc)
Rnds 8 to 9: Sc in each st around (10 sc)
Rnd 10: (4 sc, inc) x 2 (12 sc)
Rnds 11 to 12: Sc in each st around (12 sc)
FO, leaving a long tail for sewing to the back of the body. Lightly stuff.
Section 3: Wings (Teal and Lime, make 2)
Wing Base (Lime, make 2):
Row 1: Ch 6, sc in 2nd ch from hook and across (5 sc), turn.
Row 2: Ch 1, dec, 1 sc, dec (3 sc), turn.
Row 3: Ch 1, sc in each st around (3 sc), turn.
Row 4: Ch 1, dec, 1 sc (2 sc), turn.
Row 5: Ch 1, dec (1 sc). FO Lime.
Wing Border and Membrane (Teal, make 2):
Attach Teal yarn to the base corner of a Lime triangle. Work sc evenly up the slanted edge, 3 sc in the top point tip, then sc down the other side. FO, leaving a long tail for sewing.
Section 4: Horns (Lime, make 2)
Rnd 1: Magic ring with Lime, 4 sc in ring (4 sc)
Rnd 2: (1 sc, inc) x 2 (6 sc)
Rnd 3: Sc in each st around (6 sc)
FO, leaving a tail for sewing to top of head. Lightly stuff.
Section 5: Back Spikes (Lime, make 1 long strip)
Row 1: Ch 35 with Lime, *[sl st in 2nd ch from hook, hdc in next ch, sl st in next ch]*; repeat from * across the chain. FO, leaving a long tail to sew along the back and tail ridge.
Assembly
- Eyes: Using black embroidery floss and a tapestry needle, embroider closed sleeping curved lashes on the sides of the head between Rnds 33 and 35, spaced about 6 stitches apart.
- Horns: Sew the two small lime horns securely to the top of the head just behind the snout curve.
- Tail: Attach the wide end of the tail to the rear flank of the main body, curving it neatly around the side.
- Spikes: Sew the Lime spike strip along the center back of the dragon, starting from behind the horns, running down the spine, and trailing along the top of the tail.
- Wings: Position the folded wings on each upper flank of the body, tucked neatly against the sides, and sew securely in place.
✅ Checkpoint: Verify all parts are firmly attached, yarn ends are woven in invisibly, and the dragon rests stably in its curled sleeping position.
Size Customization Tips
- To make a larger dragon, use Bulky (Category 5 or 6) yarn with a 5.0 mm or 6.0 mm hook. Each additional increase round in the body adds about 1 inch to the overall diameter.
- To make a miniature version, use Sport or Fingering weight yarn with a 2.0 mm or 2.5 mm hook.
Care Instructions
- Hand wash gently in cool water with mild soap.
- Do not bleach or iron.
- Roll in a clean towel to remove excess water and lay flat to dry in the shade.
FAQ
Can I use safety eyes instead of embroidery?
Yes, but embroidery is strongly recommended if this toy is intended for children under 3 years old to prevent any choking hazards.
How do I keep the dragon curled in a circle?
Once stuffed and assembled, take your tapestry needle and a length of teal yarn to tack the tip of the tail lightly to the side of the body so it holds its snug loaf shape permanently.
Can I use variegated yarn for the body?
Variegated yarn looks wonderful on dragon scales! Just keep in mind that stitch counts and color pooling will vary depending on your specific yarn skein.
Happy Crocheting!
I hope you love bringing your little sleeping dragon to life! Save this pattern to your Pinterest board so you can easily find it later, and be sure to leave a comment below letting me know what colors you chose for your sleepy guardian.
📄 Your free PDF pattern