
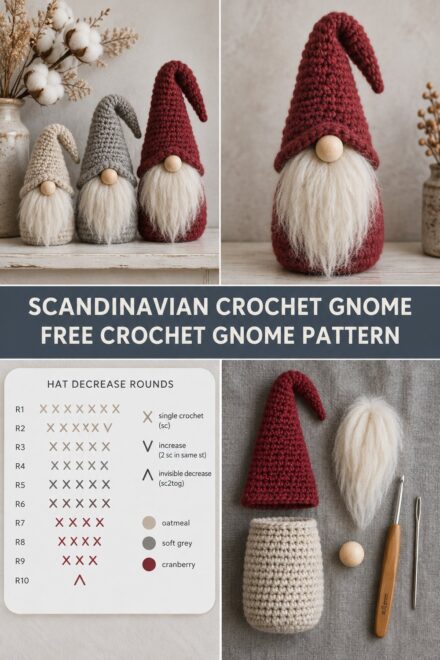
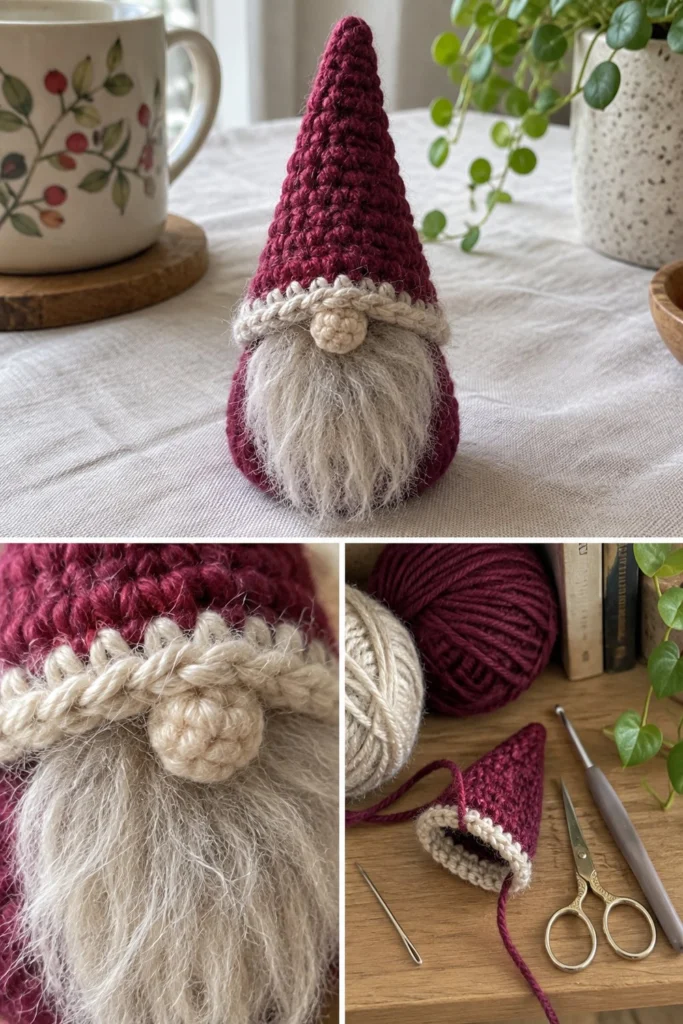
Thirty minutes and a bit of leftover yarn are all you need to bring this charming little holiday character to life. With a classic cranberry cone hat, a textured oatmeal brim, a fluffy brushed beard, and a round nose, this miniature project is both fun and delightfully quick.
No-Sew Crochet Mini Gnome – Free 30-Minute Christmas Pattern
Quick Facts
- Skill level: Easy
- Finished size: Approximately 3 inches (7.6 cm) tall and 2 inches (5 cm) wide at the base
- Yarn: Worsted weight (Category 4) in Cranberry and Oatmeal; plus small amount of brushed novelty yarn for the beard
- Hook: US C/2 (2.75 mm) crochet hook
- Stitches used: ch, sc, inc, dec, sl st
- Time to make: 30 to 45 minutes
Size customization tips are included further down.
What Makes This Crochet Mini Gnome Special
The entire hat and body are worked in one continuous piece from the top down, meaning zero sewing is required to assemble the main structure! The textured oatmeal brim is created using a simple raised stitch technique, while the beard uses a brushed yarn effect that fluffs up easily with a wire pet slicker brush or fine-tooth comb.
Skill Level
- Working in the round (spiral)
- Basic amigurumi increases and invisible decreases
- Brushing yarn to create faux fur
- Reassurance line: Because there is only one small nose to attach and no other sewing, this is one of the friendliest amigurumi projects for beginners.
Finished Measurements
| Dimension | Inches | Centimeters |
|---|---|---|
| Height | 3.0 in | 7.6 cm |
| Base Diameter | 2.0 in | 5.0 cm |
Materials You Will Need
| Material / Notion | Color / Type | Details / Quantity |
|---|---|---|
| Yarn A | Cranberry (Worsted Weight) | approx. 15 yards (14 meters) |
| Yarn B | Oatmeal (Worsted Weight) | approx. 8 yards (7 meters) |
| Yarn C | Oatmeal (Brushed/Fuzzy Yarn) | approx. 5 yards (4.5 meters) |
| Crochet Hook | US C/2 (2.75 mm) | Metal or ergonomic handle |
| Stitch Marker | Locking stitch marker | 1 piece |
| Tapestry Needle | Yarn needle with blunt tip | 1 piece |
| Scissors | Small sharp sewing scissors | 1 piece |
| Stuffing | Polyester fiberfill | Small handful |
Yarn Suggestions
| Yarn Line | Weight | Skein Yardage | Notes |
|---|---|---|---|
| Lion Brand Vanna’s Choice | Worsted (4) | 145 yds / 100g | Excellent stitch definition for mini amigurumi |
| Red Heart Super Saver | Worsted (4) | 364 yds / 198g | Durable and widely available |
| Bernat Premium | Worsted (4) | 360 yds / 198g | Soft acrylic with a great color range |
⚠️ Note: Avoid novelty chenille or eyelash yarn for the main body and hat, as it makes counting stitches nearly impossible for a small cone shape. Stick to smooth worsted weight yarn for the hat and body.
Gauge
- 6 sc x 6 rounds = 1 inch (2.5 cm) square using a 2.75 mm hook in single crochet.
- Rnds 1 to 6 of the hat/body cone = 1.5 inches (3.8 cm) across.
Abbreviations
- ch: chain
- sc: single crochet
- inc: single crochet increase (2 sc in same stitch)
- dec: invisible single crochet decrease (insert hook in front loops of next 2 stitches, yarn over, pull through both, yarn over, pull through remaining loops)
- sl st: slip stitch
- st(s): stitch(es)
- Rnd(s): round(s)
- [ ]: repeat instructions between brackets the given number of times
UK conversion note: UK: sc = dc, hdc = htr, dc = tr.
Special Stitches Explained
- Magic Ring: Form a loop with your yarn tail, insert hook into the center of the loop, yarn over and pull up a loop, ch 1, and work the required number of single crochets into the ring. Pull the tail tight to close.
- Invisible Decrease (dec): Insert your hook into the front loop only of the first stitch, then immediately into the front loop only of the second stitch. Yarn over, pull through both front loops (2 loops on hook), yarn over, and pull through both remaining loops on hook.
Pattern Instructions
Pattern Notes
- The gnome body is worked in continuous spiral rounds without joining. Use a stitch marker to keep track of the first stitch of each round.
- Stuff the body firmly as you work towards the base.
Section 1: Hat and Body
Start at the top of the hat using Cranberry (Yarn A).
Rnd 1: Magic ring with Yarn A, work 6 sc in ring (6 sc)
Rnd 2: inc x 6 (12 sc)
Rnd 3: sc in each st around (12 sc)
Rnd 4: [1 sc, inc] x 6 (18 sc)
Rnd 5: sc in each st around (18 sc)
Rnd 6: [2 sc, inc] x 6 (24 sc)
Rnd 7: sc in each st around (24 sc)
Rnd 8: [3 sc, inc] x 6 (30 sc)
Rnd 9: sc in each st around (30 sc)
Rnd 10: [4 sc, inc] x 6 (36 sc)
Rnd 11: sc in each st around (36 sc)
Rnds 12 to 17: sc in each st around (36 sc)
Change to Oatmeal (Yarn B) for the brim.
Rnd 18: Working in front loops only (FLO), sc in each st around (36 sc)
Rnd 19: Working through both loops, [4 sc, dec] x 6 (30 sc)
Rnd 20: [3 sc, dec] x 6 (24 sc)
Start stuffing the body firmly with fiberfill here.
Rnd 21: [2 sc, dec] x 6 (18 sc)
Rnd 22: [1 sc, dec] x 6 (12 sc)
Rnd 23: dec x 6 (6 sc)
Fasten off, leaving a 6-inch (15 cm) tail. Thread tail through the front loops of the final 6 stitches and pull tight to close the base completely. Weave in ends.
✅ Checkpoint: At Rnd 17, your cone should measure about 3.5 inches tall before adding the brim and stuffing. Make sure your stitch counts match before switching to Yarn B.
Section 2: Hat Brim Detail
With the gnome upside down, join Oatmeal (Yarn B) to one of the unworked back loops left behind from Rnd 18.
Round 1: Working along the remaining back loops of Rnd 18, work sl st in each st around, join with a sl st to first sl st. Fasten off and weave in ends neatly.
Section 3: Nose
Using Oatmeal (Yarn A/B smooth).
Rnd 1: Magic ring, 6 sc in ring (6 sc)
Rnd 2: inc in each st around (12 sc)
Rnd 3: sc in each st around (12 sc)
Rnd 4: dec x 6 (6 sc)
Stuff lightly with a tiny pinch of fiberfill. Fasten off, leaving an 8-inch (20 cm) tail for sewing. Close the opening and secure.
Section 4: Beard
Cut 12 strands of Yarn C (brushed fuzzy yarn), each about 3 inches (7.6 cm) long.
Attach the beard strands to the face area just below the brim using the larkshead knot method (fold a strand in half, insert hook from underneath just below the brim, pull the loop through, and pull the tails through the loop). Trim the beard into a neat V-shape pointing downward, then gently brush the strands with a wire pet slicker brush or fine-tooth comb until fluffy and full.
Assembly
- Nose Placement: Sew the stuffed nose securely to the center of the face right below the Oatmeal brim, overlapping the top edge of the brushed beard.
- Final Shaping: Fluff the beard around the sides of the nose so it frames the face naturally.
Finishing
Weave in all remaining yarn ends securely inside the body. Trim any stray fuzzy fibers around the nose and hat brim for a clean, professional finish.
Size Customization Tips
- To make a taller gnome, add 2 to 4 extra straight rounds of single crochet between Rnds 12 and 13, maintaining the 36-stitch count before changing to the brim.
- To make a wider base, continue the increase rounds by adding one more increase round (
[5 sc, inc] x 6) before switching to the brim color.
Care Instructions
Spot clean gently with a damp cloth and mild soap. Do not submerge in water or machine wash, as the brushed beard fibers and fiberfill stuffing may lose their shape.
FAQ
Can I use bulky yarn instead of worsted weight?
Yes, using a bulky yarn and a larger hook (like a 4.5 mm or 5.0 mm hook) will make a larger gnome—roughly 5 to 6 inches tall—using the exact same stitch proportions.
Is this pattern suitable for complete beginners?
Definitely! Because it’s worked entirely in continuous rounds of single crochet with no complex shaping, an adventurous beginner can easily finish this in under an hour.
Can I give this gnome to a baby under 3 years old?
To make this safe for young children, embroider the nose with simple satin stitches using scrap yarn instead of attaching a stuffed crochet sphere, and ensure all yarn tails are securely woven in.
Happy Crocheting!
I hope you enjoyed making this sweet little holiday gnome! Be sure to save this pin on Pinterest to keep it handy for your holiday crafting queue, and leave a comment below sharing what colors you used for your gnome’s hat.
📄 Your free PDF pattern