










3. Cropped V-Neck Cardigan
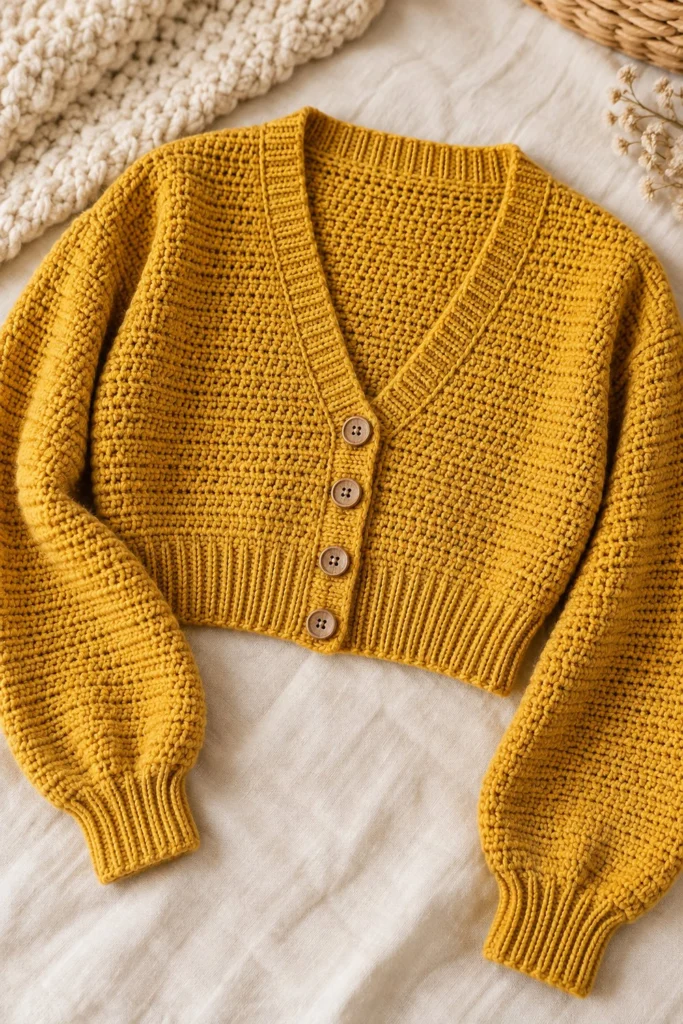
Wrap yourself in warmth and comfort with this stunning textured cropped cardigan, featuring a classic V-neck, ribbed button placket, and gorgeous voluminous balloon sleeves. Designed to fit true to size with a charming vintage silhouette, this piece works up in about 12 hours for a satisfying intermediate project.
Quick Facts
| Skill level | Finished size | Yarn | Hook | Time |
|---|---|---|---|---|
| Easy | S (M, L, XL) | DK Cotton Blend (Cat. 3) | 4.0 mm (US G-6) | 12 hours |
Materials You Will Need
- DK weight cotton blend yarn (Category 3), Mustard Yellow, approximately 1200 (1300, 1400, 1500) meters / 500 (550, 600, 650) grams
- 4.0 mm (US G-6) crochet hook
- 4 wooden buttons (25 mm diameter)
- Tapestry needle
- Stitch markers
- Measuring tape
- Scissors
Gauge
18 sts x 14 rows = 10 x 10 cm in textured half double crochet stitch using a 4.0 mm hook. Gauge is crucial for achieving the correct fit, so be sure to check your gauge before beginning.
Sizes
| Size | To fit bust | Finished bust | Length | Sleeve | Ease |
|---|---|---|---|---|---|
| S | 81-86 cm | 96 cm | 48 cm | 46 cm | 10 cm positive ease |
| M | 91-96 cm | 106 cm | 50 cm | 46 cm | 10 cm positive ease |
| L | 101-106 cm | 116 cm | 52 cm | 48 cm | 10 cm positive ease |
| XL | 111-116 cm | 126 cm | 54 cm | 48 cm | 10 cm positive ease |
The photographed piece is size S.
Abbreviations (US Terms)
- ch = chain
- sl st = slip stitch
- sc = single crochet
- hdc = half double crochet
- dc = double crochet
- blo = back loop only
- flo = front loop only
- inc = increase (work 2 sts into the same st)
- dec = decrease (work 2 sts together)
- st(s) = stitch(es)
- rep = repeat
- RS = right side
- WS = wrong side
UK terms: sc = dc, hdc = htr, dc = tr.
Pattern Notes
- The cardigan is worked in separate pieces (Back panel, Left Front panel, Right Front panel, and two Sleeves) and then seamed together.
- The body and sleeves use a textured half double crochet stitch pattern worked in rows.
- Ribbing for the cuffs, bottom band, and front placket is worked in single crochet through the back loop only.
- Ch 2 at the start of hdc rows does not count as a stitch. Ch 1 at the start of sc rows does not count as a stitch.
- Use stitch markers to keep track of shaping rows where indicated.
Instructions
Back Panel – Mustard Yellow, make 1
Ch 88 (98, 108, 118).
Row 1 (RS): Working in the back bumps of the foundation chain, hdc in 3rd ch from hook and each ch across, turn. (86 [96, 106, 116] sts)
Row 2 (WS): Ch 2, hdc in each st across, turn. (86 [96, 106, 116] sts)
Rows 3 to 45: Rep Row 2. (86 [96, 106, 116] sts)
Fasten off, leaving a 40 cm tail for shoulder seaming.
You now have 86 (96, 106, 116) sts. The piece measures 48 (50, 52, 54) cm in length and 48 (53, 58, 63) cm in width.
Left Front Panel – Mustard Yellow, make 1
Ch 44 (49, 54, 59).
Row 1 (RS): Hdc in 3rd ch from hook and each ch across, turn. (42 [47, 52, 57] sts)
Row 2 (WS): Ch 2, hdc in each st across, turn. (42 [47, 52, 57] sts)
Rows 3 to 35: Rep Row 2. (42 [47, 52, 57] sts)
Row 36 (V-Neck Shaping – RS): Ch 2, hdc to last 2 sts, hdc2tog, turn. (41 [46, 51, 56] sts)
Row 37 (WS): Ch 2, hdc in each st across, turn. (41 [46, 51, 56] sts)
Row 38 (RS): Ch 2, hdc to last 2 sts, hdc2tog, turn. (40 [45, 50, 55] sts)
Row 39 (WS): Ch 2, hdc in each st across, turn. (40 [45, 50, 55] sts)
Row 40 (RS): Ch 2, hdc to last 2 sts, hdc2tog, turn. (39 [44, 49, 54] sts)
Row 41 (WS): Ch 2, hdc in each st across, turn. (39 [44, 49, 54] sts)
Row 42 (RS): Ch 2, hdc to last 2 sts, hdc2tog, turn. (38 [43, 48, 53] sts)
Row 43 (WS): Ch 2, hdc in each st across, turn. (38 [43, 48, 53] sts)
Row 44 (RS): Ch 2, hdc to last 2 sts, hdc2tog, turn. (37 [42, 47, 52] sts)
Row 45 (WS): Ch 2, hdc in each st across, turn. (37 [42, 47, 52] sts)
Fasten off, leaving a 40 cm tail for shoulder seaming.
Right Front Panel – Mustard Yellow, make 1
Ch 44 (49, 54, 59).
Row 1 (RS): Hdc in 3rd ch from hook and each ch across, turn. (42 [47, 52, 57] sts)
Row 2 (WS): Ch 2, hdc in each st across, turn. (42 [47, 52, 57] sts)
Rows 3 to 35: Rep Row 2. (42 [47, 52, 57] sts)
Row 36 (V-Neck Shaping – RS): Ch 2, hdc2tog, hdc to end, turn. (41 [46, 51, 56] sts)
Row 37 (WS): Ch 2, hdc in each st across, turn. (41 [46, 51, 56] sts)
Row 38 (RS): Ch 2, hdc2tog, hdc to end, turn. (40 [45, 50, 55] sts)
Row 39 (WS): Ch 2, hdc in each st across, turn. (40 [45, 50, 55] sts)
Row 40 (RS): Ch 2, hdc2tog, hdc to end, turn. (39 [44, 49, 54] sts)
Row 41 (WS): Ch 2, hdc in each st across, turn. (39 [44, 49, 54] sts)
Row 42 (RS): Ch 2, hdc2tog, hdc to end, turn. (38 [43, 48, 53] sts)
Row 43 (WS): Ch 2, hdc in each st across, turn. (38 [43, 48, 53] sts)
Row 44 (RS): Ch 2, hdc2tog, hdc to end, turn. (37 [42, 47, 52] sts)
Row 45 (WS): Ch 2, hdc in each st across, turn. (37 [42, 47, 52] sts)
Fasten off, leaving a 40 cm tail for shoulder seaming.
Sleeves – Mustard Yellow, make 2
Ch 56 (56, 62, 62).
Row 1 (RS): Hdc in 3rd ch from hook and each ch across, turn. (54 [54, 60, 60] sts)
Row 2: Ch 2, inc in first st, hdc to last st, inc in last st, turn. (56 [56, 62, 62] sts)
Rows 3 to 8: Rep Row 2. (68 [68, 74, 74] sts)
Rows 9 to 38: Ch 2, hdc in each st across, turn. (68 [68, 74, 74] sts)
Fasten off, leaving a 40 cm tail for seaming.
Bottom Ribbing – Mustard Yellow, work along lower edge of body
Join yarn at bottom right corner of the cardigan body.
Row 1: Ch 11, working in back bump of ch, sc in 2nd ch from hook and across ch, sl st to next 2 sts along bottom edge of body, turn. (10 sts)
Row 2: Skip 2 sl st, working in blo, sc across to last st, working through both loops of last st, ch 1, turn. (10 sts)
Row 3: Working in blo, sc across, sl st to next 2 sts along bottom edge, turn. (10 sts)
Repeat Rows 2 and 3 all along the bottom edge from front to front.
Fasten off.
Cuffs – Mustard Yellow, make 2 (work directly onto sleeve edge)
Row 1: Ch 11, sc in 2nd ch from hook and across ch, sl st to next 2 sts along sleeve opening, turn. (10 sts)
Row 2: Skip 2 sl st, working in blo, sc across to last st, work through both loops of last st, ch 1, turn. (10 sts)
Row 3: Working in blo, sc across, sl st to next 2 sts along sleeve edge, turn. (10 sts)
Repeat Rows 2 and 3 all around the sleeve opening.
Fasten off, leaving a long tail to seam the sleeve underarm.
V-Neck and Front Placket Band – Mustard Yellow
Join yarn at bottom right front edge.
Row 1: Working evenly up the right front edge, around the V-neck, and down the left front edge, work sc in each row end and stitch across the neckline, turn. (120 sts)
Rows 2 to 4: Ch 1, sc in blo across each st, turn. (120 sts)
Note: On Row 2, evenly space 4 buttonholes along the right front band (ch 2, skip 2 sts).
Fasten off and weave in all ends.
Assembly
Lay Back panel and Front panels flat with RS facing up. Seam shoulders using mattress stitch across the top 12 (14, 16, 18) cm from each outer edge, leaving the center neck open. Fold sleeves in half lengthwise and sew along the sleeve seam. Align center of sleeve top with shoulder seam and sew sleeves into armhole openings. Fold cardigan sides and seam underarms. Sew four wooden buttons onto the right front band opposite the buttonholes.
Finishing
Weave in all remaining yarn tails securely using a tapestry needle. Block the finished cardigan lightly by pinning to the dimensions given in the sizing table, misting with water, and allowing it to dry completely.
Tips and Common Mistakes
- Do not stretch the ribbed bands while sewing; let them sit naturally against the cardigan body.
- Count your stitches at the end of every shaping row to ensure symmetrical V-neck decreases.
- Ensure you leave long enough yarn tails during panel construction to make seamless mattress stitch joins.
- Block your pieces before assembly to ensure clean edges and precise alignment during seaming.
Frequently Asked Questions
Can I adjust the length of the cropped body?
Yes, simply work fewer or more rows of half double crochet on the back and front panels before starting the V-neck shaping, making sure all three body panels match in row count.
How do I ensure my buttonholes match the buttons I chose?
Test your 25 mm buttons against a trial chain-2 space on a scrap piece of ribbing to make sure the button slides through snugly without stretching the fabric out of shape.
What is the best way to seam the panels together cleanly?
Use the mattress stitch with the matching yarn tails on the right side of the fabric for an invisible, flat seam that mimics the texture of the stitches.
What should I do if my gauge is slightly tighter than specified?
If your gauge is tighter, your finished cardigan will be smaller than the measurements in the table. Try going up a hook size, such as to a 4.5 mm hook, to meet the correct gauge.
📄 Your free PDF pattern