












7. Button Front Cardigan
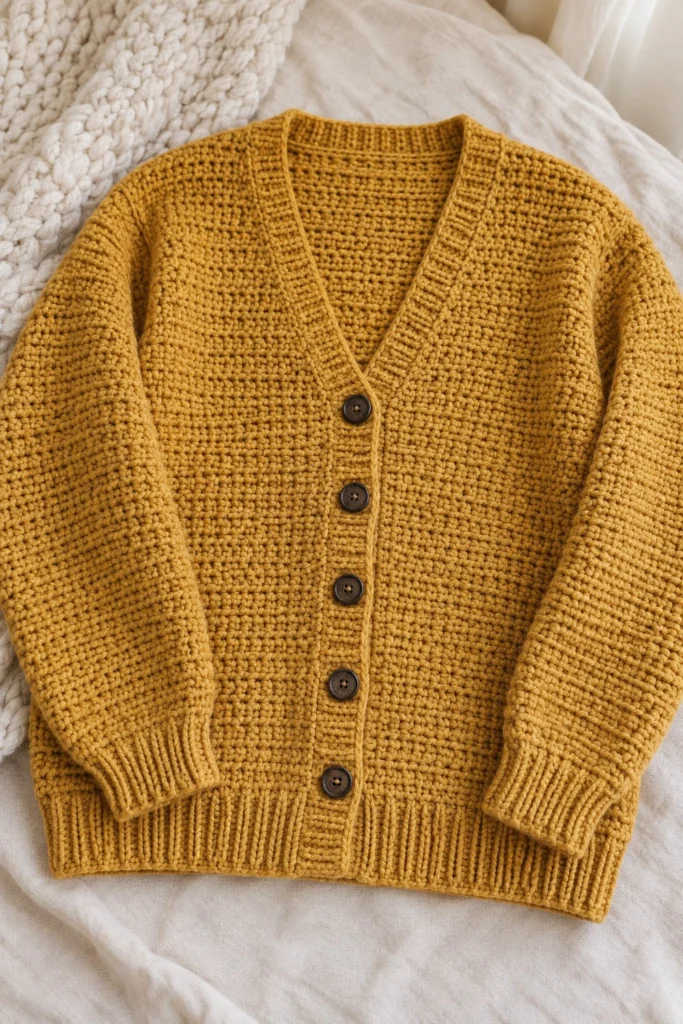
Wrap yourself in cozy warmth with this classic mustard yellow cardigan, featuring a gorgeous textured stitch pattern, deep V-neck, and rich ribbed trims. Finished at 50 cm by 50 cm for an effortless relaxed fit, this timeless layering piece takes about 14 hours of relaxing crochet.
Quick Facts
| Skill level | Finished size | Yarn | Hook | Time |
|---|---|---|---|---|
| Easy | 50 cm width x 50 cm length | Worsted weight acrylic yarn (Cat. 4) | 5.0 mm (US H-8) | 14 hours |
Materials You Will Need
- Worsted weight acrylic yarn (Category 4) in Mustard Yellow: approx. 650 grams (approx. 1200 metres)
- 5.0 mm (US H-8) crochet hook
- 5 dark brown wooden buttons (25 mm diameter)
- Tapestry needle for weaving ends
- Measuring tape and stitch markers
Gauge
14 sts x 14 rows = 10 x 10 cm in textured moss stitch using a 5.0 mm hook. Gauge is important for achieving the correct finished measurements and fit.
Sizes
| Size | To fit bust | Finished bust | Length | Sleeve |
|---|---|---|---|---|
| S | 80-85 cm | 100 cm | 50 cm | 45 cm |
| M | 90-95 cm | 106 cm | 52 cm | 46 cm |
| L | 100-105 cm | 112 cm | 54 cm | 47 cm |
| XL | 110-115 cm | 118 cm | 56 cm | 48 cm |
Ease: +15 to +20 cm. The photographed piece is size S.
Abbreviations (US Terms)
- ch = chain
- sc = single crochet
- hdc = half double crochet
- sl st = slip stitch
- st = stitch
- sts = stitches
- sk = skip
- inc = increase (work 2 sc in same st)
- dec = decrease (sc 2 together)
- BLO = back loop only
- RS = right side
- WS = wrong side
UK terms: sc = dc, hdc = htr, dc = tr.
Pattern Notes
- The cardigan is worked in separate flat pieces (Back, Left Front, Right Front, and two Sleeves) from the bottom up, then seamed together.
- Edgings (ribbed hem, button bands, and collar) are worked directly onto the finished edges.
- The main body uses a moss stitch variation (alternating sc and ch-1 spaces, or a tightly textured hdc/sc moss blend) to create the dense, woven look seen in the photo.
- Stitch counts are listed in brackets at the end of every row.
Instructions
Back Panel – Mustard Yellow, make 1
Row 1: Ch 72 (76, 80, 84), working into the back bump of the foundation chain, work 1 hdc in each ch across, turn. (71, 75, 79, 83 sts)
Row 2 (RS): Ch 1 (does not count as st here and throughout), working in moss stitch (sc, ch 1, sk next st) across to last st, 1 sc in last st, turn. (35, 37, 39, 41 sc)
Rows 3 to 50: Repeat Row 2 to maintain the textured stitch pattern until piece measures approx. 44 cm from foundation. (35, 37, 39, 41 sc)
Row 51: Begin shoulder shaping, working in pattern across first 20 (21, 22, 23) sts, turn, leaving remaining sts unworked. (10, 11, 11, 12 sc)
Rows 52 to 54: Continue shaping shoulders over 3 rows, then fasten off. (10, 11, 11, 12 sc)
Repeat for the other shoulder, leaving the center 31 (33, 35, 37) sts unworked for the back neckline. Fasten off and weave in ends.
Left Front Panel – Mustard Yellow, make 1
Row 1: Ch 36 (38, 40, 42), 1 hdc in each ch across, turn. (35, 37, 39, 41 sts)
Row 2 (RS): Work in moss stitch pattern across to end, turn. (17, 18, 19, 20 sc)
Rows 3 to 38: Continue in pattern until work reaches underarm shaping (approx. 32 cm). (17, 18, 19, 20 sc)
Rows 39 to 54: Begin V-neck shaping along the inner edge by decreasing 1 st every alternate row while maintaining the straight armhole edge on the outer side. Fasten off at shoulder height matching the back panel. (10, 11, 11, 12 sc)
Right Front Panel – Mustard Yellow, make 1
Row 1: Ch 36 (38, 40, 42), 1 hdc in each ch across, turn. (35, 37, 39, 41 sts)
Row 2 (RS): Work in moss stitch pattern across to end, turn. (17, 18, 19, 20 sc)
Rows 3 to 38: Continue in pattern until work reaches underarm shaping (approx. 32 cm). (17, 18, 19, 20 sc)
Rows 39 to 54: Work V-neck shaping symmetrically to the Left Front Panel. Fasten off at shoulder height. (10, 11, 11, 12 sc)
Sleeves – Mustard Yellow, make 2
Row 1: Ch 36 (38, 40, 42), 1 hdc in each ch across, turn. (35, 37, 39, 41 sts)
Row 2: Work in moss stitch pattern across, turn. (17, 18, 19, 20 sc)
Rows 3 to 42: Increase 1 st at each end every 6 rows to shape the sleeve taper, maintaining moss stitch in between. (23, 24, 25, 26 sc)
Rows 43 to 46: Work even in pattern. Fasten off, leaving a long tail for seaming. (23, 24, 25, 26 sc)
Assembly
Seam the shoulder seams of the front panels to the back panel using mattress stitch. Sew the sleeve caps to the armhole openings, centering the top of the sleeve with the shoulder seam. Sew the underarm and side seams from the cuff up to the hem.
Finishing
Work the Bottom Ribbing: Join yarn at the bottom edge of the cardigan, ch 9, work slip stitch ribbing in BLO across the entire lower edge, attaching to the body every 2 rows with a sl st. Fasten off.
Work the Front Bands and Collar: Join yarn at the lower right front corner, work a row of evenly spaced sc up the right front edge, around the V-neck, and down the left front edge. Work 4 more rows of ribbed texture for the button band. On the right button band row, create 5 evenly spaced buttonholes by chaining 2 and skipping 2 sts. Sew 5 dark brown buttons opposite the buttonholes. Weave in all remaining ends and block lightly.
Tips and Common Mistakes
- Count your moss stitch spaces carefully on every row to keep the side edges perfectly straight.
- When working the ribbed cuffs and bottom band, keep your tension slightly firm so the ribbing pulls in nicely.
- Make sure your buttonhole spacing is measured out and pinned before you begin sewing the buttons on.
- Block your pieces flat before seaming to ensure clean, professional edges.
Frequently Asked Questions
Can I adjust the length of the cardigan?
Yes, you can easily add or subtract rows from the main body panels before starting the V-neck shaping, making sure to adjust your yarn quantity accordingly.
How do I ensure my buttonholes are evenly spaced?
Measure the total length of the front band opening, divide by 6 to find equal intervals, and mark the placement with locking stitch markers before crocheting the buttonhole row.
What is the best way to seam the pieces together?
Use the mattress stitch on the right side of the fabric; it creates an invisible, flat seam that blends seamlessly into the textured stitch pattern.
How should I wash and care for this cardigan?
Hand wash gently in cool water with mild wool detergent, lay flat on a towel to dry in the shade, and avoid hanging it up while wet to prevent stretching.
📄 Your free PDF pattern