
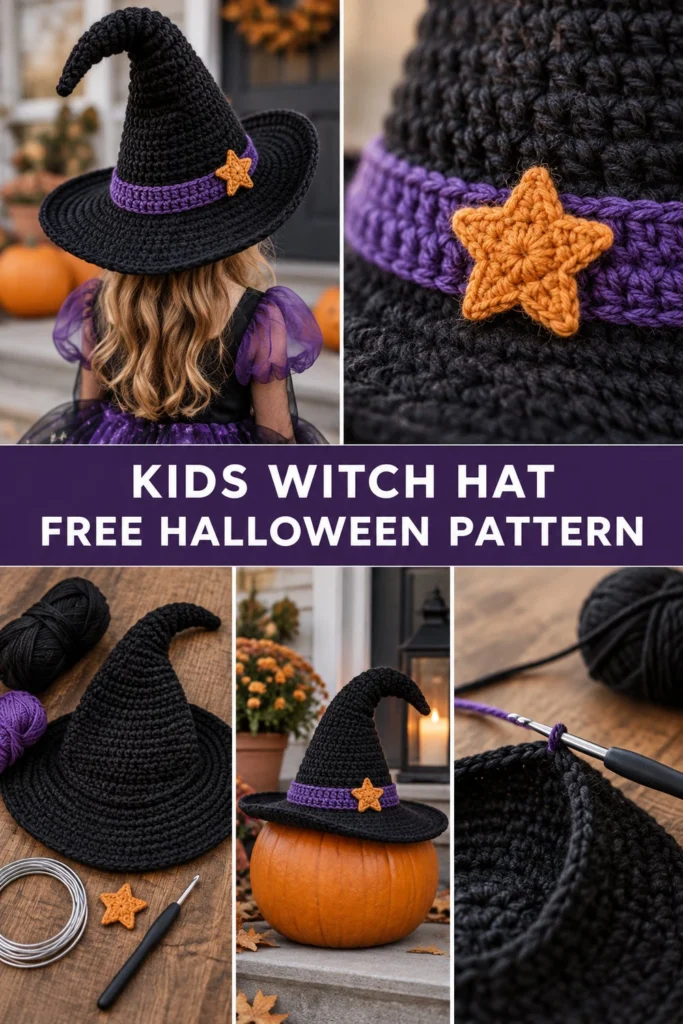
Every little witch needs the perfect handmade accessory to complete their Halloween look, and this crochet witch hat is designed to delight. Featuring a tall, elegantly curved crown, a supportive wide brim that holds its shape, and a vibrant purple accent band finished with a textured orange star, it brings magical storybook charm straight to life.
Wearable Crochet Witch Hat for Kids Free Halloween Pattern
Quick Facts
- Skill level: Intermediate
- Finished size: Child size (fits head circumference approx. 19 to 21 inches / 48 to 53 cm)
- Yarn: Worsted weight (Medium 4) acrylic or wool blend
- Hook: US H/8 (5.0 mm)
- Stitches used: ch, sl st, sc, inc, dec, BLO, FLO
- Time to make: 5 to 7 hours
What Makes This Crochet Witch Hat Special
This hat is engineered specifically to look like a classic storybook witch hat while remaining completely wearable and durable for active kids. The crown is worked in continuous rounds using gradual increases to create that signature tall, dramatic peak that naturally curves on its own. The wide brim relies on a clever hidden craft wire inserted into the final round to keep the edge stiff and stylish without drooping. Finally, the contrasting purple band and cheerful dimensional star add a pop of festive autumn color.
Skill Level
- Working in the round (spiral)
- Basic increases and invisible decreases
- Working into front loops only (FLO) and back loops only (BLO)
- Basic crochet shaping and finishing
- Confidence with intermediate stitch placements and tension control
Finished Measurements
- Brim Diameter: 12 inches / 30.5 cm across
- Crown Height: 11 inches / 28 cm tall
- Head Opening Circumference: 20 inches / 50.8 cm
Materials You Will Need
| Material | Color / Shade | Yarn Weight / Type | Quantity |
|---|---|---|---|
| Main Yarn | Black | Worsted (4) Acrylic | 350 yards / 320 meters |
| Band Yarn | Purple | Worsted (4) Acrylic | 60 yards / 55 meters |
| Star Yarn | Orange | Worsted (4) Acrylic | 15 yards / 14 meters |
| Crochet Hook | – | US H/8 (5.0 mm) | 1 hook |
| Notions | – | Aluminum craft wire (12-gauge, approx. 40 inches / 100 cm) | 1 piece |
| Notions | – | Tapestry needle, stitch markers, scissors, pliers (for wire ends) | – |
Yarn Suggestions
| Yarn Line | Weight | Skein Yardage | Notes |
|---|---|---|---|
| Lion Brand Vanna’s Choice | Worsted (4) | 170 yds / 156 m | Excellent stitch definition and holds hat shape well |
| Caron Simply Soft | Worsted (4) | 315 yds / 288 m | Soft with a lovely sheen, requires slightly tighter tension |
| Red Heart Super Saver | Worsted (4) | 364 yds / 333 m | Very durable, holds wire structure firmly |
Gauge
- 14 sc and 16 rows = 4 inches / 10 cm using a 5.0 mm hook in single crochet.
- Circle Gauge: Rnds 1 to 5 of flat crown base = 3 inches / 7.6 cm across.
Abbreviations
| Abbreviation | Meaning |
|---|---|
| ch | chain |
| sl st | slip stitch |
| sc | single crochet |
| inc | single crochet increase (2 sc in the same st) |
| dec | single crochet decrease (sc2tog using front loops) |
| BLO | back loop only |
| FLO | front loop only |
| rep | repeat |
| st(s) | stitch(es) |
| Rnd(s) | round(s) |
Special Stitches Explained
- Magic Ring (MR): Wrap yarn around your index finger twice, insert hook under rings, draw up a loop, ch 1, and work initial stitches into the center of the ring. Pull tail to close.
- Invisible Decrease (dec): Insert hook into the front loop only of the next stitch, then insert hook into the front loop only of the following stitch. Yarn over and pull through both front loops, yarn over and pull through remaining two loops on hook.
Pattern Instructions
* The crown and brim are worked in continuous spiral rounds without joining unless specified. Use a stitch marker to track the first stitch of each round.
* Do not count the turning chains or slip stitches unless noted.
Section 1: Crown and Point (Black)
Rnd 1: Work 6 sc in a Magic Ring (6 sc)
Rnd 2: sc in each st around (6 sc)
Rnd 3: (1 sc, inc) x 3 (9 sc)
Rnds 4 to 5: sc in each st around (9 sc)
Rnd 6: (2 sc, inc) x 3 (12 sc)
Rnd 7: sc in each st around (12 sc)
Rnd 8: (3 sc, inc) x 3 (15 sc)
Rnds 9 to 10: sc in each st around (15 sc)
Rnd 11: (4 sc, inc) x 3 (18 sc)
Rnd 12: sc in each st around (18 sc)
Rnd 13: (2 sc, inc) x 6 (24 sc)
Rnds 14 to 15: sc in each st around (24 sc)
Rnd 16: (3 sc, inc) x 6 (30 sc)
Rnds 17 to 18: sc in each st around (30 sc)
Rnd 19: (4 sc, inc) x 6 (36 sc)
Rnds 20 to 21: sc in each st around (36 sc)
Rnd 22: (5 sc, inc) x 6 (42 sc)
Rnds 23 to 24: sc in each st around (42 sc)
Rnd 25: (6 sc, inc) x 6 (48 sc)
Rnds 26 to 27: sc in each st around (48 sc)
Rnd 28: (7 sc, inc) x 6 (54 sc)
Rnds 29 to 30: sc in each st around (54 sc)
Rnd 31: (8 sc, inc) x 6 (60 sc)
Rnds 32 to 33: sc in each st around (60 sc)
Rnd 34: (9 sc, inc) x 6 (66 sc)
Rnds 35 to 36: sc in each st around (66 sc)
Rnd 37: (10 sc, inc) x 6 (72 sc)
Rnds 38 to 39: sc in each st around (72 sc)
Rnd 40: (11 sc, inc) x 6 (78 sc)
Rnds 41 to 42: sc in each st around (78 sc)
Rnd 43: (12 sc, inc) x 6 (84 sc)
Rnds 44 to 45: sc in each st around (84 sc)
Rnd 46: (13 sc, inc) x 6 (90 sc)
Rnds 47 to 48: sc in each st around (90 sc)
Rnd 49: (14 sc, inc) x 6 (96 sc)
Rnds 50 to 51: sc in each st around (96 sc)
Rnd 52: (15 sc, inc) x 6 (102 sc)
Rnds 53 to 54: sc in each st around (102 sc)
Rnd 55: (16 sc, inc) x 6 (108 sc)
Rnds 56 to 57: sc in each st around (108 sc)
Fasten off black yarn, leaving a short tail.
Section 2: Purple Accent Band (Purple, make 1)
Join Purple yarn to any stitch at the base of the crown.
Rnd 1: ch 1, sc in each st around, sl st to first sc to join (108 sc)
Rnd 2: ch 1, hdc in each st around, sl st to first hdc to join (108 hdc)
Rnd 3: ch 1, hdc in each st around, sl st to first hdc to join (108 hdc)
Rnd 4: ch 1, sc in each st around, sl st to first sc to join (108 sc)
Fasten off purple yarn, weaving in ends.
Section 3: Brim (Black)
Join Black yarn into the back loops of Rnd 4 of the purple band.
Rnd 1 (BLO): ch 1, working in BLO, sc in each st around (108 sc)
Rnd 2: (3 sc, inc) x 27 (135 sc)
Rnd 3: sc in each st around (135 sc)
Rnd 4: (4 sc, inc) x 27 (162 sc)
Rnd 5: sc in each st around (162 sc)
Rnd 6: (5 sc, inc) x 27 (189 sc)
Rnd 7: sc in each st around (189 sc)
Rnd 8: (6 sc, inc) x 27 (216 sc)
Rnd 9: sc in each st around (216 sc)
Rnd 10: (7 sc, inc) x 27 (243 sc)
Rnd 11: sc in each st around (243 sc)
Rnd 12: (8 sc, inc) x 27 (270 sc)
Rnd 13: sc in each st around (270 sc)
Rnd 14: Position your craft wire circle inside the outer edge of the work. Working around the wire, sc in each stitch around to encase the wire firmly inside the final round (270 sc)
Fasten off, weave in all remaining ends securely. Use pliers to twist and tape the wire ends together before fully enclosing the final few stitches.
Section 4: Star Applique (Orange, make 1)
Rnd 1: Work 5 sc in a Magic Ring, sl st to join (5 sc)
Rnd 2: (ch 4, working down the chain: sl st in 2nd ch from hook, sc in next ch, hdc in next ch. Skip 1 st on ring, sl st into next st on ring) x 5.
Fasten off, leaving a long tail for sewing.
Assembly
- Star Placement: Position the orange star securely onto the center front of the purple hat band, covering approximately Rnds 2 and 3 of the band.
- Attaching: Using the orange yarn tail and tapestry needle, whipstitch the edges of the star firmly to the purple band so it sits flat and neat.
Finishing
- Check the brim wire to ensure no sharp ends poke through the crochet stitches. Trim any excess yarn tails neatly with scissors.
- Lightly steam block the brim if necessary to ensure it lies completely flat.
Size Customization Tips
- To fit toddlers (ages 2-4): Stop crown increases at Rnd 45 (90 sc total before starting the purple band), then adjust brim increase intervals down by one st per repeat.
- To fit older children (ages 9-12): Continue crown increases up to Rnd 60 (114 sc total), then increase brim repeats accordingly to widen the base opening.
Care Instructions
Spot clean by hand with mild detergent and cool water as needed. Do not machine wash or tumble dry, as machine agitation may warp the internal craft wire and distort the shape of the crown. Reshape while damp and allow to air dry completely.
FAQ
Can I use cotton yarn instead of acrylic?
Yes, cotton yarn works wonderfully and offers crisp stitch definition, though it is slightly heavier, which may cause the tall pointed crown to flop over more easily. You may need to insert a lightweight wire or pipe cleaner inside the tip if you want it to stand rigidly upright.
How do I stop the brim from curling upward?
Curling usually happens if your tension is too tight during the increase rounds of the brim. Make sure you are maintaining even tension, and use the craft wire in Rnd 14 to force the brim to lay perfectly flat.
Is the craft wire safe for kids’ costumes?
Yes, provided the ends are twisted together securely and tucked deep inside the stitches of the final round. You can also wrap the cut ends of the wire with electrical tape or floral tape before encasing them to ensure they never poke through.