
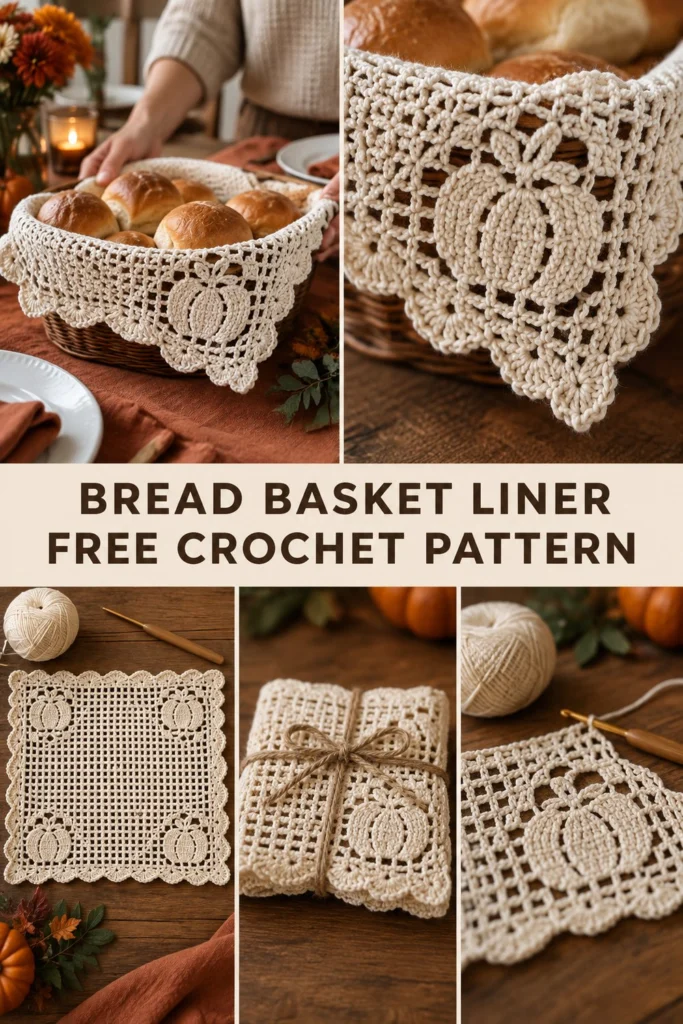
Warm dinner rolls deserve a pretty home at your holiday gathering, and this cream bread basket liner adds an instant touch of handmade elegance to your Thanksgiving table. Working from the centre out in rounds, you will create a classic filet mesh square featuring a lacy little pumpkin motif in each corner, finished with a scalloped edge designed to drape gracefully over your basket rim.
Thanksgiving Crochet Bread Basket Liner Free Pattern
Quick Facts
- Skill level: Intermediate
- Finished size: 14 inches (35.5 cm) square
- Yarn: Worsted weight (Category 4) 100% cotton yarn, approx. 280 yards (256 meters)
- Hook: 4.5 mm (US 7) crochet hook
- Stitches used: Chain, slip stitch, single crochet, double crochet
- Time to make: 5 to 7 hours
What Makes This Bread Basket Liner Special
This piece combines traditional filet crochet grids with textured cluster pumpkins, resulting in a lightweight yet structured mat. Working from the centre out allows the square to grow evenly while placing the pumpkin motifs precisely in all four corners. The final round adds a delicate shell scallop that catches the rim of a wicker basket, holding the linen securely in place while dinner rolls are passed around the table.
Skill Level
- Working in the round from a center start
- Reading a simple filet mesh grid and turning rows/rounds
- Basic shaping and corner increases
- Working post stitches or basic textured clusters for pumpkins
Don’t worry if you are new to filet crochet—the step-by-step instructions below walk you through every mesh block and corner increase!
Finished Measurements
| Dimension | Inches | Centimeters |
|---|---|---|
| Width (Flat) | 14 in | 35.5 cm |
| Length (Flat) | 14 in | 35.5 cm |
Materials You Will Need
| Material | Type / Color | Amount |
|---|---|---|
| Yarn | Worsted Weight Cotton / Cream | 280 yards (256 meters) |
| Crochet Hook | 4.5 mm (US 7) | 1 hook |
| Notions | Yarn needle, scissors, stitch markers | As needed |
Yarn Suggestions
| Brand | Line | Skein Yardage | Notes |
|---|---|---|---|
| Lion Brand | Re-Discovered Cotton | 212 yds / 194 m | Soft, matte finish, ideal drape |
| Lily | Sugar’n Cream | 120 yds / 109 m | Durable, widely available, budget-friendly |
| Peaches & Crème | Cotton Solids | 120 yds / 109 m | Great stitch definition |
Gauge
- 16 sts x 8 rows = 4 inches (10 cm) in double crochet mesh.
Abbreviations
- ch: chain
- dc: double crochet
- hdc: half double crochet
- sc: single crochet
- sl st: slip stitch
- sp: space
- st(s): stitch(es)
- rep: repeat
- sk: skip
- inc: increase (work 2 sts in same st)
- dec: decrease (work 2 sts together)
- RS: right side
UK translations for reference: sc = dc, hdc = htr, dc = tr.
Special Stitches Explained
- Magic Ring: Hold yarn tail in hand, wrap working yarn around two fingers to form a loop, insert hook through loop, pull up a loop, and ch 1 to secure.
- Filet Mesh Block: (1 dc, ch 2, 1 dc) or (1 dc, ch 2, sk 2 sts, 1 dc) depending on whether you are working into stitches or chain spaces.
- Pumpkin Motif (Solid Block): Worked as a cluster of filled double crochets (e.g., 4 dc in a ch-2 space) to form the textured pumpkin body in each corner.
Pattern Instructions
Pattern Notes
- The liner is worked from the center outward in joined rounds.
- Beginning chains-3 count as a double crochet unless stated otherwise.
- Use stitch markers in corner chain spaces to keep track of your increases.
Section 1: Center Square & Pumpkin Motifs
Rnd 1 (RS): Start with a magic ring, ch 3 (counts as 1 dc here and throughout), work [2 dc, ch 2, 3 dc, ch 2] 3 times into the ring, join with sl st to top of beg ch-3 (24 dc, 4 ch-2 sps).
Rnd 2: Sl st into next 2 dc and into corner ch-2 sp, ch 3, (1 dc, ch 2, 2 dc) in same corner sp, ch 2, skip 3 dc, work (2 dc, ch 2, 2 dc) in next corner ch-2 sp rep from * around, ch 2, join with sl st to top of beg ch-3 (32 dc, 8 ch-2 sps).
Rnd 3: Sl st into next dc and corner ch-2 sp, ch 3, (1 dc, ch 2, 2 dc) in same corner sp, (ch 2, work 1 dc in next ch-2 sp) twice, ch 2, work (2 dc, ch 2, 2 dc) in next corner sp rep from * around, ending with ch 2, join with sl st to top of beg ch-3 (40 dc, 12 ch-2 sps).
Rnds 4 to 8: Continue working in joined rounds, expanding the filet mesh grid across the sides while working corner increases (2 dc, ch 2, 2 dc) in every corner ch-2 space, and shaping the 4 corner pumpkin motifs by filling in solid dc blocks over Rnds 6-8 according to the corner mesh layout (80 dc, 32 ch-2 sps by Rnd 8).
Section 2: Scalloped Border
Rnd 9: Join cream yarn in any corner sp, ch 1, work 3 sc in same corner sp, sc in each dc and 2 sc in each ch-2 sp across side to next corner, 3 sc in corner sp rep from * around, join with sl st to first sc (192 sc).
Rnd 10: Ch 1, [skip 1 st, 5 dc in next st, skip 1 st, sc in next st] rep around the entire square, working 3 dc in corner stitches to keep the turn smooth, join with sl st to first dc (240 dc).
Fasten off yarn. Weave in all loose ends securely with a yarn needle.
Assembly and Blocking
- Block your finished liner lightly by pinning it to a 14-inch square on a blocking board, misting with water, and allowing it to dry completely to crisp up the mesh and pumpkin details.
- Place inside your favorite bread basket, draping the scalloped corners gracefully over the rim.
Size Customization Tips
- Making it larger: Work 2 additional rounds of filet mesh (repeating the side ch-2 blocks) before starting the final border round. Each extra mesh round adds approximately 1.5 inches to the overall width.
- Making it smaller: Stop the center square after Rnd 6 and proceed directly to the border rounds.
Care Instructions
- Hand wash or machine wash on a gentle, cool cycle using mild detergent.
- Lay flat to dry on a towel, reshaping gently while damp.
- Warm iron if needed, avoiding flattening the textured pumpkin clusters.
FAQ
Can I use acrylic yarn instead of cotton?
While you can use acrylic, 100% cotton is strongly recommended because it holds a crisper block, lays flat against the basket, and handles warm bread rolls safely without melting or trapping synthetic odors.
How do I adjust this pattern for a rectangular basket?
To make a rectangle, start with a foundation chain instead of a magic ring, working rows of filet mesh to your desired length before working the corner rounds and scalloped border.
Is this project suitable for an advanced beginner?
Yes! If you are comfortable with basic double crochets and counting chain spaces, you will find this pattern straightforward thanks to the repetitive filet grid structure.