











8. Snowflake Cozy Mitten
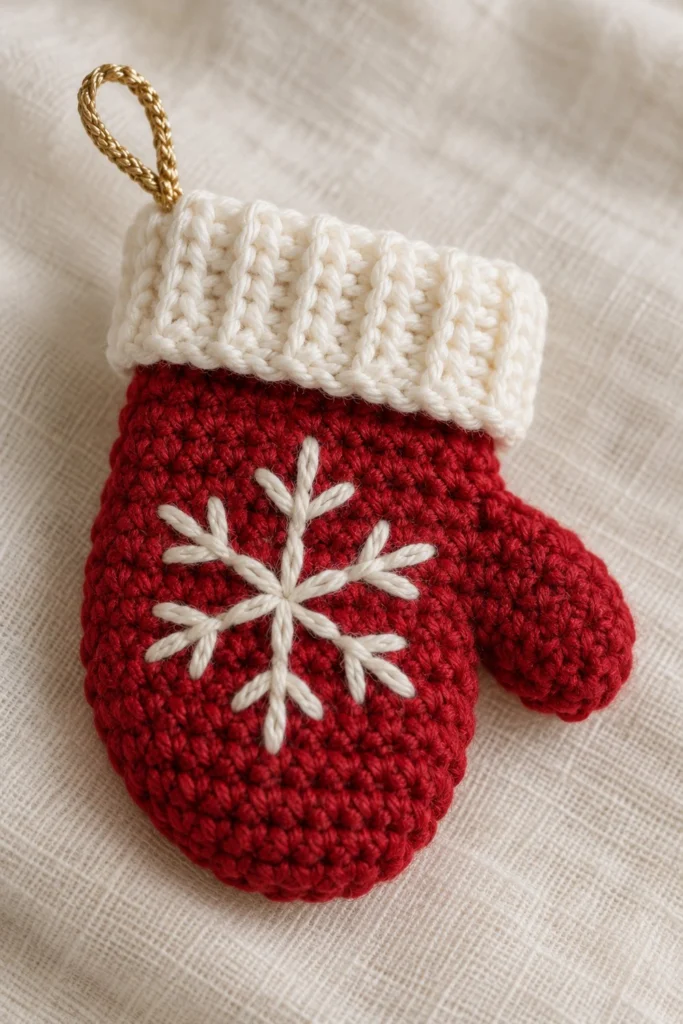
Add a touch of handmade magic to your holiday tree with this charming crochet snowflake mitten ornament. Featuring crisp white ribbing and a delicate embroidered snowflake on a rich red background, this miniature mitten works up quickly and includes a golden hanging loop for easy display. Finished size is 3.5 inches tall.
Quick Facts
| Skill level | Finished size | Yarn | Hook | Time |
|---|---|---|---|---|
| Easy | 3.5 in / 9 cm tall | DK cotton (Cat. 3) | 3.0 mm (US D/3) | 45 minutes |
Materials You Will Need
- DK weight cotton yarn in Red (approx. 15 grams / 35 metres)
- DK weight cotton yarn in White (approx. 10 grams / 25 metres)
- Small scrap of gold cord or metallic thread for the hanging loop (approx. 15 cm)
- 3.0 mm (US D/3) crochet hook
- Tapestry needle
- Polyfill stuffing (small amount)
- Stitch marker
Gauge
The first 3 rounds of the mitten hand measure approximately 3 cm across. Working with even tension matters more than exact gauge for this decorative ornament.
Abbreviations (US Terms)
- ch – chain
- sc – single crochet
- hdc – half double crochet
- blo – back loop only
- flo – front loop only
- sl st – slip stitch
- inc – increase (work 2 sc in the same stitch)
- dec – decrease (insert hook into front loops of next 2 sts, yarn over, pull through both loops, yarn over, pull through remaining 2 loops)
- st(s) – stitch(es)
- rnd(s) – round(s)
UK terms: sc = dc, hdc = htr, dc = tr.
Pattern Notes
- The hand is worked in continuous spiral rounds without joining, unless otherwise stated. Use a stitch marker to track the first stitch of each round.
- The cuff is worked in joined rows, then slip-stitched directly onto the top edge of the hand.
- Stitch counts are shown in brackets at the end of every round.
Instructions
Mitten Hand – Red, make 1
Rnd 1: 6 sc in a magic ring (6)
Rnd 2: inc x 6 (12)
Rnd 3: (sc in next st, inc in next st) x 6 (18)
Rnd 4: (sc in next 2 sts, inc in next st) x 6 (24)
Rnd 5 to Rnd 9: sc in each st around (24)
Rnd 10: sc in next 9 sts, skip next 6 sts for thumb hole, sc in next 9 sts (18)
Rnd 11: sc in next 9 sts, work 6 sc across the skipped thumb gap, sc in next 9 sts (24)
Rnd 12 to Rnd 14: sc in each st around (24)
Rnd 15: (sc in next 2 sts, dec) x 6 (18)
Stuff the hand firmly now.
Rnd 16: (sc in next st, dec) x 6 (12)
Rnd 17: dec x 6 (6)
Fasten off, leave a 15 cm tail, thread through front loops of remaining 6 sts, pull tight to close, and weave in end inside the mitten.
Thumb – Red, make 1
Join red yarn in any unworked stitch around the thumb hole opening.
Rnd 1: work 8 sc evenly around the thumb opening (8)
Rnd 2 and Rnd 3: sc in each st around (8)
Stuff the thumb lightly.
Rnd 4: dec x 4 (4)
Fasten off, leave a 10 cm tail, thread through front loops of remaining 4 sts, pull tight to close, and tuck the tail inside.
Cuff – White, make 1
The cuff is worked in rows of ribbing, then seamed into a ring.
Ch 9.
Row 1: sc in 2nd ch from hook and in each ch across, turn (8)
Row 2 to Row 20: ch 1, working in blo, sc in each st across, turn (8)
Bring the first and last rows together and slip stitch through both layers across to form a tube. Do not fasten off; you will use the working yarn to join the cuff to the top of the mitten hand.
Assembly
Slip the white ribbed cuff over the top opening of the red mitten hand so that the bottom edge of the cuff sits right above Round 14 of the hand. Using the remaining white yarn tail or a new strand, whipstitch the inner bottom edge of the cuff securely to the top edge of the mitten hand.
Finishing
Thread a tapestry needle with white yarn and embroider a six-pointed snowflake motif onto the center of the front of the red mitten hand using straight stitches and french knots at the tips. Fold a 15 cm piece of gold cord in half to form a small loop, knot the ends securely together, and sew the knot firmly to the inside top rim of the white cuff. Weave in all remaining yarn ends securely.
Tips and Common Mistakes
- Visible gaps at the thumb: If you notice tiny holes where the thumb meets the hand, use your starting tail to take a few neat anchor stitches on the inside.
- Cuff too loose or tight: Row count for the cuff can be adjusted up or down by 1 or 2 rows if your tension differs, ensuring it fits snugly around the top of the mitten.
- Embroidery symmetry: Mark the center point of the snowflake with a spare pin or scrap yarn before stitching to keep the design balanced.
- Stitch count wandering: Always use a stitch marker in the first stitch of continuous rounds to avoid accidentally adding or dropping stitches on the hand.
Frequently Asked Questions
How do I ensure the embroidered snowflake looks centered?
Position your mitten flat on a table, find the midpoint between the left and right edges on the lower half of the hand, and place your first vertical stitch directly over Round 7.
Can I use worsted weight yarn instead of DK?
You can, but it will make the finished ornament noticeably larger and require a larger hook size, such as 3.5 mm or 4.0 mm, to maintain good crochet tension.
How do I clean this ornament if it gets dusty?
Spot clean gently with a damp cloth and mild soap, then lay flat on a towel to air dry completely. Do not machine wash or submerge fully.
What should I do if my stitch count on the hand comes out to 25 instead of 24?
Simply work an extra decrease in the next round to bring your total back to the correct count before moving on.
📄 Your free PDF pattern