











4. Crochet Gingerbread Man
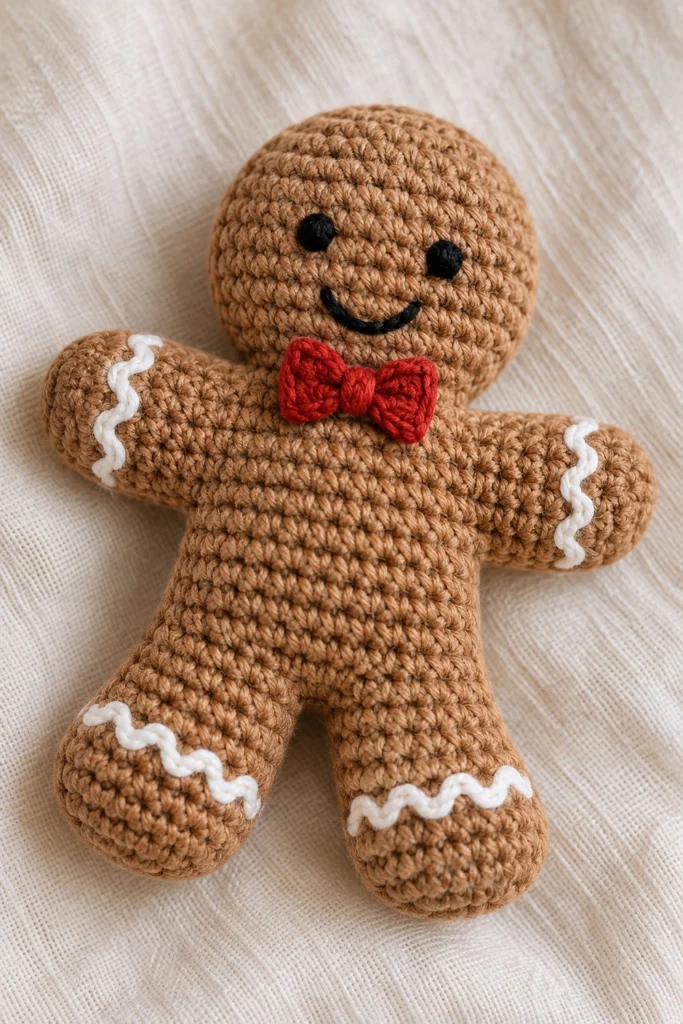
Bake a batch of everlasting holiday cheer with this sweet, huggable crochet gingerbread man! Featuring classic white icing zigzags and a dashing red bow tie, this charming plush makes a delightful handmade gift, tree ornament, or festive table decoration that takes just an hour to stitch together.
Quick Facts
| Skill level | Finished size | Yarn | Hook | Time |
|---|---|---|---|---|
| Easy | 4 in / 10 cm tall | DK cotton (Cat. 3) | 3.0 mm (US D/3) | 1 hour |
Materials You Will Need
- DK cotton yarn (Category 3) in Gingerbread Brown (approx. 20 grams, 50 metres)
- Small amounts of White DK cotton for icing zigzags
- Small amount of Red DK cotton for the bow tie
- Small amount of Black embroidery floss or yarn for the facial features
- 3.0 mm (US D/3) crochet hook
- Polyester fiberfill stuffing
- Tapestry needle
- Scissors
- Stitch marker
Gauge
The first 2 rounds of the head measure approximately 2 cm across. Working with even, firm tension is more important than exact gauge to ensure the fiberfill does not show through the stitches.
Abbreviations (US Terms)
- ch: chain
- sc: single crochet
- hdc: half double crochet
- dc: double crochet
- sl st: slip stitch
- inc: single crochet increase (work 2 sc in the same st)
- dec: single crochet decrease (sc 2 stitches together)
- BLO: back loop only
- st(s): stitch(es)
- rnd(s): round(s)
UK terms: sc = dc, hdc = htr, dc = tr.
Pattern Notes
- All parts are worked in continuous spiral rounds unless stated otherwise. Do not join with a slip stitch or turn at the end of rounds.
- Use a stitch marker to keep track of the first stitch of each round.
- Stitch counts for every round are shown in brackets at the end of the line.
- Stuff pieces firmly as you go, ensuring limbs and extremities are well-filled before closing.
Instructions
Head – Gingerbread Brown, make 1
Rnd 1: 6 sc in a magic ring (6)
Rnd 2: inc x 6 (12)
Rnd 3: (sc in next st, inc) x 6 (18)
Rnd 4: (sc in next 2 sts, inc) x 6 (24)
Rnd 5: (sc in next 3 sts, inc) x 6 (30)
Rnd 6: (sc in next 4 sts, inc) x 6 (36)
Rnd 7: (sc in next 5 sts, inc) x 6 (42)
Rnds 8-13: sc in all 42 sts around (42)
Rnd 14: (sc in next 5 sts, dec) x 6 (36)
Rnd 15: (sc in next 4 sts, dec) x 6 (30)
Rnd 16: (sc in next 3 sts, dec) x 6 (24)
Stuff firmly now.
Rnd 17: (sc in next 2 sts, dec) x 6 (18)
Fasten off, leave a 30 cm tail for sewing the head to the body.
Body – Gingerbread Brown, make 1
Rnd 1: 6 sc in a magic ring (6)
Rnd 2: inc x 6 (12)
Rnd 3: (sc in next st, inc) x 6 (18)
Rnd 4: (sc in next 2 sts, inc) x 6 (24)
Rnds 5-8: sc in all 24 sts around (24)
Fasten off, leave a 20 cm tail.
Leg (make 2) – Gingerbread Brown, make 2
Rnd 1: 6 sc in a magic ring (6)
Rnd 2: inc x 6 (12)
Rnd 3: (sc in next st, inc) x 6 (18)
Rnds 4-6: sc in all 18 sts around (18)
Stuff firmly now.
Fasten off the first leg, leaving a short tail to close any small gap at joining. Do not fasten off the second leg; continue directly into joining the legs for the lower body.
Arms (make 2) – Gingerbread Brown, make 2
Rnd 1: 6 sc in a magic ring (6)
Rnd 2: (sc in next st, inc) x 3 (9)
Rnds 3-6: sc in all 9 sts around (9)
Stuff lightly.
Rnd 7: flatten the opening and sc across both layers through 4 sts to close (4)
Fasten off, leave a 20 cm tail for sewing.
Bow Tie – Red, make 1
Row 1: Ch 9, sc in 2nd ch from hook and in each ch across, turn (8)
Rows 2-3: ch 1, sc across, turn (8)
Fasten off, leaving a 30 cm tail. Wrap the tail tightly around the center of the rectangle several times to form a bow shape, then secure securely at the back.
Assembly
Sew the two stuffed legs together at the top inner edges using the leg tails. Continue working upwards by attaching the main body piece directly over the top of the joined legs, stuffing the body firmly before closing the top seam. Position the head on top of the upper body centering it securely, and whipstitch around the neck opening using the remaining yarn tail. Sew the flattened arms to the upper sides of the body approximately 2 rounds below the neck seam. Attach the red bow tie centrally to the upper chest just beneath the chin.
Finishing
Using black embroidery floss, embroider small French knots or short straight stitches for the eyes on the upper face, and a smiling mouth with curved straight stitches just below. Using white cotton thread, embroider zigzag icing lines across the ends of both arms and both legs using surface slip stitches or neat straight embroidery stitches. Weave in all remaining loose ends securely inside the plush.
Tips and Common Mistakes
- Do not overstuff the arms or legs, or they will flare out awkwardly and make assembly difficult.
- Keep your tension consistent when working the continuous rounds so the gingerbread body maintains a smooth, even shape.
- Count your stitches at the end of every increase and decrease round to prevent the pieces from warping.
- Make sure to anchor your black embroidery floss securely inside the head so the facial features do not pull loose over time.
Frequently Asked Questions
Can I make this gingerbread man for a baby?
Yes, but for children under three years old, embroider the eyes and mouth completely with yarn instead of using plastic safety eyes or small beads to avoid any choking hazard.
What is the best way to keep the stuffing from showing through my stitches?
Use a hook size smaller than normally recommended for your yarn weight and maintain a firm, even tension as you crochet every round.
How do I make the white icing lines look like zigzags?
You can embroider them using a simple chain stitch or zigzag running stitch along the cuffs of the arms and legs.
Can I scale this pattern up using chunky yarn?
Yes, switching to a bulky chenille yarn and a 5.0 mm hook will result in a larger, cuddlier plush toy, though you will need to adjust your yarn quantities accordingly.
📄 Your free PDF pattern