











9. Layered Christmas Tree
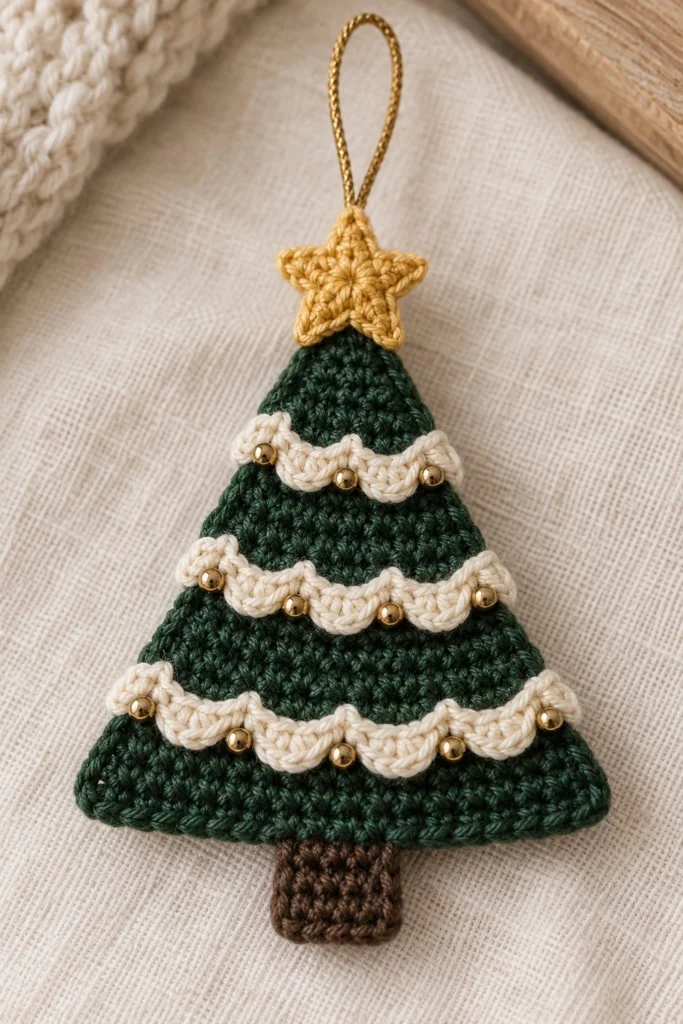
Bring rustic charm to your holiday tree with this exquisite layered Christmas tree ornament. Featuring rich dark green foliage textured with horizontal cream scalloped rickrack bands, tiny gold accent beads, and a radiant star topper, this flat double-layered piece holds its shape beautifully. It measures 4 in (10 cm) tall and takes under an hour to make.
Quick Facts
| Skill level | Finished size | Yarn | Hook | Time |
|---|---|---|---|---|
| Easy-Intermediate | 4 in / 10 cm tall | Sport weight cotton (Cat. 2) | 2.5 mm (US C/2) | 50 minutes |
Materials You Will Need
- Dark Green Yarn: 15 g (38 m) sport weight 100% cotton
- Cream Yarn: 8 g (20 m) sport weight 100% cotton
- Brown Yarn: 5 g (13 m) sport weight 100% cotton
- Yellow-Gold Yarn: 3 g (8 m) sport weight 100% cotton
- Crochet Hook: 2.5 mm (US C/2)
- Beads: 15 small gold glass seed beads (3 mm)
- Notions: Sewing needle, gold thread, tapestry needle, metallic gold hanging cord (20 cm)
Gauge
Working the first 6 rows of the tree panel yields a triangle measuring 1.5 in (3.8 cm) wide at the base and 1.25 in (3.2 cm) high. Working with tight, consistent tension is more important than matching exact gauge so the ornament remains stiff and flat.
Abbreviations (US Terms)
- ch: chain
- sc: single crochet
- hdc: half double crochet
- sl st: slip stitch
- inc: increase (2 sc in same stitch)
- BLO: back loop only
- FLO: front loop only
- st(s): stitch(es)
- RS: right side
- WS: wrong side
UK terms: sc = dc, hdc = htr, dc = tr.
Pattern Notes
- The tree is constructed from two flat triangular panels (Front and Back) joined together around the outer edges with single crochet stitches for structure and stability.
- The turning chain 1 at the end of rows does not count as a stitch throughout the pattern.
- The cream scalloped layers are crocheted directly into the unworked front loops left exposed on specific rows of the Front Panel.
- Counts at the end of each row appear in brackets.
Instructions
Tree Front Panel – Dark Green yarn, make 1
Row 1 (RS): Ch 2, 3 sc in 2nd ch from hook (3)
Row 2 (WS): Ch 1, turn, sc across (3)
Row 3 (RS): Ch 1, turn, inc in first st, sc in next st, inc in last st (5)
Row 4 (WS): Ch 1, turn, sc across (5)
Row 5 (RS – Scallop Ridge 1): Ch 1, turn, in BLO: inc in first st, sc in next 3 sts, inc in last st (7)
Row 6 (WS): Ch 1, turn, working in both loops from now on, sc across (7)
Row 7 (RS): Ch 1, turn, inc in first st, sc in next 5 sts, inc in last st (9)
Row 8 (WS): Ch 1, turn, sc across (9)
Row 9 (RS – Scallop Ridge 2): Ch 1, turn, in BLO: inc in first st, sc in next 7 sts, inc in last st (11)
Row 10 (WS): Ch 1, turn, working in both loops from now on, sc across (11)
Row 11 (RS): Ch 1, turn, inc in first st, sc in next 9 sts, inc in last st (13)
Row 12 (WS): Ch 1, turn, sc across (13)
Row 13 (RS – Scallop Ridge 3): Ch 1, turn, in BLO: inc in first st, sc in next 11 sts, inc in last st (15)
Row 14 (WS): Ch 1, turn, working in both loops from now on, sc across (15)
Fasten off Dark Green yarn and weave in ends.
Front Panel Trunk – Brown yarn, make 1
With RS facing, join Brown yarn in the 6th st of Row 14 of the Front Panel.
Row 1 (RS): Sc in same st and next 3 sts (4), ch 1, turn.
Row 2 (WS): Sc across (4), ch 1, turn.
Row 3 (RS): Sc across (4).
Fasten off Brown yarn.
Scalloped Layers – Cream yarn, worked on Front Panel
Top Scallop Band: Join Cream yarn with a sl st in the 1st exposed front loop of Row 5 on the Front Panel.
Row 1: Sl st in 1st FL, 3 hdc in next FL, sl st in next FL, 3 hdc in next FL, sl st in next FL, 3 hdc in next FL, sl st in 7th FL (3 scallops made). Fasten off.
Middle Scallop Band: Join Cream yarn with a sl st in the 1st exposed front loop of Row 9 on the Front Panel.
Row 1: [Sl st in next FL, 3 hdc in next FL] 5 times, sl st in 11th FL (5 scallops made). Fasten off.
Bottom Scallop Band: Join Cream yarn with a sl st in the 1st exposed front loop of Row 13 on the Front Panel.
Row 1: [Sl st in next FL, 3 hdc in next FL] 7 times, sl st in 15th FL (7 scallops made). Fasten off.
Tree Back Panel – Dark Green yarn, make 1
Row 1 (RS): Ch 2, 3 sc in 2nd ch from hook (3)
Row 2 (WS): Ch 1, turn, sc across (3)
Row 3 (RS): Ch 1, turn, inc in first st, sc in next st, inc in last st (5)
Row 4 (WS): Ch 1, turn, sc across (5)
Row 5 (RS): Ch 1, turn, inc in first st, sc in next 3 sts, inc in last st (7)
Row 6 (WS): Ch 1, turn, sc across (7)
Row 7 (RS): Ch 1, turn, inc in first st, sc in next 5 sts, inc in last st (9)
Row 8 (WS): Ch 1, turn, sc across (9)
Row 9 (RS): Ch 1, turn, inc in first st, sc in next 7 sts, inc in last st (11)
Row 10 (WS): Ch 1, turn, sc across (11)
Row 11 (RS): Ch 1, turn, inc in first st, sc in next 9 sts, inc in last st (13)
Row 12 (WS): Ch 1, turn, sc across (13)
Row 13 (RS): Ch 1, turn, inc in first st, sc in next 11 sts, inc in last st (15)
Row 14 (WS): Ch 1, turn, sc across (15)
Fasten off Dark Green yarn.
Back Panel Trunk – Brown yarn, make 1
With RS facing, join Brown yarn in the 6th st of Row 14 of the Back Panel.
Row 1 (RS): Sc in same st and next 3 sts (4), ch 1, turn.
Row 2 (WS): Sc across (4), ch 1, turn.
Row 3 (RS): Sc across (4).
Fasten off Brown yarn.
Top Star – Yellow-Gold yarn, make 1
Rnd 1: In a magic ring, work [ch 2, sl st in 2nd ch from hook, sl st into magic ring] 5 times (5 star points made).
Pull ring tightly closed. Fasten off, leave a 20 cm tail for sewing.
Assembly
1. Align the Front Panel and Back Panel with wrong sides facing together.
2. Using Dark Green yarn, join with a single crochet at the bottom right corner of the tree foliage. Sc evenly around the outer edge through both layers to join them, working (sc, ch 1, sc) in the top peak stitch. Change to Brown yarn along the trunk edges to sc through both layers of the stem, then back to Dark Green for the remaining side. Fasten off and weave in all yarn ends.
3. Using sewing needle and gold thread, stitch one gold seed bead securely onto the center peak of each cream hdc scallop shell across all three bands (15 beads total).
Finishing
Position the Yellow-Gold Star over the top peak of the tree. Using the long tail and a tapestry needle, sew the star securely to the top point through both tree layers. Thread the metallic gold hanging cord through the top of the star, knot the ends together, and hide the knot inside the star base. Steam lightly to flatten completely.
Tips and Common Mistakes
- Uneven Triangle Sides: Make sure to work increases only in the very first and very last stitch of increase rows to maintain a straight, clean diagonal edge.
- Flipping Scallops: Ensure you work the cream scalloped layers with the RS of the Front Panel facing toward you so the texture pops forward.
- Bead Attachment: Attach the gold seed beads after joining the front and back tree panels so your sewing thread does not pull through to the back side.
Frequently Asked Questions
Can I use acrylic yarn instead of cotton?
Yes, but cotton yarn gives crisp stitch definition and natural stiffness that prevents the flat ornament from curling without needing starch.
Can I embroider the beads instead?
If making this ornament for a home with toddlers or pets, substitute tiny french knots embroidered with yellow-gold yarn instead of glass beads for safety.
How do I stop the tree from bending?
Joining two panels provides plenty of structure, but if your crochet tension is loose, you can insert a custom-cut piece of stiff plastic canvas between the panels before joining them.
📄 Your free PDF pattern