











5. Pine Tree Cream Bauble
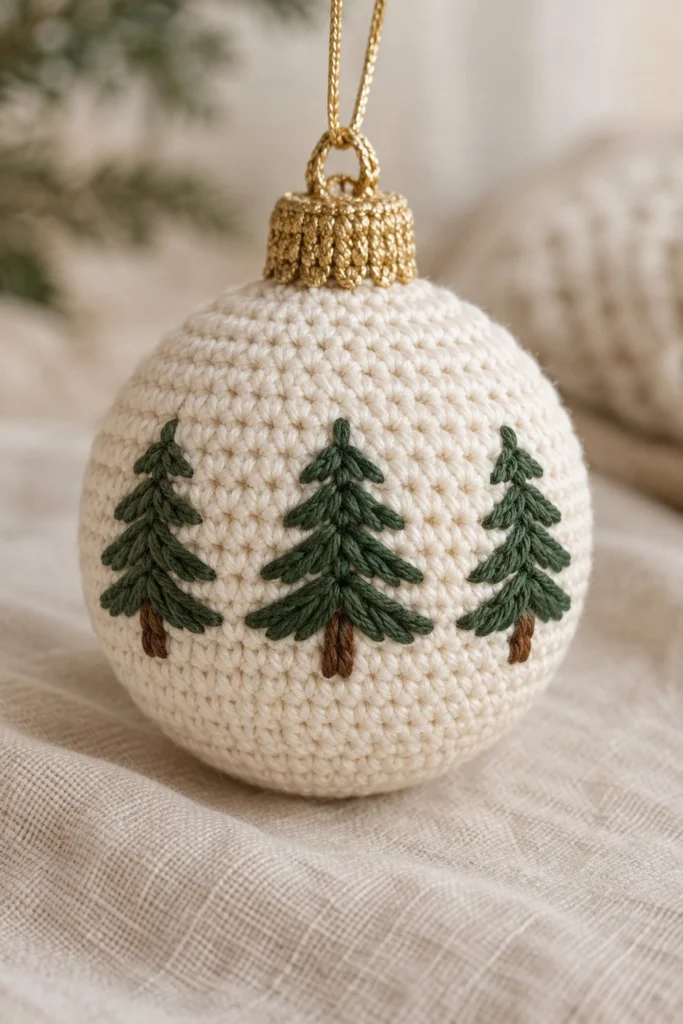
Bring a touch of timeless handcrafted charm to your holiday tree with the Pine Tree Cream Bauble. This heirloom-style ornament features a dense, clean crochet sphere embellished with delicate embroidered evergreen trees in rich forest green and warm brown. Measuring 2.5 inches across, it is a quick and satisfying project that makes a wonderful handmade gift or a treasured keepsake.
Quick Facts
| Skill level | Finished size | Yarn | Hook | Time |
|---|---|---|---|---|
| Easy-Intermediate | 2.5 in / 6.5 cm diameter | DK cotton (Cat. 3) | 2.5 mm (US C/2) | 1 hour |
Materials You Will Need
- DK cotton yarn (Cat. 3) in Cream (approx. 15g / 35m)
- Small scraps of DK cotton yarn in Forest Green (for trees) and Brown (for trunks)
- Gold metallic crochet thread or matching fingering yarn (for the cap and hanging loop, approx. 5g)
- 2.5 mm (US C/2) crochet hook
- Polyester fiberfill stuffing
- Tapestry needle
- Stitch marker
Gauge
Working tightly with consistent tension matters more than exact gauge for this ornament. The first 3 rounds of the bauble measure approximately 2.5 cm across.
Abbreviations (US Terms)
- ch: chain
- dec: single crochet decrease (insert hook in next st, yarn over, pull up a loop, insert hook in following st, yarn over, pull up a loop, yarn over, pull through all 3 loops on hook)
- inc: single crochet increase (work 2 sc in the same st)
- rep: repeat
- sc: single crochet
- sl st: slip stitch
- st(s): stitch(es)
UK terms: sc = dc, hdc = htr, dc = tr.
Pattern Notes
- The bauble body is worked in continuous spiral rounds without joining. Use a stitch marker to track the beginning of each round.
- The stitch count in brackets at the end of every round indicates the exact number of stitches that should be in that round.
- Embroidery on the bauble is worked using a tapestry needle and straight stitches after the ball is fully crocheted and stuffed.
Instructions
Bauble Body – Cream, make 1
Rnd 1: 6 sc in a magic ring (6)
Rnd 2: inc x 6 (12)
Rnd 3: (sc in next st, inc) x 6 (18)
Rnd 4: (sc in next 2 sts, inc) x 6 (24)
Rnd 5: (sc in next 3 sts, inc) x 6 (30)
Rnd 6: (sc in next 4 sts, inc) x 6 (36)
Rnd 7: (sc in next 5 sts, inc) x 6 (42)
Rnd 8: (sc in next 6 sts, inc) x 6 (48)
Rnd 9: (sc in next 7 sts, inc) x 6 (54)
Rnds 10-18: sc in each st around (54)
Rnd 19: (sc in next 7 sts, dec) x 6 (48)
Rnd 20: (sc in next 6 sts, dec) x 6 (42)
Rnd 21: (sc in next 5 sts, dec) x 6 (36)
Rnd 22: (sc in next 4 sts, dec) x 6 (30)
Rnd 23: (sc in next 3 sts, dec) x 6 (24)
Stuff firmly now.
Rnd 24: (sc in next 2 sts, dec) x 6 (18)
Rnd 25: (sc in next st, dec) x 6 (12)
Rnd 26: dec x 6 (6)
Fasten off, leave a 30 cm tail, and thread through front loops of remaining 6 sts to close tightly. Weave in end.
Bauble Cap – Gold, make 1
Rnd 1: 6 sc in a magic ring, sl st to join (6)
Rnd 2: ch 1, working in back loops only, inc in each st around, sl st to join (12)
Rnd 3: ch 1, (sc in next st, inc) x 6, sl st to join (18)
Rnd 4: ch 1, working in front loops only, (sc in next 2 sts, ch 2, sl st in same st to create texture picot) around, sl st to join (18)
Fasten off, leaving a 25 cm tail for sewing.
Assembly
Position the gold cap centrally on top of the cream bauble, aligning it over the starting magic ring of the main body. Using the remaining yarn tail, securely whipstitch the base of the cap to Rnds 2 and 3 of the bauble. Fasten off and hide ends inside.
Finishing
Using the photo as a reference, embroider three pine trees evenly spaced around the equator of the bauble between Rnds 10 and 17. Use brown yarn to stitch a short vertical trunk for each tree, then use forest green yarn to work stacked horizontal straight stitches in a triangle shape, creating layered branches. Make a 15 cm hanging loop from gold metallic thread or yarn, knot the ends securely, and anchor it firmly through the top loop of the gold cap.
Tips and Common Mistakes
- Uneven stuffing: Add small pinches of fiberfill gradually as you decrease to avoid lumpy spots in the sphere.
- Stitch marker slips: Always move your marker to the very first stitch of the new round immediately after working it.
- Embroidery spacing: Lightly mark your tree placement with pins or a vanishing fabric marker before stitching to ensure they are spaced equally apart.
- Cap curling: If the gold cap edges curl outward, block them gently with a damp cloth before sewing.
Frequently Asked Questions
How do I keep my magic ring from coming loose?
Work your first round of stitches firmly over the tail, and pull the starting tail tightly immediately after completing Rnd 1 before continuing.
Can I embroider the trees before stuffing the ball?
It is best to embroider after the ball is fully stuffed and shaped so you can see the true curvature and proportions of the surface.
What is the best way to anchor the hanging loop securely?
Pass your tapestry needle with the loop ends through both the top of the gold cap and the very top center of the cream bauble several times, knotting securely on the inside if possible.
📄 Your free PDF pattern