











7. Holiday Berry Wreath
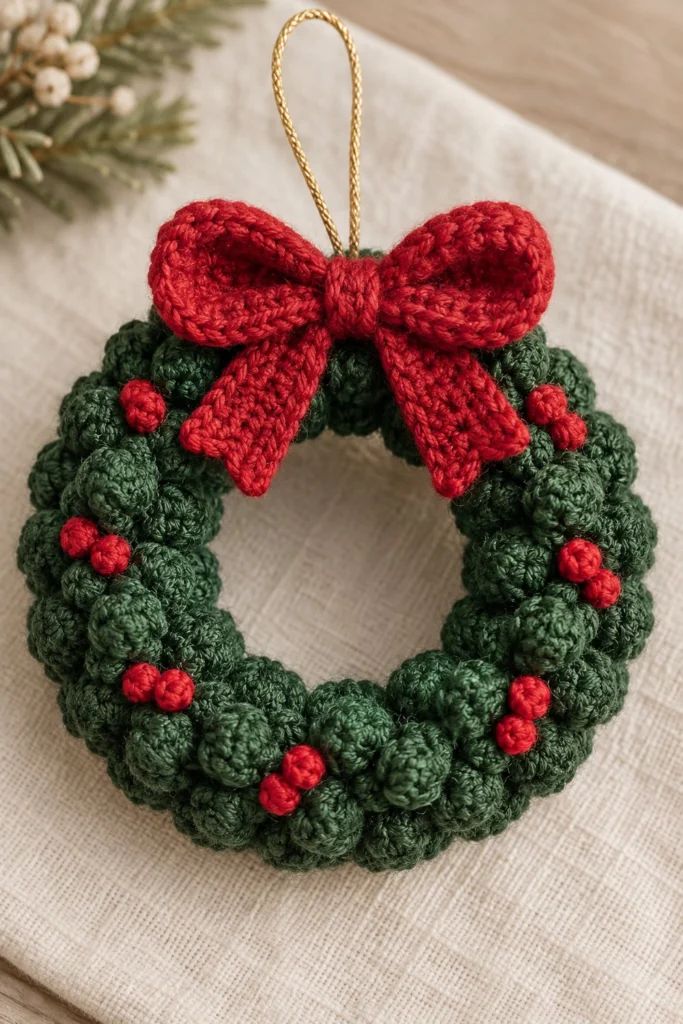
Bring a handmade touch to your holiday decorations with this charming crochet wreath ornament. Adorned with textured bobble stitches and a classic red bow, this miniature piece adds a cosy, traditional feel to your tree or festive mantel display in just one afternoon.
Quick Facts
| Skill level | Finished size | Yarn | Hook | Time |
|---|---|---|---|---|
| Easy | 3 in / 7.5 cm diameter | DK cotton (Cat. 3) | 3.0 mm (US D/3) | 40 minutes |
Materials You Will Need
- DK cotton yarn (Cat. 3) in Forest Green (approx. 15g / 35m)
- DK cotton yarn (Cat. 3) in Christmas Red (approx. 10g / 25m)
- 3.0 mm (US D/3) crochet hook
- Gold metallic cord or string for hanging (approx. 15 cm)
- Polyester toy stuffing (small amount)
- Tapestry needle
- Stitch marker
Gauge
First 2 rounds of the wreath core measure 2.5 cm across. Working with a firm, even tension matters more than exact gauge to keep the bobbles defined.
Abbreviations (US Terms)
- ch = chain
- sc = single crochet
- hdc = half double crochet
- dc = double crochet
- sl st = slip stitch
- inc = increase (2 sc in the same stitch)
- dec = decrease (sc 2 stitches together)
- bobble = 5-dc bobble: [yarn over, insert hook in stitch, yarn over, pull through, yarn over, pull through 2 loops] 5 times in the same stitch, yarn over, pull through all 6 loops on hook
- BLO = back loop only
- st(s) = stitch(es)
- [ ] = work instructions within brackets as many times as directed
UK terms: sc = dc, hdc = htr, dc = tr.
Pattern Notes
- The wreath base is worked in continuous spiral rounds without joining. Use a stitch marker to track the beginning of each round.
- The bobble rounds create the textured foliage; make sure to push the bobbles to the right side of the work.
- Stitch counts are shown in brackets at the end of every round.
Instructions
Wreath Base – Forest Green, make 1
Rnd 1: 6 sc in a magic ring (6)
Rnd 2: inc x 6 (12)
Rnd 3: [sc in next st, inc] x 6 (18)
Rnd 4: [sc in next 2 sts, inc] x 6 (24)
Rnd 5: Working in BLO, sc in each st around (24)
Rnd 6: [bobble in next st, sc in next st] 12 times (24)
Rnd 7: Working in BLO, sc in each st around (24)
Rnd 8: [sc in next st, bobble in next st] 12 times (24)
Rnd 9: Working in BLO, sc in each st around (24)
Rnd 10: [bobble in next st, sc in next st] 12 times (24)
Rnd 11: Working in BLO, sc in each st around (24)
Rnd 12: [sc in next st, bobble in next st] 12 times (24)
Stuff the tube firmly with polyester stuffing as you prepare to close it.
Rnd 13: [sc in next 2 sts, dec] x 6 (18)
Rnd 14: [sc in next st, dec] x 6 (12)
Rnd 15: dec x 6 (6)
Fasten off, leave a 30 cm tail. Use the yarn needle to weave the tail through the front loops of the remaining 6 stitches and pull tight to close. Sew the two ends of the tube together to form a ring.
Berries (Make 7 double-berry units, each consisting of 2 joined berries) – Christmas Red
Rnd 1: 5 sc in a magic ring (5)
Rnd 2: sc in each st around (5)
Rnd 3: dec x 2, sc in last st (3)
Fasten off, leave a 15 cm tail. Do not stuff. Pull the tail through the remaining stitches to close, and use the tails to attach the berries in 7 pairs around the wreath.
Bow (Make 1) – Christmas Red
Left Loop & Tail:
Ch 16, sl st in 2nd ch from hook and next 4 chs, [sc, hdc, dc, hdc, sc] in next ch (forming the loop knot area), sl st down the remaining 10 chs to form the tail. Fasten off, leaving a tail for assembly.
Right Loop & Tail:
Ch 16, sl st in 2nd ch from hook and next 4 chs, [sc, hdc, dc, hdc, sc] in next ch, sl st down the remaining 10 chs. Fasten off.
Center Knot:
Ch 6, working in rows: sc in 2nd ch from hook and across (5 sts). Turn, ch 1, sc across (5 sts) for 3 rows. Fasten off, leaving a long tail. Wrap this piece securely around the center intersection of the left and right loops to form the finished bow.
Assembly
Position the red berries in pairs scattered evenly across the front of the forest green wreath base. Secure them tightly using the yarn tails, weaving any excess ends into the inside of the wreath. Place the completed red bow at the top centre of the wreath, covering the seam where the tube ends joined, and stitch it securely in place.
Finishing
Thread the gold metallic cord securely through the stitches behind the centre of the red bow, tying the ends together in a neat knot to create a hanging loop. Weave in any remaining loose yarn ends.
Tips and Common Mistakes
- Make sure your bobbles pop out toward the outside of the ring by pushing them forward with your thumb as you work the next round.
- Counting your stitches carefully on Rnds 5 through 12 prevents the wreath tube from twisting or puckering.
- Keep your tension consistent when working the bobbles so they appear uniform in size.
- Attach the berries in tightly clustered pairs to mimic real holly berry bunches.
Frequently Asked Questions
How do I join the wreath ends into a circle?
Once you complete the final decrease round and close the opening, use your yarn needle and tail to whip-stitch the starting ring edge and the finishing edge together firmly.
What is the best way to make sure the bow sits straight?
Pin the bow in place with sewing pins before stitching it down so you can check its alignment with the hanging loop.
Can I wash this ornament?
Spot clean only with a damp cloth and mild soap to protect the cotton fibers and toy stuffing shape.
What if my bobbles look flat?
Pull up slightly taller loops on your double crochets when creating the bobble stitch to give it more pop and texture.
📄 Your free PDF pattern