











15. Textured Shell Bauble
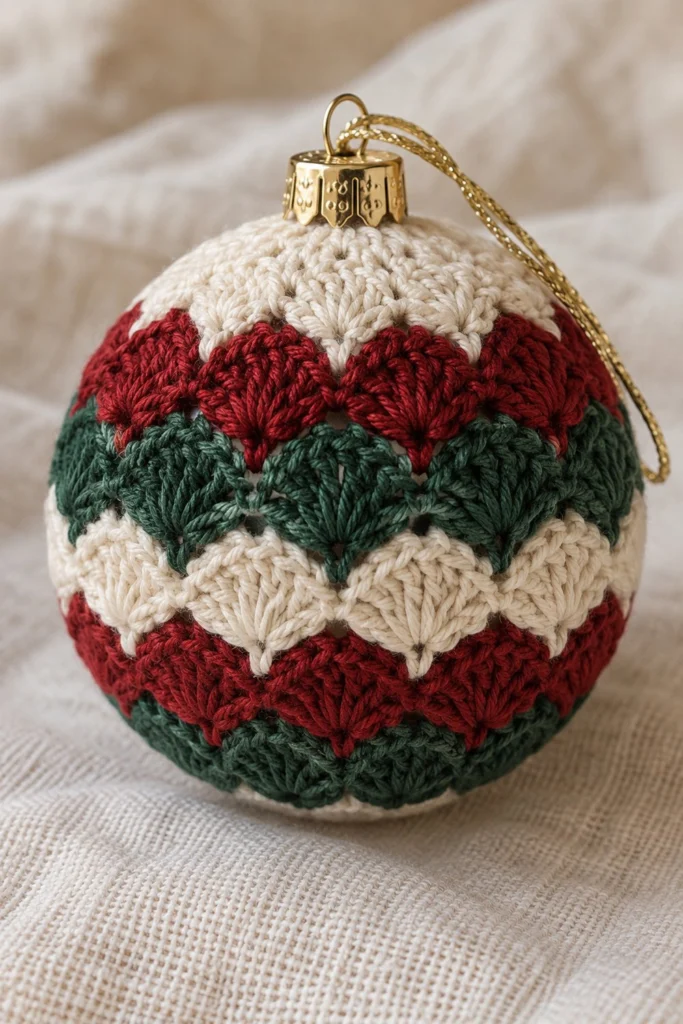
Bring vintage holiday elegance to your Christmas tree with this Textured Shell Bauble. Crafted in rich horizontal bands of deep red, pine green, and off-white yarn, the intricate fan-shell texture creates a stunning heirloom finish that catches the holiday lights beautifully. This quick intermediate project measures 2.5 in (6.5 cm) in diameter and takes just one hour to complete.
Quick Facts
| Skill level | Finished size | Yarn | Hook | Time |
|---|---|---|---|---|
| Intermediate | 2.5 in / 6.5 cm diameter | Sport weight cotton (Cat. 2) | 2.5 mm (US C/2) | 1 hour |
Materials You Will Need
- Sport weight cotton yarn (Cat. 2):
- Color A (Off-White): 15 g / 38 m
- Color B (Deep Red): 8 g / 20 m
- Color C (Dark Pine Green): 8 g / 20 m
- Color D (Metallic Gold): 5 g / 12 m
- 2.5 mm crochet hook (US C/2)
- 60 mm styrofoam sphere or polyester fiberfill stuffing (approx. 15 g)
- Tapestry needle
- Stitch marker
- Scissors
Gauge
Rounds 1–6 measure 5 cm (2 in) in diameter when laid flat. Working with tight, even tension is essential so the core form or stuffing does not show through the shell texture.
Abbreviations (US Terms)
- ch: chain
- sc: single crochet
- dc: double crochet
- inc: increase (2 sc in the same stitch)
- sc2tog: single crochet 2 stitches together (decrease)
- sl st: slip stitch
- st(s): stitch(es)
- BLO: back loop only
- FLO: front loop only
- shell: 5 dc worked into the same stitch
UK terms: sc = dc, hdc = htr, dc = tr.
Pattern Notes
- The bottom and top shaping sections are worked in joined rounds. Always join with a slip stitch to the first stitch of the round.
- Color changes occur at the start of each shell round. Fasten off or carry yarn loosely on the inside of the work.
- Stitch counts are provided in brackets at the end of each round.
- Insert the rigid core sphere or stuffing before starting the final decrease rounds.
Instructions
Bauble Body – Colors A, B, and C, make 1
With Color A (Off-White):
Rnd 1: 6 sc in a magic ring, sl st to first sc (6)
Rnd 2: ch 1, inc x 6, sl st to first sc (12)
Rnd 3: ch 1, (sc in next st, inc) x 6, sl st to first sc (18)
Rnd 4: ch 1, (sc in next 2 sts, inc) x 6, sl st to first sc (24)
Rnd 5: ch 1, (sc in next 3 sts, inc) x 6, sl st to first sc (30)
Rnd 6: ch 1, (sc in next 4 sts, inc) x 6, sl st to first sc (36)
Rnd 7: Change to Color B (Deep Red). Ch 1, sc in same st, [skip 2 sts, shell in next st, skip 2 sts, sc in next st] 5 times, skip 2 sts, shell in next st, skip 2 sts, sl st to first sc (6 shells, 6 sc)
Rnd 8: Change to Color A (Off-White). Join in 3rd dc of any shell. Ch 3 (counts as dc), 2 dc in same st, [skip 2 dc, sc in next sc, skip 2 dc, shell in 3rd dc of next shell] 5 times, skip 2 dc, sc in next sc, 2 dc in same st as initial ch-3, sl st to top of ch-3 (6 shells, 6 sc)
Rnd 9: Change to Color C (Dark Pine Green). Join in any sc between shells. Ch 1, sc in same st, [skip 2 dc, shell in 3rd dc of next shell, skip 2 dc, sc in next sc] 5 times, skip 2 dc, shell in 3rd dc of next shell, skip 2 dc, sl st to first sc (6 shells, 6 sc)
Rnd 10: Change to Color A (Off-White). Join in 3rd dc of any shell. Ch 3 (counts as dc), 2 dc in same st, [skip 2 dc, sc in next sc, skip 2 dc, shell in 3rd dc of next shell] 5 times, skip 2 dc, sc in next sc, 2 dc in same st as initial ch-3, sl st to top of ch-3 (6 shells, 6 sc)
Rnd 11: Change to Color B (Deep Red). Join in any sc between shells. Ch 1, sc in same st, [skip 2 dc, shell in 3rd dc of next shell, skip 2 dc, sc in next sc] 5 times, skip 2 dc, shell in 3rd dc of next shell, skip 2 dc, sl st to first sc (6 shells, 6 sc)
Rnd 12: Change to Color A (Off-White). Ch 1, sc in each dc and sc around, sl st to first sc (36)
Insert 60 mm foam sphere or stuff firmly now.
Rnd 13: ch 1, (sc in next 4 sts, sc2tog) x 6, sl st to first sc (30)
Rnd 14: ch 1, (sc in next 3 sts, sc2tog) x 6, sl st to first sc (24)
Rnd 15: ch 1, (sc in next 2 sts, sc2tog) x 6, sl st to first sc (18)
Rnd 16: ch 1, (sc in next st, sc2tog) x 6, sl st to first sc (12)
Rnd 17: ch 1, (sc2tog) x 6, sl st to first sc (6)
Fasten off, leave a 20 cm tail. Weave tail through FLO of remaining 6 sts and pull tight to close.
Ornament Cap – Color D (Metallic Gold), make 1
Rnd 1: 6 sc in a magic ring, sl st to first sc (6)
Rnd 2: ch 1, inc x 6, sl st to first sc (12)
Rnd 3: ch 1, in BLO: sc in each st around, sl st to first sc (12)
Rnd 4: ch 1, sc in each st around, sl st to first sc (12)
Fasten off, leave a 25 cm tail for sewing.
Assembly
Place the gold Ornament Cap centered over the top opening (Round 17) of the crocheted bauble body. Using a tapestry needle and the 25 cm gold yarn tail, whipstitch the open edge of the cap securely to the bauble. Weave in all loose ends inside the work.
Finishing
Thread a 20 cm piece of metallic gold yarn through the center top of the gold cap. Tie the ends together in a secure knot to form a 3 in (7.5 cm) hanging loop, hiding the knot inside the cap structure.
Tips and Common Mistakes
- Loose Shell Stitches: Work double crochets firmly so the shells lie flat without bulging excessively away from the inner sphere.
- Color Join Lines: When joining a new color, pull the slip stitch tight to keep color changes crisp and invisible.
- Inserting the Core: Insert your inner foam ball or stuffing before starting Round 13; attempting to insert it later will stretch out the decrease stitches.
Frequently Asked Questions
Can I use acrylic yarn instead of cotton?
Yes, DK or sport weight acrylic yarn works well, though 100% cotton yarn provides crisp stitch definition that makes the shell pattern pop.
Can I stuff this bauble with fiberfill instead of using a foam core?
Absolutely. Stuff firmly with high-loft polyester fiberfill, making sure to distribute it evenly to maintain a perfect round shape.
Is this ornament safe for young children?
This ornament has no plastic or metal safety eyes, making it child-friendly. However, ensure the hanging cord is securely fastened to prevent a choking hazard for children under three.
You Made It Through All 15
📄 Your free PDF pattern