












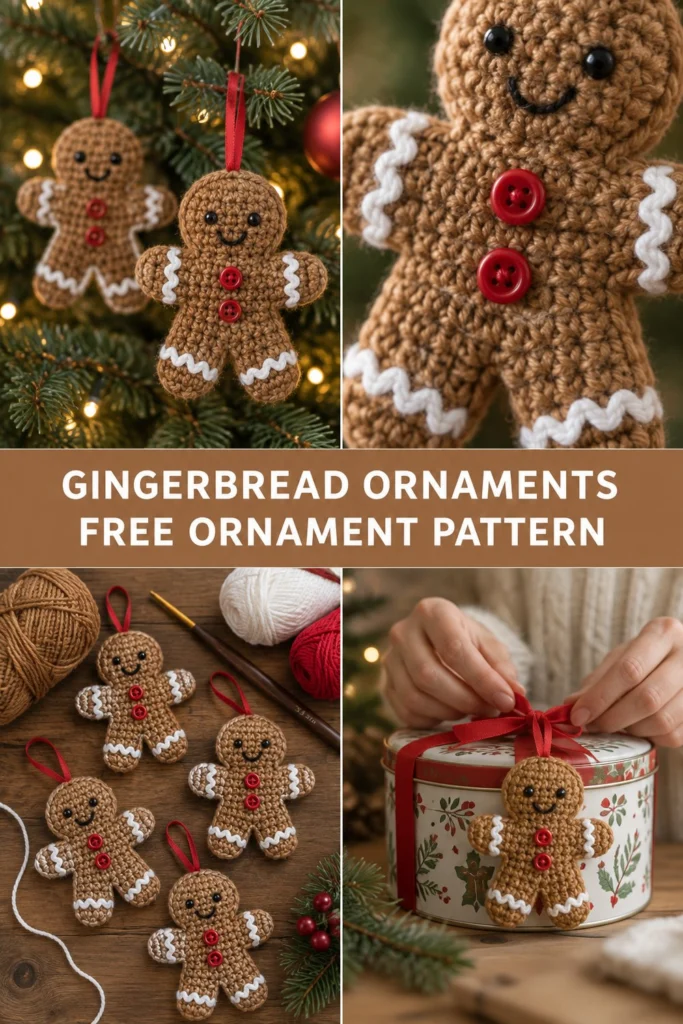
Fresh from the yarn oven, these charming little gingerbread men ornaments are ready to bring a touch of handmade magic to your holiday tree! Worked in a rich caramel brown with whimsical white icing trim and tiny red button accents, they are quick to stitch up and make wonderful gifts, tree decorations, or sweet package ties.
Quick Facts
- Skill level: Easy / Beginner-friendly
- Finished size: Approximately 4.5 inches (11.5 cm) tall and 3.5 inches (9 cm) wide
- Yarn: Sport-weight or light DK cotton/acrylic blend in Caramel Brown, White, and Red
- Hook: 3.0 mm (US C/2 or D/3) crochet hook
- Stitches used: US terms (ch, sc, inc, dec, sl st, hdc)
- Time to make: About 1 to 2 hours per ornament
Size customization tips and gauge notes are included further down the page.
What Makes This Crochet Gingerbread Ornament Special
This pattern is built using classic amigurumi shaping techniques worked in continuous rounds for the body, ensuring a sturdy, well-defined shape that holds its stuffing nicely without gaps. The charming white icing trim is added using a simple surface slip stitch technique that creates an authentic, wavy piped frosting look without needing embroidery skills. Finished off with miniature red buttons sewn securely down the center, these ornaments capture all the nostalgic detail of real holiday gingerbread cookies.
Skill Level
- Basic familiarity with crochet stitches (sc, inc, dec, hdc)
- Working in continuous spiral rounds (no joining with slip stitch unless noted)
- Basic sewing/embroidery skills for attaching buttons and weaving in ends
- If you can make a magic ring and single crochet, you can easily complete this project!
Finished Measurements
| Dimension | Inches | Centimeters |
|---|---|---|
| Height | 4.5 in | 11.5 cm |
| Width (Arm to Arm) | 3.5 in | 9 cm |
| Thickness | 1.0 in | 2.5 cm |
Materials You Will Need
| Material / Notion | Color / Type | Details / Size |
|---|---|---|
| Main Yarn (A) | Caramel Brown | Sport/Light DK weight, approx. 35 yards (32 meters) |
| Trim Yarn (B) | White | Sport/Light DK weight, approx. 10 yards (9 meters) |
| Accent Yarn (C) | Red | Sport/Light DK weight, small scrap for hanging loop and embroidery |
| Crochet Hook | Steel/Aluminum | 3.0 mm (US C/2 or D/3) |
| Red Buttons | Bright Red | Two 8mm mini buttons per ornament |
| Embroidery Thread | Black | Small amount for smiling mouth |
| Stuffing | Polyester | Fiberfill stuffing |
| Notions | Tapestry Needle, Stitch Marker, Scissors | Standard toolkit |
Yarn Suggestions
| Yarn Line | Weight | Skein Yardage | Notes |
|---|---|---|---|
| Schachenmayr Catania | Sport (Fine 2) | 137 yds / 50g | Excellent stitch definition, wide color range |
| Knit Picks CotLin | DK (Light 3) | 123 yds / 50g | Soft cotton-linen blend with a lovely matte finish |
| Hobbii Rainbow Cotton 8/8 | DK (Light 3) | 82 yds / 50g | 100% mercerized cotton, very sturdy for ornaments |
⚠️ Note: Avoid fuzzy eyelash yarns or dark novelty yarns for the main body, as they make stitch counting difficult and obscure the clean gingerbread shape.
Gauge
- 22 sts x 24 rows = 4 inches (10 cm) in single crochet using a 3.0 mm hook.
- Rnds 1 to 6 of the flat body base = 1.5 inches (3.8 cm) across.
Abbreviations
- ch: chain
- sc: single crochet
- hdc: half double crochet
- inc: single crochet increase (2 sc in the same stitch)
- dec: invisible single crochet decrease (insert hook into front loops of next 2 stitches, yo, draw through both, yo, pull through remaining 2 loops)
- sl st: slip stitch
- st(s): stitch(es)
- Rnd(s): round(s)
- sk: skip
- ( … ): repeat instructions enclosed in parentheses the specified number of times
UK conversion note: sc = dc, hdc = htr, dc = tr.
Special Stitches Explained
- Magic Ring: Wrap yarn around your index finger twice to create a ring, insert hook into center, draw up a loop, ch 1, and work your first round of single crochets into the ring. Pull the tail to close securely.
- Invisible Decrease (dec): Insert your hook into the front loop only of the first stitch, then immediately into the front loop only of the second stitch. Yarn over and pull through both front loops, yarn over and pull through remaining two loops on hook. This eliminates unsightly gaps in amigurumi.
- Surface Slip Stitch (Icing Trim): Hold working yarn on the back of the piece. Insert hook from front to back through the fabric, yarn over behind the work, pull loop through to the front, and pull directly through the loop on your hook. Repeat along the limb edges to create raised white frosting lines.
Pattern Instructions
Pattern Notes
- Work in continuous spiral rounds without joining unless specified. Use a stitch marker to track the beginning of each round.
- Make two identical body panels (Front and Back) for each ornament.
- Stuff the gingerbread man firmly right before closing the final seams together.
Section 1: Body Panel (Caramel Brown, make 2)
Rnd 1: Start 6 sc in a magic ring (6 sc)
Rnd 2: (inc) x 6 (12 sc)
Rnd 3: (1 sc, inc) x 6 (18 sc)
Rnd 4: (2 sc, inc) x 6 (24 sc)
Rnd 5: (3 sc, inc) x 6 (30 sc)
Rnds 6 to 8: sc in each st around (30 sc)
Now we will shape the head and limbs by working projecting arms and legs from the main body round.
Shaping the Left Arm:
Row 1 (Arm): Ch 5, starting in 2nd ch from hook, sl st in 2nd ch, sc in next 2 ch, hdc in last ch, skip next 2 sts on body, sl st in next body st to anchor arm. Fasten off brown yarn for front panel; leave a long 12-inch (30 cm) tail on the back panel for joining later.
Shaping the Right Arm:
Count 12 stitches to the right along Rnd 8 from the first arm anchor point. Attach brown yarn with a sl st, ch 5, starting in 2nd ch from hook, sl st in 2nd ch, sc in next 2 ch, hdc in last ch, sl st into the next body st. Fasten off.
Shaping the Left and Right Legs:
From the bottom center of the body (opposite the head), count 3 sts to the left. Attach brown yarn, ch 6, starting in 2nd ch from hook, sl st in 2nd ch, sc in next 3 ch, hdc in last ch, skip 1 body st, sl st in next body st. Fasten off. Repeat on the right side for the second leg, leaving a 2-inch gap between legs at the bottom center.
✅ Checkpoint: You should now have two flat gingerbread body panels complete with head, two arms, and two legs.
Section 2: Assembly & Finishing
- Face Details: Before joining the two panels, embroider two French knots for the eyes using black embroidery thread between Rnds 4 and 5 of the head, spaced 3 stitches apart. Embroider a small curved smiling mouth centered one round below the eyes.
- Buttons & Icing: Sew the two small red buttons onto the center of the front panel at Rnds 6 and 7. Using White yarn (Yarn B) and a tapestry needle or surface crochet hook, add wavy icing zig-zags along the outer edges of the arms and legs.
- Joining Panels: Place the Front and Back panels together with wrong sides facing inward. Using the long brown tail from the back panel and a tapestry needle, whipstitch the two panels together around the outer perimeter.
- Stuffing: When you are about three-quarters of the way sewn closed, stuff the body, head, and limbs firmly with polyester fiberfill using the back of a crochet hook to push stuffing into the small arms and legs. Finish stitching closed and weave in all loose ends securely inside the piece.
- Hanging Loop: Attach a 6-inch strand of Red yarn (Yarn C) securely to the top center of the head, knot the ends together to form a hanging loop for your Christmas tree.
Size Customization Tips
- To make a larger ornament for a wreath or door hanging, use worsted-weight yarn with a 4.0 mm hook, which increases the finished height to roughly 6 inches (15 cm).
- To make a smaller gift tag ornament, use size 10 crochet thread with a 1.5 mm steel hook.
Care Instructions
- Gently spot clean with a damp cloth and mild soap if needed.
- Do not submerge fully in water if fiberfill stuffing is packed tightly; air dry flat away from direct heat.
FAQ
Can I use safety eyes instead of embroidery for the face?
Yes, you can use 6mm black safety eyes inserted into the front panel before stuffing. However, if making this ornament for children under 3 years old, embroidered eyes are strongly recommended for safety.
Can I make just one flat layer instead of two?
You can! If you prefer a flatter ornament, simply make one single body panel, add the white surface slip stitch icing, buttons, and hanging loop directly to the back, and stiffen it slightly with fabric stiffener if desired.
How do I prevent the stuffing from poking through the stitches?
Make sure you are using a hook size 0.5 mm smaller than recommended on your yarn label so your single crochet stitches stay nice and tight, locking the fiberfill securely inside.
Happy Crocheting!
I hope you adore making these sweet gingerbread men for your holiday season! Be sure to save this pin on Pinterest to your Christmas crochet board, and leave a comment below to let me know what colors of icing and buttons you chose for your little cookies. Happy crocheting!
📄 Your free PDF pattern