
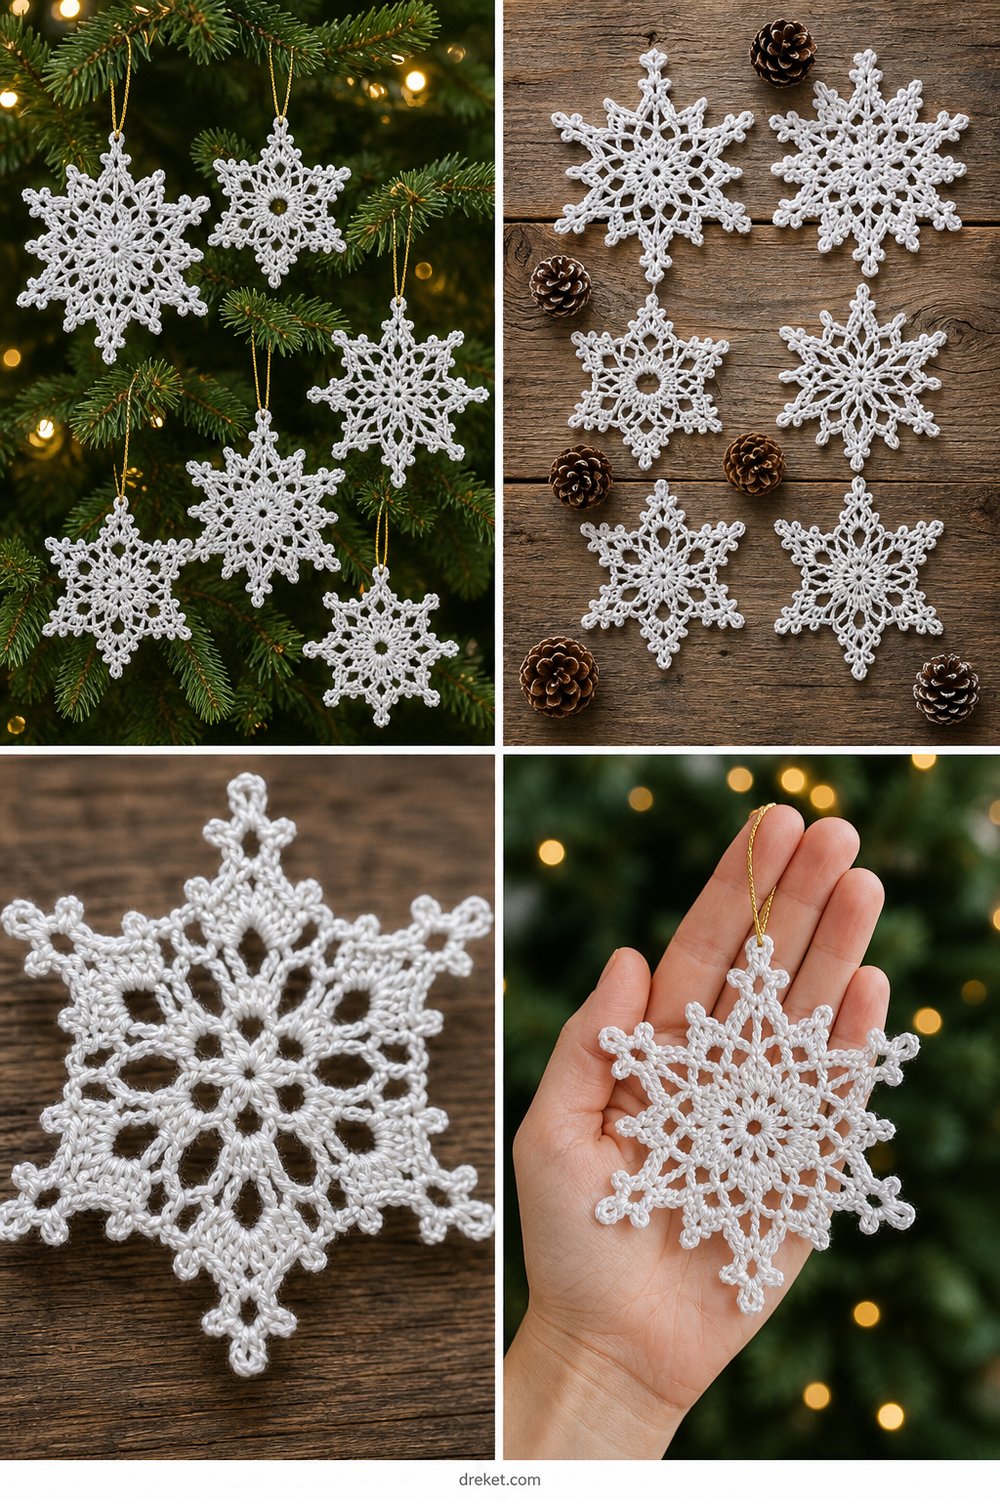
Imagine stepping into a warmly lit room where the scent of fresh evergreen fills the air and a glowing Christmas tree is adorned with delicate, handmade treasures. These heirloom-quality crochet ornaments capture the crisp beauty of winter frost, transforming fine cotton thread into intricate six-pointed lace structures. Whether you are trimming your own holiday tree or gifting a cherished keepsake, this project brings traditional charm and modern elegance straight to your hooks.
Nordic Snowflake Christmas Tree Ornaments Free Crochet Pattern
Quick Facts
This design utilizes foundational and intermediate crochet stitches including ch, sl st, sc, hdc, dc, tr, and picot. The finished pieces measure approximately 4.5 inches (11.5 cm) across, making them an ideal, quick-to-stitch afternoon project. Estimated completion time is roughly 1.5 to 2 hours per snowflake. Their timeless heirloom appeal makes them wonderful holiday gifts, package toppers, or festive garland accents.
Sizing customization tips are included later in the article to help you easily adjust thread weights and hook sizes.
What Makes This Nordic Snowflake Christmas Tree Ornaments Special
The magic of these ornaments lies in the careful interplay of open mesh points, cluster centers, and treble-crochet spikes that build outwards from a tight ring. By working in the round with fine crochet thread and stiffening the finished motifs, the geometric six-pointed symmetry holds its crisp shape indefinitely. The inclusion of delicate picot tips gives each design an authentic, heirloom-quality frost-like edge that catches the light beautifully when hung next to twinkling fairy lights.
Skill Level
- Level: Intermediate
- Required Skills: Working in the round, starting with a magic ring or chain loop, skipping stitches, creating cluster stitches, working treble-crochet spikes, and forming picots.
💡 Designer Tip: If you are comfortable reading crochet charts and basic lace construction, you will breeze through these patterns. Beginners looking for a rewarding challenge can take it one round at a time!
Finished Measurements
| Ornament Design | Diameter (Inches) | Diameter (Centimeters) |
|---|---|---|
| Classic Starburst | 4.5 in | 11.5 cm |
| Crystal Frost | 4.2 in | 10.7 cm |
| Winter Lace | 4.8 in | 12.2 cm |
Materials You Will Need
- Crochet Thread: Size 10 crochet cotton thread
- Hook: Steel crochet hook size US 7 (1.65 mm)
- Notions: Tapestry needle for weaving ends, rust-proof stainless steel T-pins, blocking mat or foam board, fabric stiffener or heavy starch, metallic gold ribbon for hanging loops.
| Color Name | Colorway | Yarn Weight / Type | Yardage Needed |
|---|---|---|---|
| Snow White | Pure White | Size 10 Cotton Thread | 35 yds / 32 m per ornament |
Yarn Suggestions
| Yarn Brand & Line Name | Weight / Type | Yardage per Skein | Notes |
|---|---|---|---|
| DMC Cebelia Crochet Cotton Art. 16 | Size 10 Cotton | 284 yds / 260 m | Extremely high twist, creates ultra-crisp stitch definition. |
| Aunt Lydia’s Classic Crochet Thread Size 10 | Size 10 Cotton | 350 yds / 320 m | Readily available, affordable, and stiffens wonderfully. |
| Hobbii Rainbow Cotton 8/4 | Fingering / Super Fine | 186 yds / 170 m | A softer cotton alternative if a non-stiffened rustic look is desired. |
⚠️ Note: Avoid stretchy acrylic yarns or bulky wools for this specific pattern, as they will not hold the crisp, architectural lace points required for a proper snowflake silhouette.
Gauge
- Gauge: Working Rounds 1–3 of any snowflake design should yield a circle measuring approximately 1.5 inches (3.8 cm) in diameter using a US 7 (1.65 mm) steel hook.
| Measurement Type | Stitches / Rounds | Size |
|---|---|---|
| Motif Center Gauge | 3 Rounds | 1.5 in / 3.8 cm across |
💡 Designer Tip: Gauge is not strictly critical for sizing garments here, but maintaining consistent tension ensures your lace points remain sharp and symmetrical. Always check your gauge before starting a batch.
Abbreviations
| Abbreviation | Full Meaning |
|---|---|
| ch | chain |
| sl st | slip stitch |
| sc | single crochet |
| hdc | half double crochet |
| dc | double crochet |
| tr | treble crochet |
| picot | chain 3, slip stitch in the first chain made |
| cluster | 3-dc cluster stitch |
| sp | space |
| st(s) | stitch(es) |
| rep | repeat |
| yo | yarn over |
Special Stitches Explained
- Picot: Ch 3, insert hook into the back bump and front loop of the first ch made, yo and pull through loop and working loop on hook.
- 3-dc Cluster: [Yo, insert hook in indicated st/sp, yo and pull up loop, yo and pull through 2 loops] 3 times in the same st/sp, yo and pull through all 4 loops on hook.
- Treble Crochet Spike (tr-spike): Yo twice, insert hook into the designated lower-round space, yo and pull up a loop, [yo and pull through 2 loops] 3 times.
Pattern Instructions
Section 1: Classic Starburst Snowflake Motif
Round 1: Ch 6, join with a sl st to form a ring. Ch 1, work 12 sc into the ring, join with sl st to first sc. (12 sc)
Round 2: Ch 4 (counts as first dc and ch-1), [dc in next sc, ch 1] 11 times, join with sl st to 3rd ch of starting ch-4. (24 sts including ch-1 spaces)
Round 3: Sl st into the first ch-1 sp, ch 1, (sc, ch 3, sc) in same ch-1 sp, ch 3, skip next ch-1 sp; rep from * to * around, join with sl st to first sc. (6 picot points)
✅ Checkpoint: At the end of Round 3, you should have exactly 6 distinct corner loops established. Verify your count before moving on.
Round 4: Sl st into the first ch-3 sp, ch 4 (counts as tr), work (2 tr, picot, 3 tr) in same ch-3 sp, work (3 tr, picot, 3 tr) in next ch-3 sp; rep from * around, join with sl st to top of starting ch-4. (36 tr, 6 picots)*
Round 5: Sl st across to the first picot, ch 1, (sc, ch 5, sc) in picot, ch 5, work 1 sc in space between the two 3-tr groups of the previous round, ch 5; rep from * around, join with sl st to first sc. Fasten off, leaving a 6-inch tail to weave in. (18 ch-5 loops)
Section 2: Stiffening and Blocking
Step 1: Prepare a stiffening solution of equal parts white glue and water, or use a commercial fabric stiffener spray.
Step 2: Submerge the finished snowflake motif completely into the solution, gently squeezing to saturate all fibers.
Step 3: Lay the damp snowflake flat onto a blocking mat or foam board covered in plastic wrap.
Step 4: Using rust-proof T-pins, pin out each of the 6 main lace points firmly to ensure symmetrical angles and crisp edges. Allow to dry completely for 24 hours.
Size Customization Tips
- Scaling Up: To create a larger wall-hanging ornament, switch to a Sport or DK weight cotton yarn paired with a US D/3 (3.25 mm) or E/4 (3.50 mm) crochet hook. This will increase the finished diameter to approximately 8 to 10 inches (20 to 25 cm).
- Scaling Down: To make delicate earrings or miniature tree accents, use Size 20 or Size 30 crochet cotton thread with a US 12 (1.0 mm) or US 14 (0.75 mm) steel hook, reducing the finished size to roughly 2.5 inches (6.4 cm).
Care Instructions
- Gently spot-clean stiffened ornaments with a dry cloth if dusty.
- Do not submerge stiffened cotton ornaments in water, as moisture will dissolve the starch or stiffening agent.
- Store flat in a breathable box layered with acid-free tissue paper between seasons to prevent crushing.
Nordic Snowflake Christmas Tree Ornaments Free Crochet Pattern
Thank you so much for joining me in creating these timeless holiday heirlooms! I hope your tree shines brighter than ever with your new handmade creations. If you stitch these up, please share your photos on social media and tag me so I can admire your festive handiwork. Don’t forget to save this pattern to your holiday Pinterest boards and leave a comment below sharing which ornament design was your favorite! Happy crocheting and happy holidays!