











8. Little Witch Toy
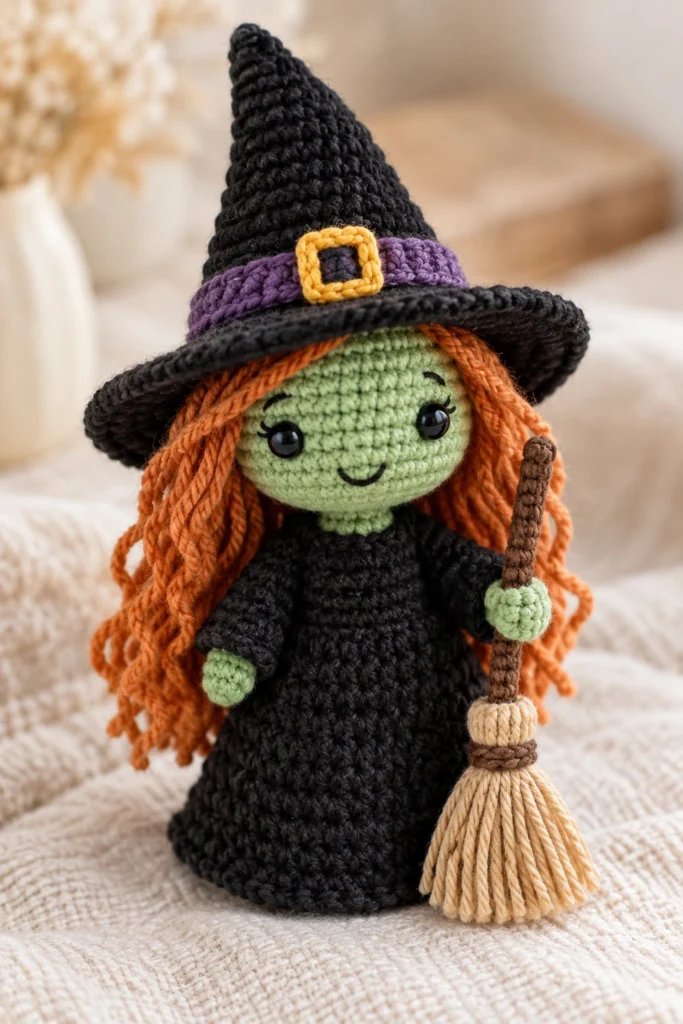
Cast a spell on your Halloween decor with this adorable little crochet witch, featuring a vibrant green face, classic pointed hat, and a tiny handmade broomstick. Standing at 5 inches tall, this intermediate amigurumi project works up quickly and makes a delightful seasonal companion.
Quick Facts
| Skill level | Finished size | Yarn | Hook | Time |
|---|---|---|---|---|
| Intermediate | 5 in / 12.5 cm tall | DK cotton (Cat. 3) | 3.5 mm (US E/4) | 2.5 hours |
Materials You Will Need
- DK weight cotton yarn (Category 3) in Black (30g, 75m), Green (15g, 35m), Purple (10g, 25m), Orange (10g, 25m), and Brown (10g, 25m)
- Small scrap of Yellow yarn for the hat buckle
- 3.5 mm (US E/4) crochet hook
- Polyester fiberfill stuffing
- Two 6 mm black safety eyes
- Tapustry needle for assembly and hair insertion
- Stitch marker
Gauge
Working tightly matters more than exact gauge in amigurumi to prevent stuffing from showing through; for this pattern, the first 2 rounds of the head measure approximately 2 cm across.
Abbreviations (US Terms)
- ch: chain
- sc: single crochet
- hdc: half double crochet
- dc: double crochet
- inc: single crochet increase (work 2 sc in the same stitch)
- dec: single crochet decrease (join 2 stitches into 1 using the invisible decrease method)
- sl st: slip stitch
- BLO: back loop only
- FLO: front loop only
- Rnd / Rnd: round
- st/sts: stitch / stitches
UK terms: sc = dc, hdc = htr, dc = tr.
Pattern Notes
- All parts are worked in continuous spiral rounds unless otherwise stated. Do not join with a slip stitch or turn at the end of rounds.
- Use a stitch marker to keep track of the first stitch of each round. Move the marker up at the start of every new round.
- The stitch count at the end of each round is shown in brackets like (12).
- Insert safety eyes firmly between Rnds 10 and 11 of the head, leaving about 6 stitches between them.
Instructions
Head – Green, make 1
Rnd 1: 6 sc in a magic ring (6)
Rnd 2: inc x 6 (12)
Rnd 3: (1 sc, inc) x 6 (18)
Rnd 4: (2 sc, inc) x 6 (24)
Rnd 5: (3 sc, inc) x 6 (30)
Rnd 6: (4 sc, inc) x 6 (36)
Rnds 7-12: sc in each st around (36)
Rnd 13: (4 sc, dec) x 6 (30)
Rnd 14: (3 sc, dec) x 6 (24)
Insert safety eyes between Rnds 10 and 11, approximately 6 stitches apart.
Stuff firmly with fiberfill.
Rnd 15: (2 sc, dec) x 6 (18)
Fasten off, leave a 25 cm tail for sewing to the body.
Body and Dress – Black, make 1
Rnd 1: 6 sc in a magic ring (6)
Rnd 2: inc x 6 (12)
Rnd 3: (1 sc, inc) x 6 (18)
Rnd 4: (2 sc, inc) x 6 (24)
Rnd 5: (3 sc, inc) x 6 (30)
Rnd 6: BLO sc in each st around (30)
Rnds 7-10: sc in each st around (30)
Rnd 11: (3 sc, dec) x 6 (24)
Rnd 12: sc in each st around (24)
Rnd 13: (2 sc, dec) x 6 (18)
Rnd 14: sc in each st around (18)
Stuff firmly with fiberfill.
Fasten off, leave a 20 cm tail.
Hat – Black, make 1
Rnd 1: 4 sc in a magic ring (4)
Rnd 2: sc in each st around (4)
Rnd 3: (1 sc, inc) x 2 (6)
Rnd 4: sc in each st around (6)
Rnd 5: (2 sc, inc) x 2 (8)
Rnd 6: sc in each st around (8)
Rnd 7: (3 sc, inc) x 2 (10)
Rnd 8: sc in each st around (10)
Rnd 9: (4 sc, inc) x 2 (12)
Rnd 10: (3 sc, inc) x 3 (15)
Rnd 11: sc in each st around (15)
Rnd 12: (4 sc, inc) x 3 (18)
Rnd 13: sc in each st around (18)
Rnd 14: With Purple yarn, BLO (2 sc, inc) x 6 (24)
Rnd 15: With Black yarn, (3 sc, inc) x 6 (30)
Rnd 16: (4 sc, inc) x 6 (36)
Rnd 17: FLO (5 sc, inc) x 6 (42)
Rnd 18: sl st in each st around (42)
Fasten off, weave in ends.
Arms – Green and Black, make 2
Rnd 1: With Green, 5 sc in a magic ring (5)
Rnd 2: inc, 4 sc (6)
Rnd 3: sc in each st around (6)
Rnd 4: Change to Black, sc in each st around (6)
Rnds 5-8: sc in each st around (6)
Do not stuff.
Flatten the opening and sc across both layers to close: 3 sc (3).
Fasten off, leave a 15 cm tail for sewing.
Broomstick – Brown, make 1
Handle:
Rnd 1: 4 sc in a magic ring (4)
Rnds 2-12: sc in each st around (4)
Fasten off, leave a 10 cm tail.
Bristles:
Cut 10 strands of brown yarn measuring 6 cm each. Latch-hook or tie them securely to one end of the handle, trim evenly to form the broom bristles.
Assembly
Sew the head securely to the top of the body using the leftover yarn tail, ensuring it sits straight and centered. Attach the arms to the upper sides of the body approximately 1 round below the neck seam. Cut lengths of orange yarn (about 10 cm each) and attach them strand by strand around the sides and back of the head just below the hat line to create long hair; trim neatly. Place the pointed hat firmly on top of the head at a slight tilt and secure with a few hidden stitches. Embroider a small yellow buckle onto the purple band of the hat with yellow yarn. Finally, tack the broomstick to one of the witch’s hands.
Finishing
Embroider a friendly smiling mouth and small black eyelashes under the safety eyes using a single strand of black embroidery floss. Weave in all remaining loose yarn ends securely inside the body and hat cavities.
Tips and Common Mistakes
- Do not overstuff the arms, as they need to lie flat against the witch’s body.
- Make sure to switch to the back loop only (BLO) when instructed on the hat and dress to create sharp, defined creases.
- Keep your tension even throughout the color changes to avoid unsightly bumps in the fabric.
- Count your stitches at the end of every round, especially during the increase and decrease phases of the head and hat.
Frequently Asked Questions
Can I use worsted weight yarn instead of DK weight?
Yes, you can substitute worsted weight yarn, but keep in mind that your finished witch will turn out slightly larger and you will need to use a larger crochet hook, such as a 4.0 mm or 4.5 mm.
What should I do if I am making this toy for a child under three years old?
For safety reasons, embroider the eyes using black yarn or embroidery floss instead of using plastic safety eyes to prevent any choking hazards.
How do I keep my magic ring from coming undone?
Pull the initial tail very tight after working the first round of stitches, and use your tapestry needle to weave that tail through several nearby stitches inside the piece to secure it firmly.
📄 Your free PDF pattern