











11. Cauldron With Bubbles
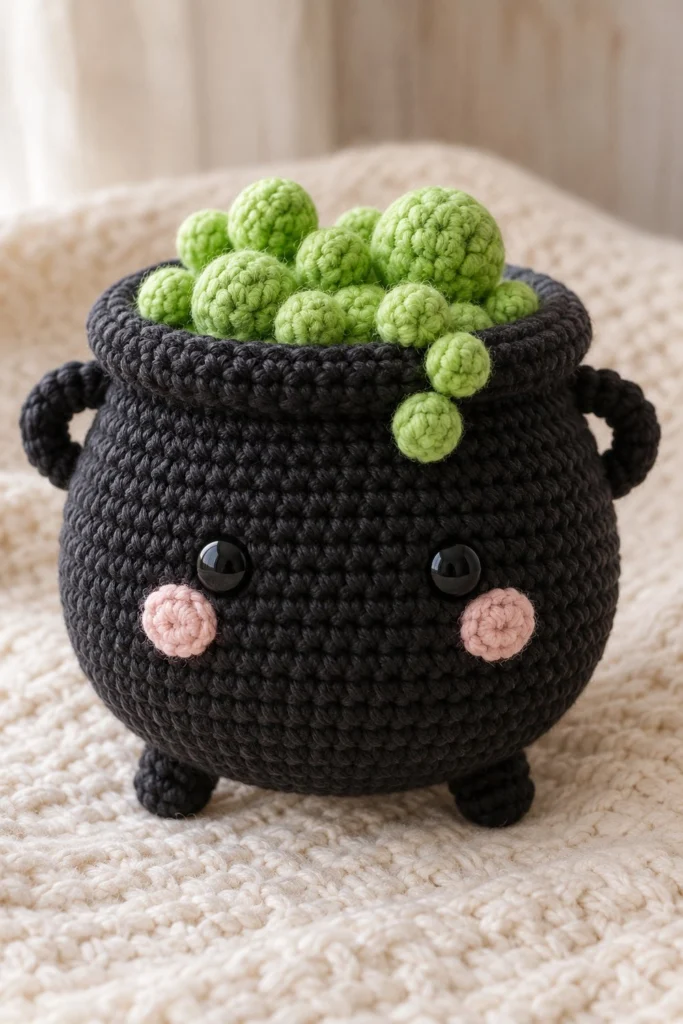
Bring some spooky cheer to your Halloween decor with this adorable bubbling cauldron amigurumi, featuring bright green foam spheres spilling over its textured rim. Measuring 3.5 inches tall, this compact pot works up quickly in just an hour and a half.
Quick Facts
| Skill level | Finished size | Yarn | Hook | Time |
|---|---|---|---|---|
| Easy-Intermediate | 3.5 in / 9 cm tall | DK cotton (Cat. 3) | 3.5 mm (US E/4) | 1.5 hours |
Materials You Will Need
- DK weight cotton yarn in Black (30 grams / 75 metres)
- DK weight cotton yarn in Bright Green (10 grams / 25 metres)
- DK weight cotton yarn in Light Pink (small scrap for blush)
- 3.5 mm (US E/4) crochet hook
- Polyester fiberfill stuffing
- Two 8 mm black safety eyes
- Pink embroidery floss for mouth and cheeks
- Yarn needle and stitch marker
Gauge
Working tightly matters more than exact gauge for amigurumi to ensure the stuffing does not show through; the first two rounds of the cauldron base should measure approximately 2 cm across.
Abbreviations (US Terms)
- ch: chain
- sc: single crochet
- inc: single crochet increase (work 2 sc in the same stitch)
- dec: single crochet decrease (work 2 sc together through front loops)
- sl st: slip stitch
- BLO: back loop only
- FLO: front loop only
- st(s): stitch(es)
- rnd(s): round(s)
UK terms: sc = dc, hdc = htr, dc = tr.
Pattern Notes
- The cauldron body and bubbles are worked in continuous spiral rounds without joining unless otherwise stated.
- Use a stitch marker to keep track of the first stitch of each round.
- The stitch count at the end of every round is shown in brackets.
- Stuff pieces firmly as you go unless instructed otherwise.
Instructions
Cauldron Body – Black, make 1
Rnd 1: 6 sc in a magic ring (6)
Rnd 2: inc x 6 (12)
Rnd 3: (1 sc, inc) x 6 (18)
Rnd 4: (2 sc, inc) x 6 (24)
Rnd 5: (3 sc, inc) x 6 (30)
Rnd 6: (4 sc, inc) x 6 (36)
Rnd 7: (5 sc, inc) x 6 (42)
Rnd 8: (6 sc, inc) x 6 (48)
Rnd 9: Working in BLO, sc in each st around (48)
Rnd 10-15: sc in each st around (48)
Rnd 16: (6 sc, dec) x 6 (42)
Rnd 17: sc in each st around (42)
Rnd 18: Working in FLO, (5 sc, inc) x 6 (49)
Rnd 19: sl st in each st around (49)
Fasten off, weave in ends securely.
Bubble Spheres – Bright Green, make 6 to 8 in varying sizes
Small Bubble (make 4):
Rnd 1: 6 sc in a magic ring (6)
Rnd 2: inc x 6 (12)
Rnd 3: dec x 6 (6)
Stuff lightly.
Fasten off, leave a 15 cm tail for sewing.
Large Bubble (make 3):
Rnd 1: 6 sc in a magic ring (6)
Rnd 2: inc x 6 (12)
Rnd 3: (1 sc, inc) x 6 (18)
Rnd 4-5: sc in each st around (18)
Rnd 6: (1 sc, dec) x 6 (12)
Stuff firmly now.
Rnd 7: dec x 6 (6)
Fasten off, leave a 20 cm tail for sewing.
Assembly
Insert safety eyes between Rnds 12 and 13 of the cauldron body, about 6 stitches apart. Embroider a wide, smiling mouth centered between the eyes using pink embroidery floss. Sew the pink blush patches directly beneath the outer corners of each eye. Stuff the cauldron body firmly with polyester fiberfill. Arrange and sew the green bubble spheres securely into a clustered mound spilling over the top rim of the cauldron.
Finishing
Weave in all remaining loose yarn ends inside the cauldron body and trim excess. Check that all safety eyes are locked firmly in place.
Tips and Common Mistakes
- Do not overstuff the individual bubbles or they will lose their rounded shape.
- Keep your tension even during the base rounds to ensure the cauldron sits flat on a table.
- Remember to work Round 9 in the back loop only to create the bottom edge ridge.
- Always insert your safety eye washers immediately after pushing the posts through the fabric.
Frequently Asked Questions
Can I use worsted weight yarn instead of DK?
Yes, you can substitute worsted weight yarn with a 4.0 mm hook, but your finished cauldron will turn out slightly larger than 3.5 inches.
Are safety eyes safe for a baby or toddler?
Safety eyes can present a choking hazard for children under three years old; for young children, embroider the eyes using black embroidery floss instead.
How do I make the cauldron stand upright firmly?
Ensure you flatten the magic ring area slightly and stuff the bottom half densely before shaping the upper curves.
📄 Your free PDF pattern