
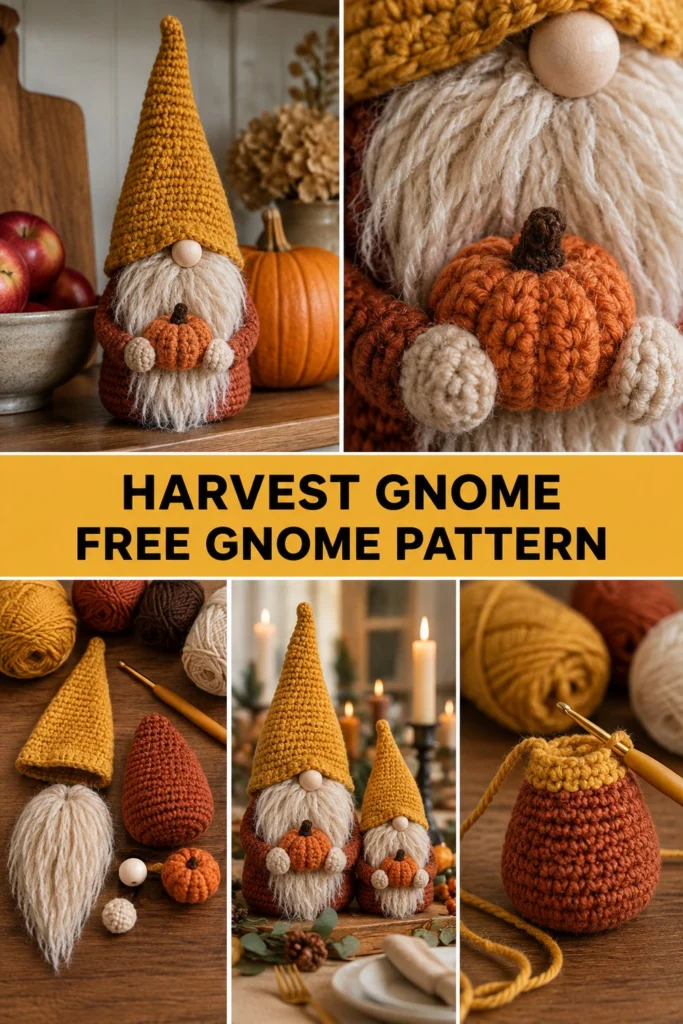
Meet the cosiest guest at your Thanksgiving table: a harvest gnome hugging a tiny pumpkin. His mustard hat is a tall cone, the beard is a fluffy fringe of oatmeal yarn brushed out at the end, and a wooden bead makes the nose. He stands on a weighted base, so he never tips over.
Harvest Crochet Gnome Shelf Sitter Free Thanksgiving Pattern
Quick Facts
- Skill level: Intermediate
- Finished size: 9 inches tall by 4.5 inches wide
- Yarn: Worsted weight (Category 4) in mustard yellow, rust orange, and oatmeal
- Hook: US E/4 (3.5 mm) crochet hook
- Stitches used: sc, inc, dec, BLO, sl st
- Time to make: 4 to 6 hours
What Makes This Fall Gnome Pattern Special
This amigurumi harvest gnome is designed for stability and texture. The body is worked in continuous rounds with a flat, reinforced base so he sits upright on any shelf without tipping. The rust orange base transitions into a textured body, topped with a tall, seamless mustard cone hat. The oatmeal beard is created using a knotted fringe technique that is carefully brushed out to create a soft, rustic look that mirrors a real gnome’s beard. A simple wooden bead attached right below the hat brim serves as the quintessential gnome nose, while he proudly holds a tiny ribbed pumpkin in his crochet hands.
Skill Level
- Working in continuous spiral rounds
- Decreasing (invisible decrease recommended)
- Basic sewing and yarn manipulation (brushing out fringe)
- Working into back loops only (BLO)
Don’t worry if you are new to amigurumi details; I’ll walk you through every step of the assembly and finishing process!
Finished Measurements
| Dimension | Inches | Centimeters |
|---|---|---|
| Height (base to tip of hat) | 9.0 in | 22.8 cm |
| Width (at widest body point) | 4.5 in | 11.4 cm |
| Depth | 4.5 in | 11.4 cm |
Materials You Will Need
| Material | Color / Description | Quantity / Details |
|---|---|---|
| Worsted Weight Yarn | Mustard Yellow | 50 yards (approx. 25g) |
| Worsted Weight Yarn | Rust Orange | 60 yards (approx. 30g) |
| Worsted Weight Yarn | Oatmeal / Cream | 25 yards (approx. 15g) |
| Crochet Hook | US E/4 (3.5 mm) | Standard amigurumi hook |
| Wooden Bead | Natural Wood (20 mm) | 1 piece for the nose |
| Polyfill Stuffing | White Polyester | 1 small bag |
| Weighting Material | Poly pellets or glass beads | 1/4 cup in a small pouch |
| Notions | Stitch markers, tapestry needle, pet slicker brush | For brushing beard fringe |
Yarn Suggestions
| Yarn Line | Weight | Notes |
|---|---|---|
| Lion Brand Vanna’s Choice | Worsted (4) | Excellent stitch definition, holds shape well for amigurumi |
| Caron Simply Soft | Worsted (4) | Smooth and easy to work with |
| Red Heart Super Saver | Worsted (4) | Durable, highly accessible color range |
Gauge
- Amigurumi Gauge: 6 sts x 6 rounds = 1 inch in single crochet using a 3.5 mm hook.
- Circle Check: Rnds 1 to 6 of the body flat circle = 2.0 inches across.
Abbreviations
- ch: chain
- sc: single crochet
- inc: single crochet increase (work 2 sc in the same st)
- dec: invisible single crochet decrease (insert hook in front loops of next 2 sts, yarn over, pull through both, yarn over, pull through 2 loops)
- BLO: back loop only
- sl st: slip stitch
- st(s): stitch(es)
- Rnd(s): round(s)
- FO: fasten off
UK translation: sc = dc, hdc = htr, dc = tr.
Special Stitches Explained
- Magic Ring: Form an adjustable loop with your yarn tail, insert hook into center, yarn over and pull up a loop, ch 1, and work the required number of sc sts into the ring. Pull the tail tight to close the center hole.
- Invisible Decrease (dec): Insert your hook into the front loop only of the next stitch, then immediately insert your hook into the front loop only of the following stitch. Yarn over and pull through both front loops (2 loops on hook). Yarn over and pull through remaining 2 loops.
- Brushed Fringe Beard: Cut 4-inch strands of oatmeal yarn, attach them using lark’s head knots to the front of the body, then use a clean pet slicker brush to untwist and fluff the yarn fibers until smooth.
Pattern Instructions
Pattern Notes: Work in continuous spiral rounds without joining unless stated otherwise. Use a stitch marker to keep track of the first stitch of each round.
Section 1: Body (Rust Orange, make 1)
Rnd 1: Start 6 sc in a magic ring (6 sc)
Rnd 2: (inc) x 6 (12 sc)
Rnd 3: (1 sc, inc) x 6 (18 sc)
Rnd 4: (2 sc, inc) x 6 (24 sc)
Rnd 5: (3 sc, inc) x 6 (30 sc)
Rnd 6: (4 sc, inc) x 6 (36 sc)
Rnd 7: Working in BLO, sc in each st around (36 sc)
Rnds 8 to 15: sc in each st around (36 sc)
Rnd 16: (4 sc, dec) x 6 (30 sc)
Rnd 17: (3 sc, dec) x 6 (24 sc)
Rnd 18: (2 sc, dec) x 6 (18 sc)
Stuff the body firmly with polyfill.
Rnd 19: (1 sc, dec) x 6 (12 sc)
Rnd 20: (dec) x 6 (6 sc)
FO, leaving a long tail. Thread tail through front loops of remaining 6 sts and pull tight to close. Weave in end.
Section 2: Hat (Mustard Yellow, make 1)
Rnd 1: Start 4 sc in a magic ring (4 sc)
Rnd 2: sc in each st around (4 sc)
Rnd 3: (1 sc, inc) x 2 (6 sc)
Rnd 4: sc in each st around (6 sc)
Rnd 5: (2 sc, inc) x 2 (8 sc)
Rnd 6: sc in each st around (8 sc)
Rnd 7: (3 sc, inc) x 2 (10 sc)
Rnd 8: sc in each st around (10 sc)
Rnd 9: (4 sc, inc) x 2 (12 sc)
Rnd 10: sc in each st around (12 sc)
Rnd 11: (3 sc, inc) x 3 (15 sc)
Rnd 12: sc in each st around (15 sc)
Rnd 13: (4 sc, inc) x 3 (18 sc)
Rnds 14 to 15: sc in each st around (18 sc)
Rnd 16: (5 sc, inc) x 3 (21 sc)
Rnds 17 to 18: sc in each st around (21 sc)
Rnd 19: (6 sc, inc) x 3 (24 sc)
Rnds 20 to 21: sc in each st around (24 sc)
Rnd 22: (3 sc, inc) x 6 (30 sc)
Rnds 23 to 24: sc in each st around (30 sc)
Rnd 25: (4 sc, inc) x 6 (36 sc)
Rnds 26 to 27: sc in each st around (36 sc)
Rnd 28: (5 sc, inc) x 6 (42 sc)
Rnds 29 to 30: sc in each st around (42 sc)
Rnd 31: (6 sc, inc) x 6 (48 sc)
Rnd 32: sc in each st around (48 sc)
FO, leaving a long tail for sewing. Lightly stuff the top tip of the hat so it holds its conical shape.
Section 3: Tiny Pumpkin (Rust Orange and Brown, make 1)
Rnd 1: With rust orange, start 6 sc in a magic ring (6 sc)
Rnd 2: (inc) x 6 (12 sc)
Rnd 3: (1 sc, inc) x 6 (18 sc)
Rnds 4 to 6: sc in each st around (18 sc)
Rnd 7: (1 sc, dec) x 6 (12 sc)
Stuff firmly with polyfill.
Rnd 8: (dec) x 6 (6 sc)
FO, close hole. Using a long strand of rust orange yarn and a tapestry needle, wrap the yarn tightly around the outside of the pumpkin from top to bottom 4 times, pulling slightly to create the signature pumpkin segments. Securely knot and hide ends.
Stem: Join brown yarn at top center of pumpkin, ch 3, sl st in 2nd ch from hook and next ch, sl st back into center. FO and weave in.
Section 4: Arms (Rust Orange, make 2)
Rnd 1: Start 6 sc in a magic ring (6 sc)
Rnd 2: (1 sc, inc) x 3 (9 sc)
Rnds 3 to 5: sc in each st around (9 sc)
Lightly stuff the hand/arm.
Rnd 6: (1 sc, dec) x 3 (6 sc)
FO, leaving a long tail for sewing.
Assembly
1. Beard: Cut 15 strands of oatmeal yarn, each 4 inches long. Attach them to the front upper portion of the body (covering Rnds 12 through 16) using lark’s head knots across a 6-stitch width. Take a pet slicker brush and gently brush out the strands until they form a fluffy, uniform beard shape. Trim the bottom edge evenly.
2. Nose: Sew the natural wood bead securely right above the top center of the beard, overlapping the lower edge of where the hat will sit.
3. Hat: Place the mustard hat over the top of the body so the brim rests just above the nose and covers the top of the beard. Pin in place and whipstitch securely to the body around the lower edge.
4. Arms: Flatten the open ends of the two arms. Sew them to the left and right sides of the body (around Rnd 14) so they angle forward.
5. Pumpkin: Position the tiny pumpkin centered between the two hands. Sew the hands to the sides of the pumpkin so it looks like the gnome is holding it.
Finishing
Weave in all remaining yarn ends inside the body. Check that the gnome sits level on a flat surface.
Size Customization Tips
- Making it taller: Add 3 extra rounds of straight sc in the body before starting the decreases, and add 4 extra rounds to the hat cone. Each extra 6-st body round adds about 0.2 inches of height.
- Making it smaller: Use a sport weight yarn and a 2.75 mm crochet hook with a matching smaller wooden bead.
Care Instructions
Spot clean only with a damp cloth and mild soap. Do not submerge in water, as the inner weighting pellets and polyfill will retain moisture. Gently brush the beard with a soft comb or pet brush if it gets ruffled.
FAQ
Can I use safety eyes instead of a wooden bead?
Yes, but safety eyes are usually not traditional for this style of faceless gnome. If you are making this toy for a child under 3, embroidering a small French knot nose or omitting hard wooden beads is recommended for safety.
How do I keep the hat from flopping over?
The pattern instructs you to lightly stuff the top tip of the hat. If you want a completely upright hat, insert a lightweight floral wire or pipe cleaner into the tip before attaching it to the body.
What is the best way to weight the base?
Plastic poly pellets or clean glass weighting beads work best. Always place them inside a small scrap piece of fabric or a nylon stocking tied securely at the end before putting them inside the crochet body so pellets never leak out between stitches.