
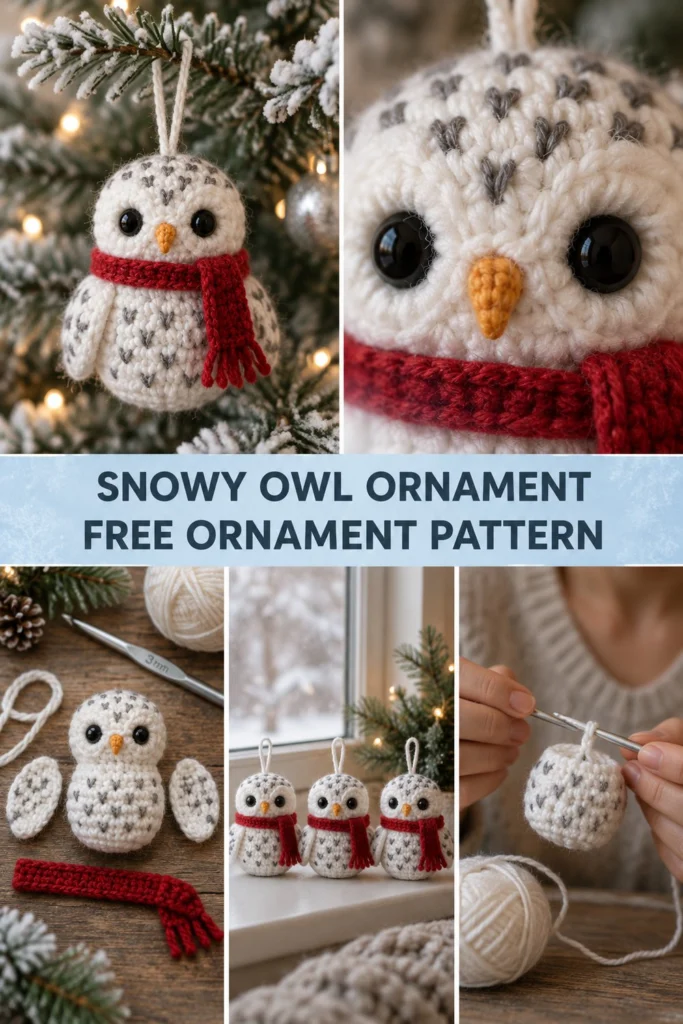
Bring a touch of whimsical woodland magic to your holiday tree this season with this adorable little snowy owl ornament. Working in quick continuous rounds with soft textured details and a cozy miniature scarf, this delightful amigurumi project is an absolute joy to stitch.
Snowy Owl Crochet Christmas Ornament Free Pattern
Quick Facts
- Skill level: Easy Beginner
- Finished size: 3 inches (7.6 cm) tall by 2.5 inches (6.4 cm) wide
- Yarn: Sport weight yarn in White, Dark Grey, and Crimson Red
- Hook: 3.0 mm crochet hook (US size C/2 or D/3)
- Stitches used: sc, inc, dec, sl st, ch
- Time to make: 1 to 2 hours
What Makes This Snowy Owl Ornament Special
This festive little ornament is designed with amigurumi efficiency in mind. The main body is formed using a classic continuous egg-shaped spiral, while the tiny flat oval wings are worked separately and sewn securely to the sides. The charming grey V-shaped speckles are easily added using simple surface embroidery stitches just before attaching the miniature red scarf around the neck.
Skill Level
- Basic understanding of crochet terminology and magic ring technique
- Working in continuous spiral rounds without joining
- Basic increases and invisible decreases
- Simple surface embroidery and assembly
If you can hold a hook and yarn, you can easily complete this sweet little project!
Finished Measurements
| Measurement | Inches | Centimeters |
|---|---|---|
| Height (excluding hanger) | 3.0 in | 7.6 cm |
| Width (body at widest point) | 2.5 in | 6.4 cm |
| Depth | 2.5 in | 6.4 cm |
Materials You Will Need
| Material / Color | Yarn Weight / Type | Yards | Meters |
|---|---|---|---|
| White (Main Color) | Sport / Cotton-Acrylic Blend | 35 yds | 32 m |
| Dark Grey (Speckles) | Sport / Cotton-Acrylic Blend | 5 yds | 5 m |
| Crimson Red (Scarf) | Sport / Cotton-Acrylic Blend | 10 yds | 9 m |
| Yellow (Beak) | Sport / Cotton-Acrylic Blend | 2 yds | 2 m |
- Crochet Hook: 3.0 mm
- Notions: Polyester fiberfill stuffing, tapestry needle, stitch markers, two 6mm black safety eyes (or embroidery floss for babies under 3), small length of white yarn for the hanging loop.
Yarn Suggestions
| Yarn Line | Weight | Notes |
|---|---|---|
| Schachenmayr Catania | Sport (Fine) | Excellent stitch definition, wide color range |
| Omega Hilos Vera | Sport (Fine) | Smooth mercerized cotton, holds shape well |
| YarnArt Jeans | Sport (Fine) | Wonderful cotton-acrylic blend with a soft matte finish |
Gauge
- Rnds 1 to 6 of the flat circle base = 1.5 inches (3.8 cm) across using a 3.0 mm hook.
- Exact gauge is not critical for amigurumi ornaments, but tight and even stitches ensure the fiberfill stuffing does not show through.
Abbreviations
- ch: chain
- sc: single crochet
- inc: single crochet increase (2 sc in one stitch)
- dec: invisible decrease (sc2tog through front loops only)
- sl st: slip stitch
- st(s): stitch(es)
- Rnd(s): round(s)
- Row(s): row(s)
- FO: fasten off
UK terms equivalent note: sc = dc, hdc = htr, dc = tr.
Special Stitches Explained
- Magic Ring: A movable starting ring. Wrap yarn around your left index finger twice, insert hook under loops, pull up a loop, ch 1, and work the first round of stitches into the center of the ring.
- Invisible Decrease (dec): Insert hook into the front loop only of the next stitch, then insert hook into the front loop only of the following stitch (3 loops on hook). Yarn over and pull through the first 2 loops, yarn over and pull through remaining 2 loops.
Pattern Instructions
Pattern Notes: The body and wings are worked in continuous spiral rounds without joining. Do not slip stitch at the end of rounds unless specified. Use a stitch marker to keep track of the first stitch of each round.
Section 1: Body (White, make 1)
Rnd 1: Start 6 sc in a magic ring (6 sc)
Rnd 2: (inc) x 6 (12 sc)
Rnd 3: (1 sc, inc) x 6 (18 sc)
Rnd 4: (2 sc, inc) x 6 (24 sc)
Rnd 5: (3 sc, inc) x 6 (30 sc)
Rnd 6: (4 sc, inc) x 6 (36 sc)
Rnds 7 to 14: sc in each st around (36 sc)
Rnd 15: (4 sc, dec) x 6 (30 sc)
Rnd 16: (3 sc, dec) x 6 (24 sc)
Insert safety eyes between Rnds 10 and 11, approximately 6 stitches apart. Embroider the small yellow triangular beak centered between the eyes using yellow yarn. Start firmly stuffing the body with polyester fiberfill.
Rnd 17: (2 sc, dec) x 6 (18 sc)
Rnd 18: (1 sc, dec) x 6 (12 sc)
Add a little more stuffing to top off the owl.
Rnd 19: (dec) x 6 (6 sc)
FO, leaving a long tail. Thread tail through front loops of remaining 6 stitches and pull tight to close the opening. Weave in end securely.
Section 2: Wings (White, make 2)
Row 1: Ch 5, starting in 2nd ch from hook, 4 sc, turn (4 sc)
Row 2: Ch 1, inc, 2 sc, inc, turn (6 sc)
Rows 3 to 4: Ch 1, sc in each st across, turn (6 sc)
Row 5: Ch 1, dec, 2 sc, dec, turn (4 sc)
Row 6: Ch 1, dec x 2 (2 sc)
FO, leaving a long tail for sewing.
Section 3: Scarf (Crimson Red, make 1)
Row 1: Ch 43, starting in 2nd ch from hook, 42 sc, turn (42 sc)
Row 2: Ch 1, sc in each st across (42 sc)
FO. Cut several 1-inch strands of red yarn and attach them as fringe to both short ends of the scarf.
Section 4: Hanging Loop (White, make 1)
Cut a 6-inch strand of white yarn, secure it firmly to the top center of the owl’s head (between Rnds 18 and 19), and knot the ends together to form a hanging loop.
Assembly and Finishing
- Embroidery: Using dark grey yarn and a tapestry needle, embroider small V-shaped speckles scattered across the head and body of the owl in rows, mimicking snowy owl plumage as shown in the photos.
- Wings: Pin the flat oval wings to each side of the body, spanning roughly Rnds 8 through 13. Sew them securely in place with the white yarn tails.
- Scarf: Wrap the crimson red scarf around the owl’s neck just below the beak, crossing one end over the other so the fringed ends drape nicely down the front chest. Secure with a few discreet stitches of red yarn if desired.
Size Customization Tips
- To make a slightly larger ornament, use a worsted weight yarn with a 4.0 mm hook, adding one extra increase round to the body (+6 stitches per round) and adjusting the straight rounds accordingly.
- For a miniature gift tag size, use embroidery floss or lace weight thread with a 1.5 mm hook.
Care Instructions
Spot clean gently with a damp cloth and mild soap. Do not submerge in water or machine wash to protect the fiberfill stuffing and safety eyes.
FAQ
Can I use safety eyes if children under 3 will handle the ornament?
For ornaments intended for small children or babies under 3, it is always recommended to embroider the eyes using black embroidery floss instead of using plastic safety eyes to prevent any choking hazard.
How do I make the owl sit flat on a tree branch?
When stuffing the bottom portion of the owl, gently flatten the base against a hard surface before closing Rnd 19 so it maintains a stable, rounded egg shape that rests easily on branches.
Can I substitute worsted weight yarn for this pattern?
Yes, you can use worsted weight yarn, but keep in mind your finished ornament will be slightly larger (around 4 inches tall) and you will need to increase your yarn amounts accordingly.