
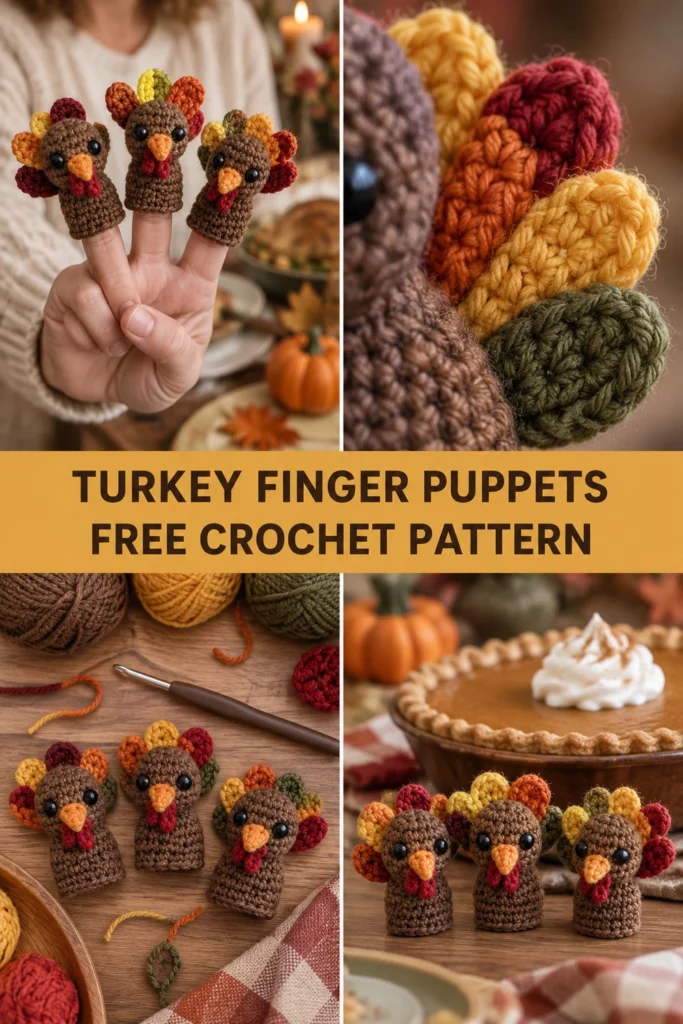
Keep little ones busy at the Thanksgiving table with adorable turkey finger puppets! Each little bird is worked as a tiny amigurumi tube in continuous single crochet rounds, topped with a colorful fan of mini feathers, an orange beak, and a red waltungs sewn into place. They take about thirty minutes each and use up tiny scraps of yarn from your stash.
Crochet Turkey Finger Puppet Set Free Thanksgiving Pattern
Quick Facts
| Feature | Detail |
|---|---|
| Skill level | Easy / Beginner Amigurumi |
| Finished size | Approx. 2.5 in (6.4 cm) tall, fits standard fingers |
| Yarn | Fingering or Sport weight yarn scraps (Cotton or Acrylic) |
| Hook | 2.5 mm (US C/2) crochet hook |
| Stitches used | US terminology (sc, inc, dec, sl st) |
| Time to make | ~30 minutes per puppet |
What Makes This Crochet Turkey Finger Puppet Special
These sweet little turkeys are designed specifically as interactive toys for children during holiday dinners. Working the body in continuous rounds creates a seamless, sturdy tube that slips easily over a child’s finger without flopping over. The tail feathers are worked individually and layered into a vibrant fan, using leftover scraps of red, orange, yellow, and green yarn to capture the rich colors of autumn.
Skill Level
- Basic amigurumi construction (magic ring, continuous rounds)
- Simple increases and invisible decreases
- Basic sewing and embroidery techniques
Finished Measurements
| Dimension | Inches | Centimeters |
|---|---|---|
| Height | 2.5 in | 6.4 cm |
| Diameter (Base) | 0.8 in | 2.0 cm |
Materials You Will Need
| Material | Description | Quantity / Details |
|---|---|---|
| Brown Yarn (A) | Sport/Fingering weight (body) | ~15 yds / 14 m |
| Red Yarn (B) | Sport/Fingering weight (waddle/feather) | ~3 yds / 3 m |
| Orange Yarn (C) | Sport/Fingering weight (beak/feather) | ~3 yds / 3 m |
| Yellow Yarn (D) | Sport/Fingering weight (feather) | ~3 yds / 3 m |
| Green Yarn (E) | Sport/Fingering weight (feather) | ~3 yds / 3 m |
| Black Yarn | Embroidery floss or scrap (eyes) | Small amount |
| Crochet Hook | 2.5 mm (US C/2) | — |
| Notions | Yarn needle, stitch marker, tiny amount of fiberfill | — |
Yarn Suggestions
| Yarn Line | Weight | Skein Yardage | Notes |
|---|---|---|---|
| Schachenmayr Catania | Sport (Fine 2) | 137 yds (125 m) per 50g | 100% mercerized cotton; holds shape brilliantly for amigurumi. |
| Knit Picks CotLin | Fingering (Fine 2) | 123 yds (112 m) per 50g | Cotton/linen blend with a lovely matte finish. |
| Hobbii Rainbow Cotton 8/4 | Fingering (Fine 2) | 186 yds (170 m) per 50g | Incredible color range for making multi-colored feathers. |
Gauge
- 12 sts x 14 rnds = 2 in (5 cm) in single crochet using a 2.5 mm hook.
- Rnds 1 to 3 of the body base = 0.8 in (2 cm) across.
- Gauge is not overly critical for puppets, but keeping your stitches tight ensures the finger opening stays snug.
Abbreviations (US Terms)
| Abbreviation | Meaning |
|---|---|
| ch | chain |
| dec | single crochet decrease (invisible decrease recommended) |
| inc | single crochet increase (2 sc in same stitch) |
| rep | repeat |
| rnd(s) | round(s) |
| sc | single crochet |
| sl st | slip stitch |
| st(s) | stitch(es) |
| [ ] | work instructions within brackets as directed |
UK/Australia equivalent terms: UK: sc = dc, hdc = htr, dc = tr.
Special Stitches Explained
- Magic Ring: A movable starting loop. Wrap yarn around your fingers, insert hook, pull up a loop, and ch 1 to secure, then work the first round of stitches into the ring.
- Invisible Decrease (dec): Insert hook into the front loop only of the next stitch, then insert hook into the front loop only of the following stitch (3 loops on hook). Yarn over and pull through the first 2 loops, yarn over and pull through remaining 2 loops.
Pattern Instructions
Pattern Notes
- The body is worked in continuous spiral rounds without joining. Do not turn at the end of rounds.
- Use a stitch marker to keep track of the first stitch of each round.
- Stuff the very top of the head lightly with fiberfill, leaving the lower half open and unstuffed so a finger can slide inside.
Body (Make 1 per Turkey in Brown Yarn A)
Rnd 1: Start 6 sc in a magic ring (6 sc)
Rnd 2: [inc] x 6 (12 sc)
Rnd 3: [1 sc, inc] x 6 (18 sc)
Rnds 4 to 10: sc in each st around (18 sc)
Rnd 11: [1 sc, dec] x 6 (12 sc)
Sl st in next st, fasten off, leaving a short tail. Weave in the starting tail. Stuff the top dome of the head lightly.
Tail Feathers (Make 4 to 5 in assorted colors: Red B, Orange C, Yellow D, Green E)
Each feather is worked flat in rows or as a small oval shape.
Row 1: Ch 5, sc in 2nd ch from hook and in next 3 ch, turn (4 sc)
Row 2: Ch 1, dec, dec, turn (2 sc)
Row 3: Ch 1, dec (1 sc)
Fasten off, leaving a 6 in (15 cm) tail for sewing. Make feathers in a mix of autumn colors so you have a fan of contrasting shades.
Beak (Make 1 in Orange Yarn C)
Rnd 1: Start 4 sc in a magic ring (4 sc)
Rnd 2: [1 sc, inc] x 2 (6 sc)
Fasten off, leaving a 4 in (10 cm) tail for sewing. Flatten slightly.
Waddle (Make 1 in Red Yarn B)
Row 1: Ch 4, sl st in 2nd ch from hook, sl st in next ch, sc in last ch (3 sts)
Fasten off, leaving a 4 in (10 cm) tail for sewing.
Assembly
- Tail Fan: Arrange 4 to 5 colorful feathers in a fan shape overlapping slightly at the base. Sew the bottom edges securely to the back of the turkey’s body spanning Rnds 5 to 9.
- Beak & Waddle: Position the beak centrally on the front of the face around Rnd 7. Sew it in place. Position the red waddle just below and slightly to one side of the beak, stitching it securely.
- Eyes: Using black embroidery floss or a length of black yarn, embroider two small french knots or short horizontal stitches for the eyes on Rnd 8, about 3 stitches apart, just above the beak.
Size Customization Tips
- Larger Finger Size: If you need a wider opening for a larger adult finger or thumb, start Rnd 1 with 8 sc in the magic ring, increase to 24 sc on Rnd 3, and maintain 24 sc for the body rounds.
- Child vs. Adult: The standard pattern fits most children’s fingers and average adult fingers comfortably due to the natural stretch of single crochet stitches.
Care Instructions
Spot clean gently with a damp cloth and mild soap. Do not submerge completely in water if fiberfill stuffing tends to clump, and lay flat to dry completely before the next play session.
FAQ
Can I use safety eyes instead of embroidery?
For children aged 3 and older, small 4mm or 5mm safety eyes can be used. However, for babies and toddlers under 3 years old, always embroider the eyes using black yarn or embroidery floss to eliminate any choking hazards.
What is the best yarn for these puppets?
Smooth sport or fingering weight mercerized cotton (like Schachenmayr Catania) is ideal. It resists pilling, holds its shape firmly on a finger, and shows off your stitches cleanly.
How do I keep the puppet from slipping off fingers?
Working the body down to 12 stitches in the final rounds creates a natural cuff effect that grips the finger snugly. If it feels too loose, work an extra decrease round to reduce the base opening to 10 stitches.