











10. Detailed Skull Amigurumi
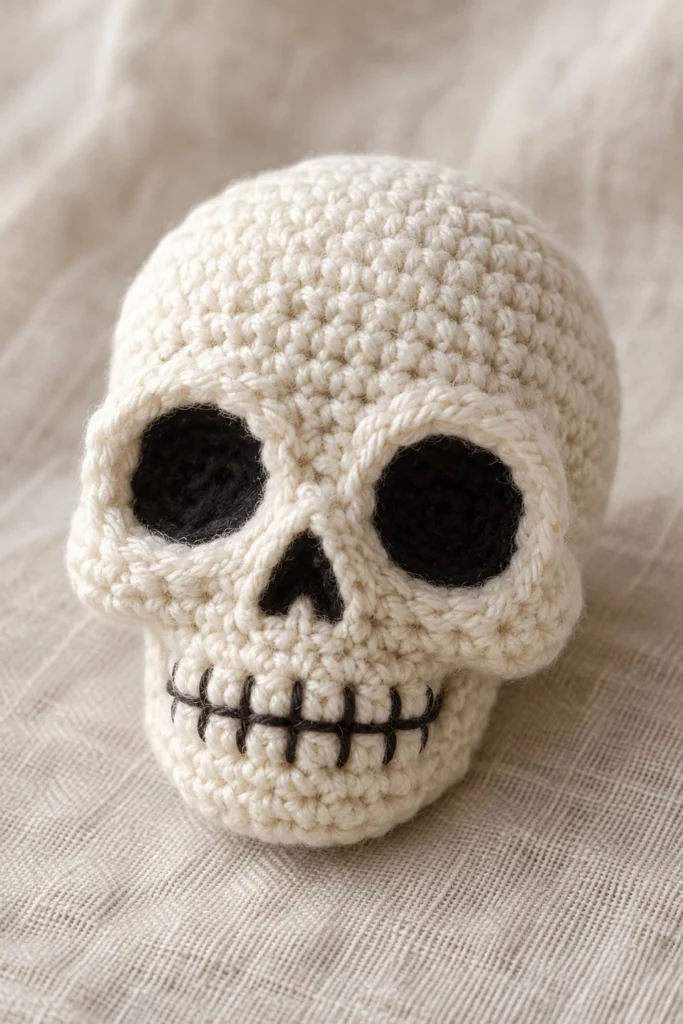
Bring a playful, slightly spooky touch to your autumn decor with this charming little crochet skull. Worked seamlessly in one piece from top to bottom with carefully shaped eye sockets, it is quick to make and full of personality at three inches tall.
Quick Facts
| Skill level | Finished size | Yarn | Hook | Time |
|---|---|---|---|---|
| Easy-Intermediate | 3 in / 7.5 cm tall | DK cotton (Cat. 3) | 3.5 mm (US E/4) | 1 hour |
Materials You Will Need
- DK weight cotton yarn (Cat. 3): 25 grams (approx. 60 metres) in Cream White
- Small amount of Black embroidery floss or DK yarn for facial features
- 3.5 mm (US E/4) crochet hook
- Polyester fiberfill stuffing
- Tapestry needle
- Stitch marker
Gauge
First 3 rounds measure approximately 2.5 cm across. Gauge is not critical for this project, but work tightly with even tension to ensure the stuffing does not show through the stitches.
Abbreviations (US Terms)
- ch: chain
- sc: single crochet
- inc: single crochet increase (work 2 sc in same stitch)
- dec: single crochet decrease (work 2 sc together through front loops)
- sl st: slip stitch
- st(s): stitch(es)
- Rnd(s): round(s)
- BLO: back loop only
UK terms: sc = dc, hdc = htr, dc = tr.
Pattern Notes
- All parts are worked in continuous spiral rounds without joining unless specified otherwise. Use a stitch marker to track the first stitch of each round.
- Stitch counts are given in brackets at the end of each round.
Instructions
Skull Body – Cream White, make 1
Rnd 1: 6 sc in a magic ring (6)
Rnd 2: inc x 6 (12)
Rnd 3: (1 sc, inc) x 6 (18)
Rnd 4: (2 sc, inc) x 6 (24)
Rnd 5: (3 sc, inc) x 6 (30)
Rnd 6: (4 sc, inc) x 6 (36)
Rnd 7 to Rnd 11: sc in each st around (36)
Rnd 12: (4 sc, dec) x 6 (30)
Rnd 13: (3 sc, dec) x 6 (24)
Rnd 14: (2 sc, dec) x 6 (18)
Stuff firmly now.
Rnd 15: (1 sc, dec) x 6 (12)
Rnd 16: dec x 6 (6)
Fasten off, leave a 20 cm tail, thread through front loops of remaining 6 sts, pull tight to close, and weave in end.
Assembly
Position the facial features on the front of the skull, centered between Rnd 4 and Rnd 11. Using black yarn or embroidery floss, embroider two large hollow oval eye sockets, a small inverted triangle for the nose cavity, and a straight horizontal mouth line across the jaw with vertical hash marks for teeth.
Finishing
Weave in all remaining loose ends securely inside the skull body. Shape the stuffed piece gently between your hands to define the rounded cranium and narrower jawline.
Tips and Common Mistakes
- Do not overstuff the lower jaw area so that the skull maintains a slightly flattened bottom.
- Always move your stitch marker to the first stitch of the new round immediately.
- If your magic ring leaves a hole, use the starting tail to weave around the base of the ring stitches and pull tight before securing.
Frequently Asked Questions
Can I use acrylic yarn instead of cotton?
Yes, DK weight acrylic yarn works wonderfully and gives the skull a softer texture.
Can I make this for a baby or toddler?
For children under three, embroider all facial details with yarn instead of using any plastic components, and ensure all ends are securely fastened.
How do I change the size of the skull?
You can easily resize the pattern by using a heavier yarn with a larger hook for a bigger skull, or a finer thread with a smaller hook for a miniature version.
📄 Your free PDF pattern