











23. Mini Pumpkin Basket
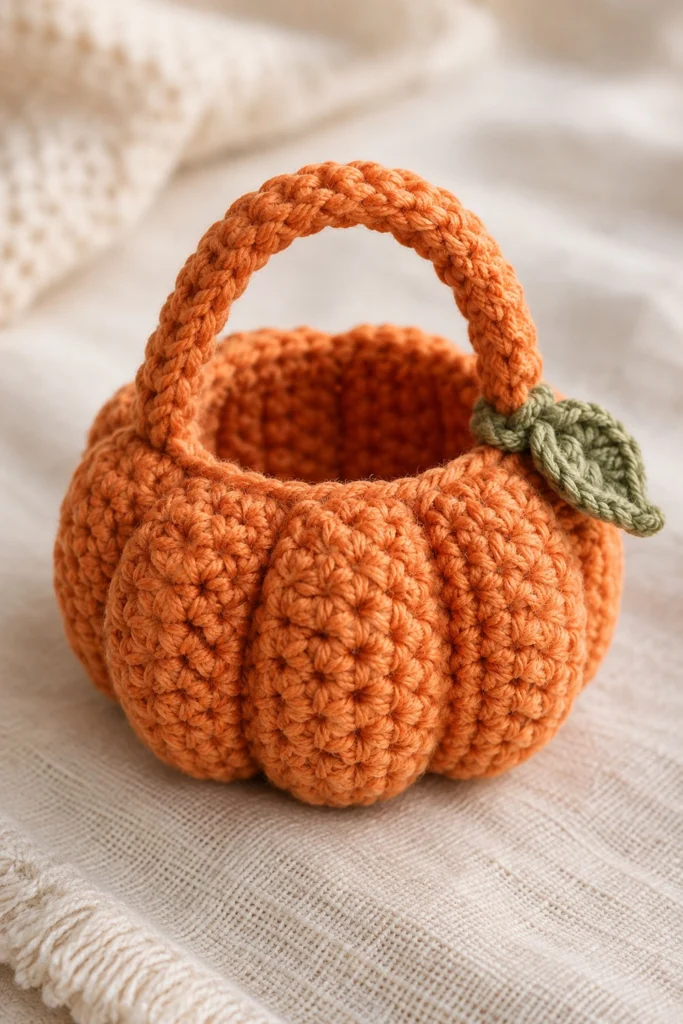
Bring a touch of handmade Halloween spirit to your seasonal displays with this charming Mini Pumpkin Basket, designed to hold tiny treats or simply sit as a festive decor piece. Standing at a neat three inches wide, this quick project works up in no time using basic stitches and clever surface shaping.
Quick Facts
| Skill level | Finished size | Yarn | Hook | Time |
|---|---|---|---|---|
| Easy-Intermediate | 3 in / 7.5 cm wide | Worsted cotton (Cat. 4) | 4.0 mm (US G/6) | 1 hour |
Materials You Will Need
- Worsted weight cotton yarn (Cat. 4) in Orange (35 grams, 60 metres) and Green (10 grams, 18 metres)
- 4.0 mm (US G/6) crochet hook
- Polyfill fiberfill stuffing (5 grams)
- Tapestry needle
- Stitch marker
Gauge
First 3 rounds of the basket base measure 3.5 cm across. Working tightly with even tension matters more than exact gauge to ensure the basket holds its rigid shape.
Abbreviations (US Terms)
- ch = chain
- sc = single crochet
- inc = single crochet increase (work 2 sc in the same stitch)
- dec = single crochet decrease (insert hook into next 2 stitches, yarn over, pull through all loops)
- sl st = slip stitch
- BLO = back loop only
- st(s) = stitch(es)
- rep = repeat
UK terms: sc = dc, hdc = htr, dc = tr.
Pattern Notes
- The basket body is worked in continuous spiral rounds without joining, unless otherwise specified. Use a stitch marker to track the beginning of each round.
- Stitch counts are listed in brackets at the end of every round.
- Maintain firm, consistent tension so the basket maintains its structure.
Instructions
Basket Base and Body – Orange, make 1
Rnd 1: 6 sc in a magic ring (6)
Rnd 2: inc x 6 (12)
Rnd 3: (1 sc, inc) x 6 (18)
Rnd 4: (2 sc, inc) x 6 (24)
Rnd 5: (3 sc, inc) x 6 (30)
Rnd 6: (4 sc, inc) x 6 (36)
Rnd 7: (5 sc, inc) x 6 (42)
Rnd 8: Working in BLO, sc in each st around (42)
Rnd 9 to Rnd 14: sc in each st around (42)
Rnd 15: (5 sc, dec) x 6 (36)
Rnd 16: sc in each st around (36)
Fasten off, leave a 40 cm tail for weaving and shaping the pumpkin segments.
Stem and Handle – Green, make 1
Rnd 1: 6 sc in a magic ring (6)
Rnd 2: (1 sc, inc) x 3 (9)
Rnd 3 to Rnd 4: sc in each st around (9)
Rnd 5: (1 sc, dec) x 3 (6)
Rnd 6: sc in each st around (6)
Rnd 7: Ch 25, skip remaining stem stitches, join with a sl st to the opposite side of the stem base to form the handle loop.
Fasten off, leave a 25 cm tail for sewing.
Assembly
Stuff the basket body lightly with fiberfill to give it shape while keeping the interior open for treats. Thread the long orange tail onto your tapestry needle. Bring the needle from the bottom center of the basket up through the inside to the top opening, pulling firmly to create the classic pumpkin indentations. Repeat this process around the basket at equal intervals to create six distinct segments. Secure and weave in the orange ends. Sew the green stem and handle securely to the top center opening of the basket.
Finishing
Weave in any remaining loose yarn ends securely inside the basket. Check that all segments are evenly pulled and the handle is centered.
Tips and Common Mistakes
- Do not overstuff the basket, or the sides will bulge and lose their clean pumpkin shape.
- Always use a stitch marker at the start of rounds to prevent losing your place in spiral work.
- Ensure cotton yarn is used rather than acrylic for a stiffer, more durable finish that holds small items well.
- Double-check that your handle chain is twisted evenly before securing it down.
Frequently Asked Questions
Can I use acrylic yarn instead of cotton?
Yes, but cotton yarn provides better structural rigidity for a basket, whereas acrylic may result in a softer, more pliable finish.
How do I wash this item?
Spot clean gently with a damp cloth and mild soap. Do not submerge completely in water to preserve the inner fiberfill shape.
Can I make this basket larger?
Yes, you can continue the base increase rounds for another round or two before starting the body rows, adjusting the stem size proportionally.
📄 Your free PDF pattern