











8. Christmas Tree Coaster
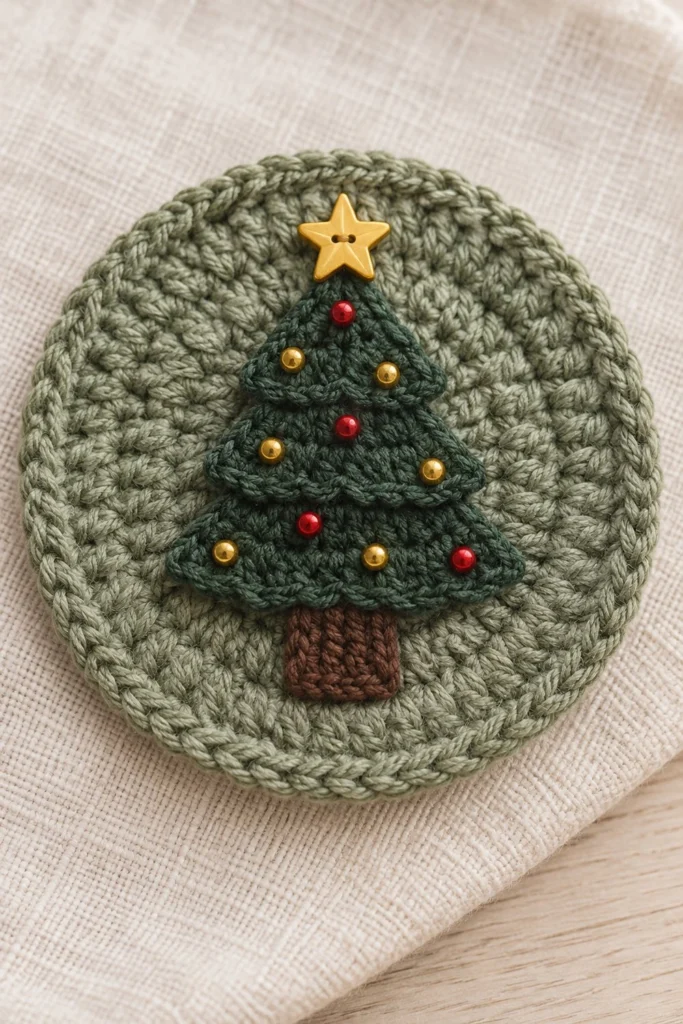
Bring handmade charm to your holiday table with this festive Christmas Tree Coaster. Featuring a textured circular base, a layered evergreen tree complete with tiny decorative beads, and a sweet wooden star button on top, it protects surfaces while spreading seasonal cheer. Measuring 4 inches across, this quick project takes about an hour to complete.
Quick Facts
| Skill level | Finished size | Yarn | Hook | Time |
|---|---|---|---|---|
| Easy-Intermediate | 4 in / 10 cm across | DK cotton (Cat. 3) | 3.5 mm (US E/4) | 1 hour |
Materials You Will Need
- DK weight 100% cotton yarn: Sage Green (Color A, approx. 15 grams / 35 metres), Dark Green (Color B, approx. 8 grams / 20 metres), Brown (Color C, approx. 2 grams / 5 metres)
- 3.5 mm (US E/4) crochet hook
- 1 gold star button (approx. 18 mm)
- 6 tiny red seed beads and 6 tiny gold seed beads for tree decorations
- Tapestry needle
- Matching sewing thread and needle for attaching beads and button
Gauge
First 3 rounds of the Coaster Base measure 5 cm across. Working with consistent tension matters more than exact gauge for this project.
Abbreviations (US Terms)
- ch: chain
- sc: single crochet
- hdc: half double crochet
- dc: double crochet
- sl st: slip stitch
- inc: increase (work 2 sc in the same stitch)
- dec: decrease (sc 2 stitches together)
- BLO: back loop only
- st(s): stitch(es)
UK terms: sc = dc, hdc = htr, dc = tr.
Pattern Notes
- The Coaster Base is worked in continuous rounds without joining; use a stitch marker to track the first stitch of each round.
- The Christmas Tree is worked in rows from the top down, with each tier built directly onto the previous one.
- Stitch counts are shown in brackets at the end of every round and row.
Instructions
Coaster Base – Sage Green, make 1
Rnd 1: 8 sc in a magic ring (8)
Rnd 2: inc x 8 (16)
Rnd 3: (sc 1, inc) x 8 (24)
Rnd 4: (sc 2, inc) x 8 (32)
Rnd 5: (sc 3, inc) x 8 (40)
Rnd 6: (sc 4, inc) x 8 (48)
Rnd 7: (sc 5, inc) x 8 (56)
Rnd 8: (sc 6, inc) x 8 (64)
Rnd 9: working in BLO, sc in each st around (64)
Rnd 10: sl st in each st around (64)
Fasten off, weave in all ends securely.
Christmas Tree – Dark Green, make 1
Ch 9.
Row 1: Working in the back bumps of the chain, sc in 2nd ch from hook and in each ch across, turn (8)
Row 2: Ch 1, sc2tog, sc 4, sc2tog, turn (6)
Row 3: Ch 1, sc across, turn (6)
Row 4: Ch 1, sc2tog, sc 2, sc2tog, turn (4)
Row 5: Ch 1, sc across, turn (4)
Row 6: Ch 1, sc2tog twice, turn (2)
Row 7: Ch 1, sc2tog. Do not fasten off (1).
Now work the edging around the tree to create the layered branches:
Working down the left edge, work 2 sc in the side of each row down to the base, 3 sc in the bottom corner, sc across the bottom of the tree, 3 sc in the bottom right corner, and 2 sc in the side of each row back up to the top tip. Join with a sl st to the first st.
Fasten off, leave a 30 cm tail for sewing.
Tree Trunk – Brown, make 1
Ch 5.
Row 1: Sc in 2nd ch from hook and in each ch across, turn (4)
Rows 2-3: Ch 1, sc across, turn (4)
Fasten off, leave a 20 cm tail for sewing.
Assembly
Position the tree trunk centrally at the lower edge of the Christmas tree, overlapping the bottom edge by one row, and sew it in place using the brown tail. Center the assembled tree on top of the sage green coaster base, with the bottom of the trunk resting just inside the edge of Rnd 9. Sew the tree securely to the coaster base using the dark green tail. Using matching sewing thread, sew the gold star button to the very top tip of the tree. Sew the 6 red and 6 gold seed beads securely onto the tree branches, distributing them evenly across the three tiers.
Finishing
Weave in any remaining loose yarn ends on the back of the coaster. Gently steam block the finished piece under a damp cloth to ensure the coaster lies completely flat.
Tip: Use sewing thread rather than yarn when attaching the beads and button so they sit snugly and securely against the crochet stitches.
Tips and Common Mistakes
- Count your stitches at the end of each round on the coaster base to ensure your circle stays flat and does not ripple.
- When working the tree edging, keep your tension even so the sides of the tree maintain their neat, jagged shape.
- Make sure to anchor your seed beads with multiple passes of thread so they do not loosen with everyday use.
- Use mercerized cotton yarn for a crisp stitch definition and a smooth surface that resists pilling.
Frequently Asked Questions
How do I clean this coaster if it gets stained?
Spot clean gently with mild soap and warm water, then lay flat to dry. Avoid machine washing or tumble drying to protect the wooden button and beads.
Can I use acrylic yarn instead of cotton?
Cotton yarn is strongly recommended because it is absorbent, heat-resistant, and holds its shape much better under cups and mugs than acrylic.
What should I do if my coaster base starts to cup or ripple?
Cupping usually means your stitches are too tight, while rippling means you have too many stitches. Check your stitch counts against the pattern for each round and adjust your hook size if necessary.
Can I make the coaster larger to fit a teapot?
Yes, simply continue the pattern by adding more increase rounds (+8 stitches per round) before working the BLO ridge round.
📄 Your free PDF pattern