











13. Santa Owl Coaster
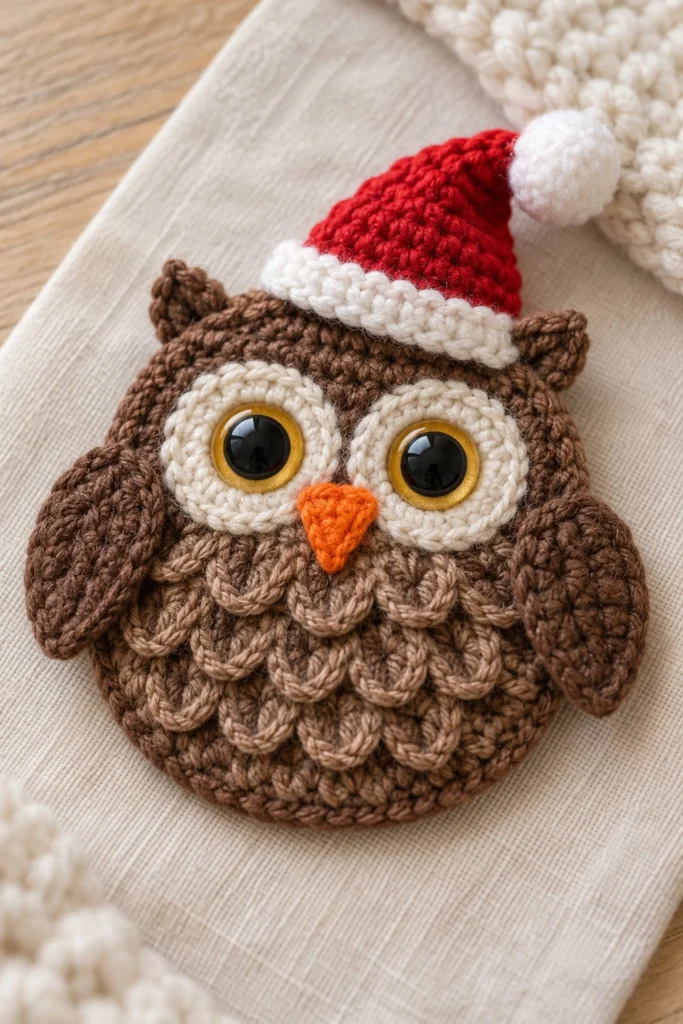
Bring some festive cheer to your holiday table with this charming Santa Owl Coaster! Featuring a classic textured body, wide curious eyes, and a cute little Santa hat complete with a fluffy pom-pom, this cheerful coaster measures 4 inches across and takes just about an hour to whip up.
Quick Facts
| Skill level | Finished size | Yarn | Hook | Time |
|---|---|---|---|---|
| Easy-Intermediate | 4 in / 10 cm across | DK cotton (Cat. 3) | 3.5 mm (US E/4) | 1 hour |
Materials You Will Need
- DK weight cotton yarn in Dark Brown (approx. 15g / 40m), Light Brown (approx. 5g / 15m), Cream (approx. 5g / 15m), Red (approx. 5g / 15m), White (approx. 5g / 15m), and Orange (approx. 2g / 6m)
- 3.5 mm (US E/4) crochet hook
- Two 12mm black safety eyes with backings (or black embroidery floss if making for a toddler under three)
- Small amount of fiberfill stuffing for the hat tip
- Yarn needle for weaving in ends
- Stitch marker
Gauge
The first 3 rounds of the Base measure 2 inches (5 cm) across. Working with even tension is more important than exact gauge for this flat coaster project.
Abbreviations (US Terms)
- ch: chain
- sc: single crochet
- hdc: half double crochet
- dc: double crochet
- sl st: slip stitch
- inc: increase (work 2 sc in the same stitch)
- dec: decrease (sc 2 stitches together)
- BLO: back loop only
- FLO: front loop only
- st(s): stitch(es)
- rep: repeat
- MR: magic ring
UK terms: sc = dc, hdc = htr, dc = tr.
Pattern Notes
- The coaster base is worked in continuous spiral rounds without joining, unless otherwise stated. Use a stitch marker to keep track of the first stitch of each round.
- Stitch counts are provided in brackets at the end of each round.
- Color changes should be made on the last pull-through of the previous stitch for clean transitions.
Instructions
Base – Dark Brown, make 1
Rnd 1: 6 sc in a magic ring (6)
Rnd 2: inc x 6 (12)
Rnd 3: (sc in next st, inc) x 6 (18)
Rnd 4: (sc in next 2 sts, inc) x 6 (24)
Rnd 5: (sc in next 3 sts, inc) x 6 (30)
Rnd 6: (sc in next 4 sts, inc) x 6 (36)
Rnd 7: (sc in next 5 sts, inc) x 6 (42)
Rnd 8: (sc in next 6 sts, inc) x 6 (48)
Rnd 9: (sc in next 7 sts, inc) x 6 (54)
Rnd 10: sl st in next st, fasten off and weave in ends (54)
Feather Texture Rows – Light Brown, make 1
Note: Worked onto the exposed loops of the base.
Row 1: Attach Light Brown yarn to the front loop of any stitch on Rnd 4 of the Base, working from left to right across the front: [sl st in next st, work (hdc, dc, hdc) in same st, skip next st] repeat around the center body to create textured feather loops, fasten off and weave in ends (24)
Eye Patches (Make 2) – Cream
Rnd 1: 6 sc in a magic ring, join with sl st to first sc (6)
Rnd 2: ch 1, inc in each st around, join with sl st to first sc (12)
Rnd 3: ch 1, (sc in next st, inc) x 6, join with sl st to first sc (18)
Fasten off, leaving a 20 cm tail for sewing.
Wings (Make 2) – Dark Brown
Row 1: ch 5, turn, sc in 2nd ch from hook and in each ch across, turn (4)
Row 2: ch 1, inc, sc in next 2 sts, inc, turn (6)
Row 3: ch 1, sc across, turn (6)
Row 4: ch 1, dec, sc in next 2 sts, dec, turn (4)
Row 5: ch 1, dec x 2, turn (2)
Row 6: ch 1, dec, fasten off leaving a 20 cm tail for sewing (1)
Ears / Tufts (Make 2) – Dark Brown
Row 1: Join yarn to top outer edge of base, ch 3, sc in 2nd ch from hook, hdc in next ch, sl st to base right next to starting point, fasten off and weave in ends (3)
Beak – Orange, make 1
Row 1: ch 4, sc in 2nd ch from hook, hdc in next ch, dc in last ch, fasten off leaving a 15 cm tail for sewing (3)
Santa Hat – Red and White, make 1
Rnd 1: With White, 6 sc in a magic ring (6)
Rnd 2: inc x 6 (12)
Rnd 3: sc in each st around (12)
Rnd 4: Change to Red, working in BLO, sc in each st around (12)
Rnd 5: (sc in next 2 sts, dec) x 3 (9)
Rnd 6: sc in each st around (9)
Rnd 7: (sc in next st, dec) x 3 (6)
Rnd 8: sc in each st around (6)
Fasten off, leave a 25 cm tail for sewing. Stuff the tip of the hat lightly with a small dab of fiberfill before attaching.
Assembly
1. Insert the safety eyes into the center of each Cream Eye Patch, securing the backs firmly on the wrong side.
2. Sew the Eye Patches onto the upper center of the owl base, just below the top edge.
3. Position the triangular Orange Beak pointing downwards right between the bottom inner edges of the two Eye Patches and sew securely.
4. Attach one Dark Brown Wing to each side of the owl base, angling them slightly downwards over the textured feather rows.
5. Sew the Santa Hat tilted slightly to the top left of the owl’s head, resting just above the ear tufts.
Finishing
Weave in all remaining loose yarn ends securely on the back of the coaster. Lightly steam block the finished piece if necessary to ensure it lies completely flat.
Tip: Use a tiny drop of fabric glue on the safety eye backs before snapping them in place to ensure they stay permanently secure on a frequently handled coaster.
Tips and Common Mistakes
- Curling base: If your base starts to cup or ripple, check your hook size and tension—making your stitches too tight will cause curling, while too loose will make it floppy.
- Eye placement: Make sure to attach the eye patches close together so the beak fits snugly right between them.
- Hat angle: Tilted hats give character! Don’t mount the Santa hat completely straight; angle it toward one of the ear tufts for a playful look.
- Yarn weight consistency: Ensure all colors used are the same DK yarn weight so the pieces stitch up in correct proportion to one another.
Frequently Asked Questions
Can I use worsted weight yarn instead of DK?
Yes, but your finished coaster will turn out larger than 4 inches across and you will need to adjust your hook size up to a 4.0mm or 4.5mm hook.
How do I wash this coaster if it gets stained with coffee or tea?
Hand wash gently in lukewarm water with mild detergent, lay flat to reshape, and air dry completely before using again.
What should I do if I am making this for a baby or toddler?
Do not use plastic safety eyes. Instead, use black embroidery floss to embroider simple French knots or small straight-stitch eyes securely.
Can I attach a loop to turn this into a Christmas tree ornament?
Definitely! Simply attach a 4-inch loop of matching yarn or metallic thread to the top point of the Santa hat before hanging.
📄 Your free PDF pattern