











5. Gingerbread Cookie Coaster
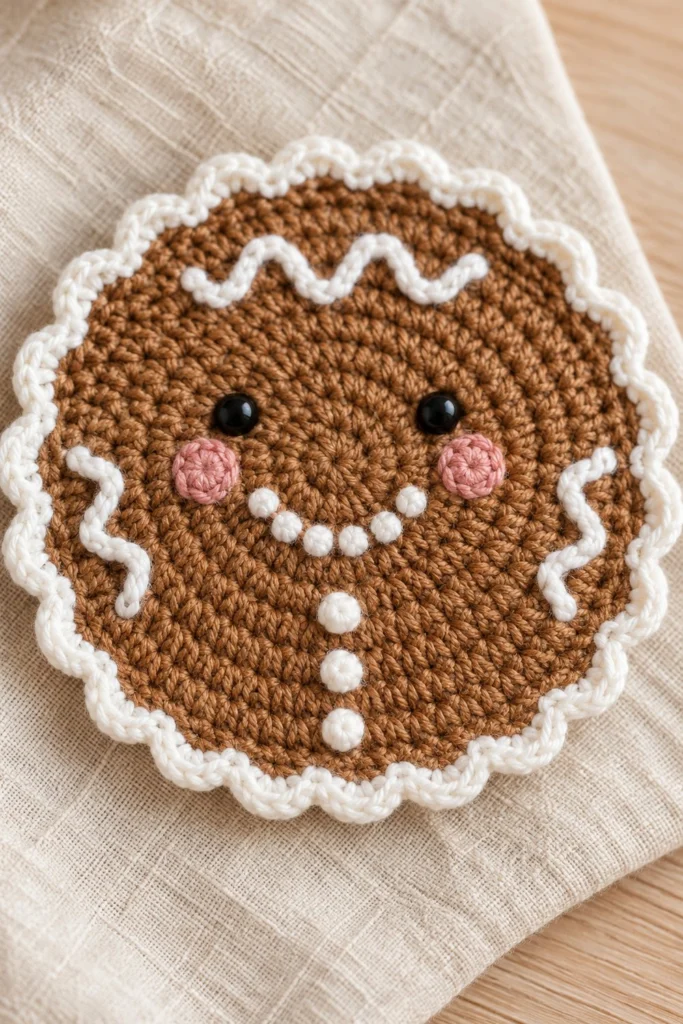
Add a touch of handmade sweetness to your holiday table with this charming gingerbread cookie coaster. Featuring delightful scalloped icing edges, rosy pink cheeks, and sweet embroidered details, it works up quickly in sturdy cotton yarn to protect your surfaces in festive style.
Quick Facts
| Skill level | Finished size | Yarn | Hook | Time |
|---|---|---|---|---|
| Easy | 4 in / 10 cm across | DK cotton (Cat. 3) | 3.5 mm (US E/4) | 45 minutes |
Materials You Will Need
- DK weight 100% cotton yarn in Gingerbread Brown (approx. 20 grams / 50 metres)
- DK weight 100% cotton yarn in White (approx. 10 grams / 25 metres)
- DK weight 100% cotton yarn in Light Pink (small scrap for cheeks)
- 3.5 mm (US E/4) crochet hook
- Two 6 mm black safety eyes with backings (or scrap black embroidery floss)
- Fiberfill stuffing (optional, for lightly stuffing cheeks and buttons as you sew them on for a 3D padded effect)
- Tapestry needle
- Stitch marker
Gauge
The first 3 rounds of the Cookie Base measure approximately 4 cm across. Working with even tension matters more than exact gauge for this project.
Abbreviations (US Terms)
- ch: chain
- sc: single crochet
- hdc: half double crochet
- dc: double crochet
- sl st: slip stitch
- inc: work 2 sc in the same stitch
- dec: single crochet 2 stitches together
- BLO: back loop only
- sk: skip
- st(s): stitch(es)
- Rnd(s): round(s)
- ( ) x N: repeat the instructions inside the parentheses N times
UK terms: sc = dc, hdc = htr, dc = tr.
Pattern Notes
- The Cookie Base is worked in continuous spiral rounds without joining, unless otherwise stated. Use a stitch marker to track the first stitch of each round.
- The scalloped border is worked directly onto the outer edge of the completed cookie base.
- Icing details like the squiggles and smile are surface crochet and embroidery worked after the base is complete.
Instructions
Cookie Base – Gingerbread Brown, make 1
Rnd 1: 6 sc in a magic ring (6)
Rnd 2: inc x 6 (12)
Rnd 3: (sc, inc) x 6 (18)
Rnd 4: (2 sc, inc) x 6 (24)
Rnd 5: (3 sc, inc) x 6 (30)
Rnd 6: (4 sc, inc) x 6 (36)
Rnd 7: (5 sc, inc) x 6 (42)
Rnd 8: (6 sc, inc) x 6 (48)
Rnd 9: (7 sc, inc) x 6 (54)
Rnd 10: (8 sc, inc) x 6 (60)
Sl st in next st to finish, fasten off invisibly and weave in ends. (60)
Scalloped Border – White, make 1
Rnd 1: Join white yarn in any back loop of Rnd 10 of the cookie base. Working in the BLO around: *sk 1 st, work 5 dc in next st, sk 1 st, sl st in next st; repeat from * around to create 15 scalloped shells, join with a sl st to first st. Fasten off and weave in all tails. (60)
Cheeks – Light Pink, make 2
Rnd 1: 6 sc in a magic ring, sl st to join in first sc (6)
Fasten off, leaving a 20 cm tail for sewing. Lightly stuff with fiberfill as you sew them on for a 3D padded effect if desired. (6)
Icing Buttons – White, make 3
Rnd 1: 5 sc in a magic ring, sl st to join in first sc (5)
Fasten off, leaving a 20 cm tail for sewing. Lightly stuff with fiberfill as you sew them on for a 3D padded effect if desired. (5)
Assembly
Insert the 6 mm safety eyes between Rnd 6 and Rnd 7 of the cookie base, spacing them approximately 6 stitches apart. Secure the backings firmly on the reverse side.
Sew the two pink cheeks directly below and slightly to the outside of each safety eye.
Position the three white icing buttons vertically down the lower center of the cookie base, starting just below the smile area, and sew securely in place.
Finishing
Using white embroidery floss or leftover white yarn, embroider a curved smile with french knots or tiny stitches running between the cheeks. Add wiggly icing lines across the top forehead and onto both side edges using surface slip stitches or chain-stitch embroidery. Weave in all remaining loose yarn tails securely on the back of the coaster.
Tip: Keep your tension consistent when working the scalloped white border so all fifteen shell curves match neatly in size.
Tips and Common Mistakes
- Ruffled edges: If your cookie base starts to ripple or cup, your stitches are too tight or you have worked extra increases. Check your counts at the end of every round.
- Curved icing lines: When adding surface slip-stitch squiggles, keep your working yarn loose so the stitches do not pull or warp the flat surface of the brown base.
- Safety eyes security: Always click the safety eye backings on completely before stuffing or finishing. If making this for a toddler, embroider the eyes with black yarn instead.
- Coaster thickness: This coaster is designed as a single flat layer to lie smoothly under cups, but you can back it with a round circle of felt if you prefer a thicker finish.
Frequently Asked Questions
Can I make this coaster larger to fit a mug and a spoon?
Yes, simply continue the flat circle increases for another round or two (+6 stitches per round), then adjust the border shell count to fit your final stitch total evenly.
What is the best way to wash these cotton coasters?
Hand wash gently in cool water with mild soap and lay flat to dry on a towel to preserve the flat shape and embroidered details.
Can I use acrylic yarn instead of cotton for this project?
Cotton is recommended because it absorbs moisture from cold glasses and resists heat from hot mugs better than acrylic, which can melt or pill.
What should I do if my stitch count is off by one at the end of a round?
Do not panic. Simply fudge a single increase or decrease in the final few stitches of that round to get back on track before moving to the next one.
📄 Your free PDF pattern