











7. Elf Face Coaster
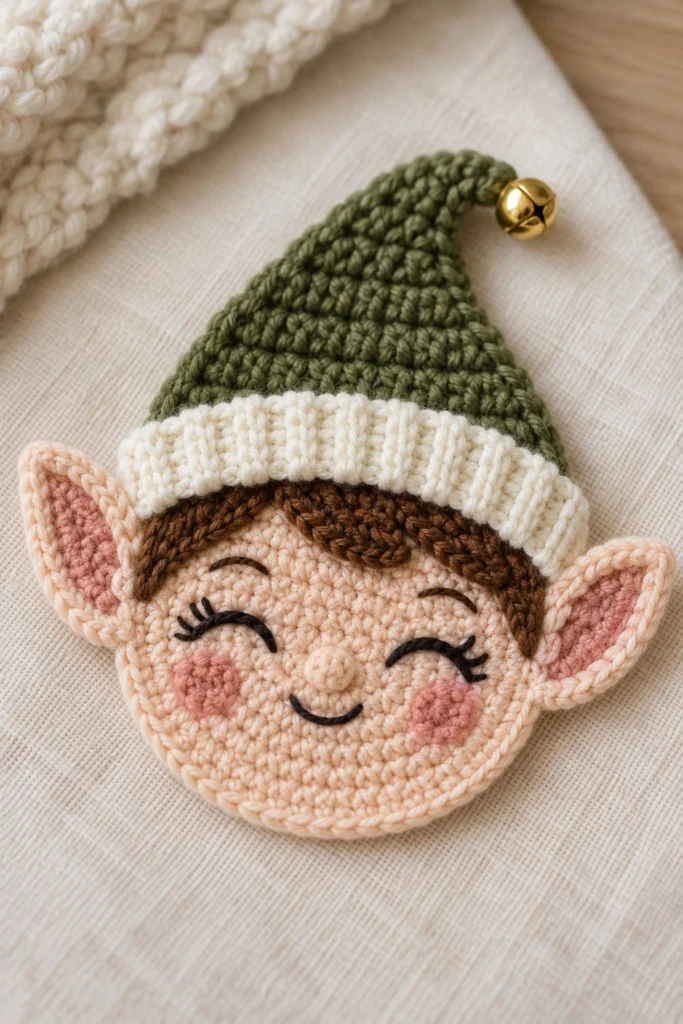
Bring festive cheer to your holiday table with this charming elf face coaster, complete with rosy cheeks, playful brown hair, and a pointy green hat topped with a golden jingle bell. Measuring 4 inches across, this delightful crochet project works up in just an hour.
Quick Facts
| Skill level | Finished size | Yarn | Hook | Time |
|---|---|---|---|---|
| Intermediate | 4 in / 10 cm diameter | DK cotton (Cat. 3) | 3.5 mm (US E/4) | 1 hour |
Materials You Will Need
- DK cotton yarn (Category 3) in Peach (approx. 10g), Pine Green (approx. 8g), Cream (approx. 5g), and Dark Brown (approx. 3g)
- Small amounts of Pink yarn for cheeks and Black embroidery floss for face details
- 3.5 mm (US E/4) crochet hook
- 1 small gold jingle bell
- Tapestry needle and sharp embroidery needle
- Scissors
Gauge
The first 3 rounds of the Face base measure 1.5 inches (3.8 cm) across. Working with even tension is more important than exact gauge for this project.
Abbreviations (US Terms)
- ch: chain
- sl st: slip stitch
- sc: single crochet
- hdc: half double crochet
- inc: increase (work 2 sc in the same stitch)
- dec: decrease (sc 2 stitches together)
- BLO: back loop only
- FLO: front loop only
- st(s): stitch(es)
- rnd(s): round(s)
- rep: repeat
UK terms: sc = dc, hdc = htr, dc = tr.
Pattern Notes
- The Face Base is worked in continuous spiral rounds without joining, unless otherwise stated. Use a stitch marker to keep track of the first stitch of each round.
- Stitch counts for each round are listed in brackets at the end of the line.
- The hat brim is worked in rows of back loop only half double crochet to create ribbing texture.
Instructions
Face Base – Peach, make 1
Rnd 1: 6 sc in a magic ring (6)
Rnd 2: inc x 6 (12)
Rnd 3: (sc in next st, inc) x 6 (18)
Rnd 4: (sc in next 2 sts, inc) x 6 (24)
Rnd 5: (sc in next 3 sts, inc) x 6 (30)
Rnd 6: (sc in next 4 sts, inc) x 6 (36)
Rnd 7: (sc in next 5 sts, inc) x 6 (42)
Rnd 8: (sc in next 6 sts, inc) x 6 (48)
Rnd 9: sc in each st around (48)
Fasten off, leave a 30 cm tail for sewing.
Hair – Dark Brown, make 2 tufts
Row 1: Ch 8, sc in 2nd ch from hook and in each ch across (7)
Fasten off, leaving a 15 cm tail for sewing.
Hat Brim – Cream, make 1
Row 1: Ch 6, hdc in 3rd ch from hook and in each ch across, turn (4 hdc, 1 turning ch counts as st)
Row 2-20: Ch 2, working in BLO, hdc in each st across, turn (5)
Fasten off, leaving a 20 cm tail to seam the band if desired, or leave open to sew straight across the face.
Hat – Pine Green, make 1
Rnd 1: 4 sc in a magic ring (4)
Rnd 2: sc in each st around (4)
Rnd 3: (sc, inc) x 2 (6)
Rnd 4: sc in each st around (6)
Rnd 5: (sc in next 2 sts, inc) x 2 (8)
Rnd 6: sc in each st around (8)
Rnd 7: (sc in next 3 sts, inc) x 2 (10)
Rnd 8: sc in each st around (10)
Rnd 9: (sc in next 4 sts, inc) x 2 (12)
Rnd 10: sc in each st around (12)
Rnd 11: (sc in next 3 sts, inc) x 3 (15)
Rnd 12: sc in each st around (15)
Rnd 13: (sc in next 4 sts, inc) x 3 (18)
Rnd 14: sc in each st around (18)
Rnd 15: (sc in next 2 sts, inc) x 6 (24)
Rnd 16: sc in each st around (24)
Rnd 17: (sc in next 3 sts, inc) x 6 (30)
Rnd 18: sc in each st around (30)
Rnd 19: (sc in next 4 sts, inc) x 6 (36)
Rnd 20: sc in each st around (36)
Rnd 21: (sc in next 5 sts, inc) x 6 (42)
Rnd 22: sc in each st around (42)
Rnd 23: (sc in next 6 sts, inc) x 6 (48)
Fasten off, leave a 30 cm tail for sewing.
Ears – Peach, make 2
Rnd 1: Ch 4, starting in 2nd ch from hook, work 2 sc, 3 sc in last ch, rotate to work along opposite side of foundation chain, work 1 sc, inc in last ch (8)
Rnd 2: inc, sc in next st, inc x 3, sc in next st, inc x 2 (14)
Fasten off, leave a 20 cm tail for sewing.
Nose – Peach, make 1
Rnd 1: 5 sc in a magic ring, sl st to join to first sc (5)
Fasten off, leave a 15 cm tail for sewing.
Cheeks – Pink, make 2
Rnd 1: 6 sc in a magic ring, sl st to join to first sc (6)
Fasten off, leave a 15 cm tail for sewing.
Assembly
Position the ribbed cream hat brim horizontally across the upper portion of the peach face base, just above the center line, and sew securely in place. Tuck the dark brown hair tufts under the bottom edge of the hat brim, one on the left and one on the right, and stitch them down. Place the green hat over the top of the brim, overlapping the bottom edge slightly, and sew the base of the hat around the upper circumference of the face. Sew the small round nose to the center of the face just below the brim. Attach the pink cheek circles on either side of the nose. Sew one ear to the left side of the face and the second ear to the right side of the face, aligning them level with the nose and eyes.
Finishing
Using black embroidery floss, embroider closed, smiling crescent eyes with three small eyelashes extending upward on the outer corners of each eye. Embroider a simple curved smile below the nose. Secure all yarn ends on the back of the work, weave them in neatly, and trim excess. Attach the gold jingle bell securely to the pointed tip of the green hat using matching green yarn.
Tip: Lightly steam block your finished coaster before embroidery to ensure the stitches lay completely flat and smooth for a polished look.
Tips and Common Mistakes
- Make sure to count your stitches carefully on the increasing rounds of the hat to ensure it matches the 48-stitch width of the face base.
- When attaching the hair tufts, place them slightly angled so they peek out naturally beneath the ribbed brim.
- Use a sharp embroidery needle for the facial features so you can split the embroidery floss for delicate, clean lines.
- Keep tension consistent when working the ribbed hat brim so the rows stay neat and uniform.
Frequently Asked Questions
Can I use acrylic yarn instead of cotton?
Cotton is recommended because it absorbs moisture better and resists heat from mugs, making it ideal for a functional coaster. Acrylic may melt slightly under very hot mugs.
How do I wash the elf face coaster?
Spot clean gently with mild soap and warm water, lay flat to reshape, and air dry completely. Do not machine wash or tumble dry to protect the jingle bell and embroidery.
What should I do if my hat base stitch count doesn’t match the face?
If your hat base is off by a stitch or two when you reach the final round, simply adjust your increases slightly on the last round to reach 48 stitches so it aligns perfectly with the face edge.
📄 Your free PDF pattern