











3. Snowman Winter Coaster
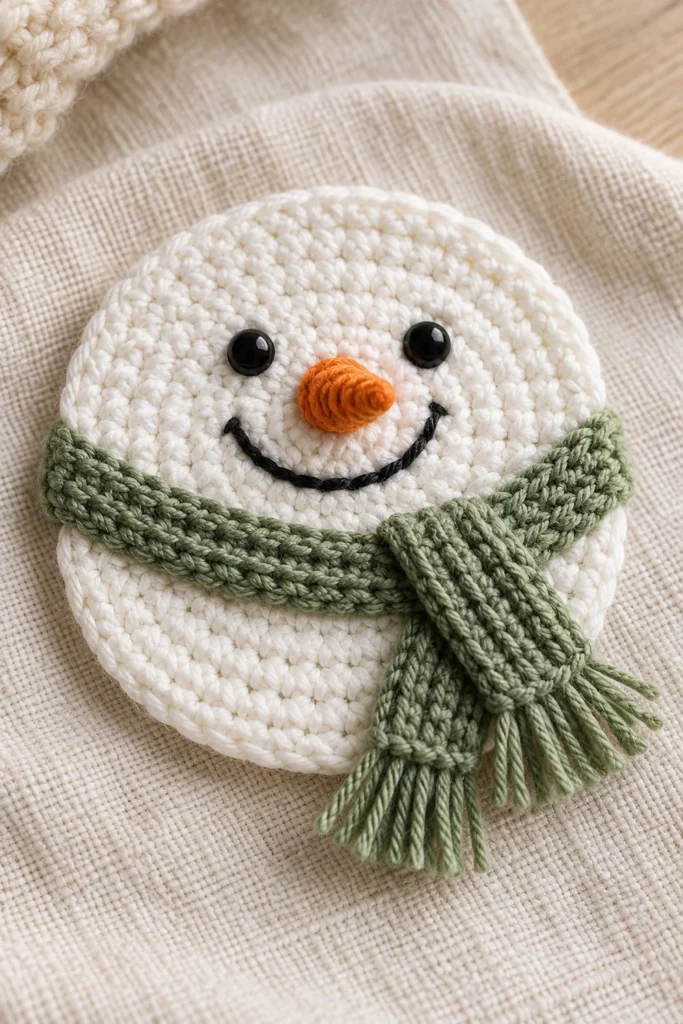
Add festive charm to your winter table with this adorable snowman coaster! Featuring a classic single crochet circle base, embroidered facial details, safety eyes, a textured 3D carrot nose, and a cozy ribbed scarf with fringe, it works up quickly and makes a wonderful holiday gift.
Quick Facts
| Skill level | Finished size | Yarn | Hook | Time |
|---|---|---|---|---|
| Easy | 4 in / 10 cm across | DK cotton (Cat. 3) | 3.5 mm (US E/4) | 45 minutes |
Materials You Will Need
- DK weight cotton yarn (Category 3) in White (approx. 15 grams / 35 metres), Sage Green (approx. 10 grams / 25 metres), and Orange (small scrap for nose)
- 3.5 mm (US E/4) crochet hook
- Two 6 mm black safety eyes
- Black embroidery floss or lightweight yarn for the mouth
- Tapestry needle
- Scissors
- Stitch marker
Gauge
The first 3 rounds of the Snowman Base measure approximately 1.5 in / 4 cm across. Working with even tension is more important than exact gauge for this project.
Abbreviations (US Terms)
- ch: chain
- sc: single crochet
- inc: single crochet increase (2 sc in the same stitch)
- sl st: slip stitch
- BLO: back loop only
- FLO: front loop only
- st(s): stitch(es)
- rnd(s): round(s)
- row(s): row(s)
- FO: fasten off
UK terms: sc = dc, hdc = htr, dc = tr.
Pattern Notes
- The Snowman Base is worked in continuous spiral rounds without joining. Use a stitch marker to keep track of the first stitch of each round.
- The Scarf is worked in flat rows in the back loop only to create ribbed texture.
- The Nose is worked in continuous spiral rounds.
- Stitch counts are listed in brackets at the end of every round and row.
Instructions
Snowman Base – White, make 2 (one front, one back)
Rnd 1: 6 sc in a magic ring (6)
Rnd 2: inc x 6 (12)
Rnd 3: (1 sc, inc) x 6 (18)
Rnd 4: (2 sc, inc) x 6 (24)
Rnd 5: (3 sc, inc) x 6 (30)
Rnd 6: (4 sc, inc) x 6 (36)
Rnd 7: (5 sc, inc) x 6 (42)
Rnd 8: (6 sc, inc) x 6 (48)
Rnd 9: (7 sc, inc) x 6 (54)
Rnd 10: (8 sc, inc) x 6 (60)
For the front piece: FO, weave in ends. For the back piece: do not FO, you will use this working yarn to slip stitch the two circles together around the edge later.
Carrot Nose – Orange, make 1
Rnd 1: 4 sc in a magic ring (4)
Rnd 2: sc in each st around (4)
Rnd 3: (1 sc, inc) x 2 (6)
Rnd 4: sc in each st around (6)
FO, leaving a 20 cm tail for sewing. Lightly stuff with a tiny pinch of leftover yarn ends.
Scarf – Sage Green, make 1
Row 1: Ch 8, working in the 2nd ch from hook, sc in each ch across, turn (7)
Row 2 to Row 34: Ch 1, working in BLO, sc in each st across, turn (7)
FO, leaving a 20 cm tail.
Assembly
1. On the front snowman circle, insert the two 6 mm safety eyes between Rnds 7 and 8, spaced about 5 stitches apart. Secure the backs firmly.
2. Using black embroidery floss, embroider a smiling mouth with 6 small stitches centered below the eyes, spanning across Rnd 6.
3. Sew the carrot nose centrally between the eyes pointing slightly downward, directly above the center of the smile.
4. Wrap the sage green scarf around the lower portion of the snowman face just below the smile, crossing the right end over the left end. Secure with a few discreet stitches at the crossover point so it stays in place.
5. Cut eight 5 cm strands of sage green yarn and attach them as fringe to both ends of the scarf using the lark’s head knot method. Trim evenly to about 1.5 cm.
6. Place the front snowman piece and the back snowman piece wrong sides together. Join with white yarn and work sc through both corresponding stitches all the way around the outer edge to join them into a sturdy coaster. FO and weave in all remaining ends.
Finishing
Block the finished coaster lightly under a damp cloth if needed to ensure the edges lie completely flat. Inspect all yarn ends to ensure they are securely woven in and trimmed.
Tip: Joining the front and back pieces with a single crochet border adds wonderful thickness and durability, making the coaster much better at absorbing condensation!
Tips and Common Mistakes
- Count your stitches carefully on Rnds 1 through 10 of the base to ensure your circle stays flat and does not ripple or cup.
- Make sure the safety eye backing washers are pressed on as far as possible so the eyes sit flush against the stitches.
- When working the scarf rows in the back loop only, check your stitch count at the end of every row so you do not accidentally drop the turning stitch.
- If you prefer a completely soft coaster with no hard plastic parts for young children, embroider the eyes with black yarn instead of using safety eyes.
Frequently Asked Questions
Can I make this coaster without safety eyes?
Yes! If you prefer a child-safe version or do not have safety eyes on hand, simply embroider two small French knots or satin-stitch circles for the eyes using black embroidery floss.
How do I wash this coaster?
Spot clean with a damp cloth and mild soap, or hand wash gently in cool water and lay flat to dry. Do not tumble dry.
My circle is starting to curl or ruffle. What went wrong?
If it cups into a bowl shape, you have too few stitches (add an extra increase in the round). If it ripples with wavy edges, you have too many stitches (rip back and check your counts per round).
Can I adjust the length of the scarf?
Yes, simply work more or fewer rows in the scarf section before fastening off to make it wrap tighter or looser around the snowman’s neck.
📄 Your free PDF pattern