











2. Reindeer Face Coaster
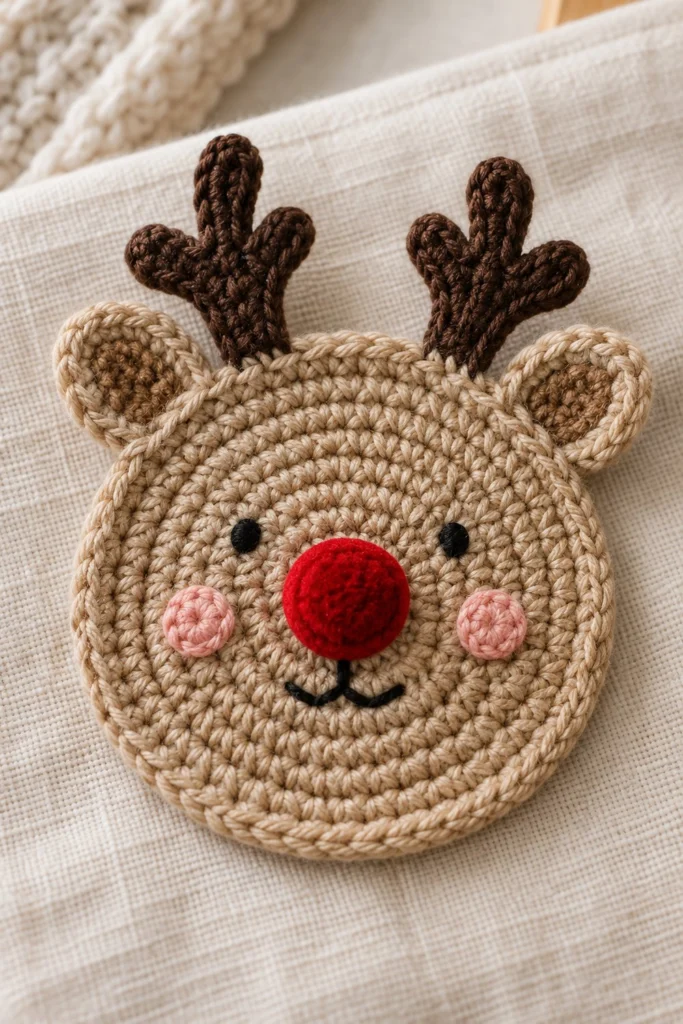
Bring festive charm to your coffee table with this adorable crochet reindeer coaster. Featuring sweet rosy cheeks, friendly embroidered features, and textured antlers, this delightful project works up quickly and makes a wonderful holiday gift or party decoration. Finished size is approximately 4 inches (10 cm) across, taking about 45 minutes to complete.
Quick Facts
| Skill level | Finished size | Yarn | Hook | Time |
|---|---|---|---|---|
| Easy | 4 in / 10 cm across | DK cotton (Cat. 3) | 3.5 mm (US E/4) | 45 minutes |
Materials You Will Need
- DK weight 100% cotton yarn: 15 g (35 m) in Tan (Main Color), 5 g (12 m) in Dark Brown (Antlers and Ear Detail), 3 g (7 m) in Light Pink (Cheeks)
- Small amount of Black embroidery floss or cotton thread for eyes and mouth
- One 15 mm red pom-pom (or alternative red yarn to crochet a small nose)
- 3.5 mm (US E/4) crochet hook
- Tapestry needle
- Scissors
- Stitch marker
Gauge
First 3 rounds of the Face base measure approximately 1.5 inches (3.8 cm) across. Working with even tension matters more than exact gauge for this project.
Abbreviations (US Terms)
- ch: chain
- sc: single crochet
- hdc: half double crochet
- dc: double crochet
- sl st: slip stitch
- inc: increase (work 2 sc in the same stitch)
- dec: decrease (work 2 sc together)
- st(s): stitch(es)
- Rnd(s): round(s)
- BLO: back loop only
UK terms: sc = dc, hdc = htr, dc = tr.
Pattern Notes
- The main face is worked in continuous spiral rounds without joining. Use a stitch marker to keep track of the first stitch of each round.
- Antlers and ears are worked in joined rounds or rows as specified in their individual sections.
- Stitch counts are shown in brackets at the end of every round.
Instructions
Face Base – Tan, make 1
Rnd 1: 6 sc in a magic ring (6)
Rnd 2: inc x 6 (12)
Rnd 3: (sc in next st, inc) x 6 (18)
Rnd 4: (sc in next 2 sts, inc) x 6 (24)
Rnd 5: (sc in next 3 sts, inc) x 6 (30)
Rnd 6: (sc in next 4 sts, inc) x 6 (36)
Rnd 7: (sc in next 5 sts, inc) x 6 (42)
Rnd 8: (sc in next 6 sts, inc) x 6 (48)
Rnd 9: (sc in next 7 sts, inc) x 6 (54)
Rnd 10: (sc in next 8 sts, inc) x 6 (60)
Fasten off invisibly, leave a 30 cm tail for weaving in ends.
Outer Ears – Tan (make 2) and Inner Ears – Dark Brown (make 2)
Outer Ear (make 2 in Tan):
Rnd 1: 6 sc in a magic ring, sl st to join (6)
Rnd 2: ch 1, inc in each st around, sl st to join (12)
Fasten off, leave a 20 cm tail for sewing.
Inner Ear (make 2 in Dark Brown):
Rnd 1: 6 sc in a magic ring, sl st to join (6)
Fasten off, leave a 20 cm tail for sewing, and sew onto the center of each Tan outer ear.
Antlers – Dark Brown, make 2
Row 1: Ch 9, working in the back bumps of the chain, sl st in 2nd ch from hook, sc in next 2 chs, ch 3, sl st in 2nd ch from hook, sl st in next ch, sc down the main stem, repeat upper branch instructions for the second tine, finish sl sts down to base (15)
Fasten off, leave a 25 cm tail for sewing.
Cheeks – Light Pink, make 2
Rnd 1: 6 sc in a magic ring, sl st to join (6)
Rnd 2: ch 1, inc in each st around, sl st to join (12)
Fasten off, leave a 20 cm tail for sewing.
Assembly
1. Position the two ears at the upper sides of the face (around Rnds 8-10) and securely sew them in place.
2. Position the antlers between the ears along the top edge of the face base and sew firmly.
3. Sew the two light pink cheeks onto the lower left and lower right areas of the face.
4. Glue or sew the red pom-pom firmly in the center of the face for the nose.
5. Using black embroidery floss and a tapestry needle, embroider two small French knots or short straight stitches for the eyes above the cheeks and nose, and stitch a small “Y” shaped mouth directly below the nose.
Finishing
Weave in all remaining yarn ends securely on the wrong side of the coaster. Block lightly with a steam iron or damp cloth if needed to ensure the coaster lies completely flat.
Tip: Use cotton yarn rather than acrylic so the coaster absorbs moisture well and withstands heat from warm mugs.
Tips and Common Mistakes
- If your circle starts to cup or ripple, check your stitch counts per round to ensure you are not adding extra increases.
- Ensure all facial embroidery is symmetrical by using pins to map out eye and mouth positions before stitching.
- Make sure all yarn ends on the back are securely fastened so the coaster sits flat on tabletops.
- If you prefer a thicker coaster, you can crochet a second identical plain circle and whipstitch both circles together back-to-back.
Frequently Asked Questions
Can I use safety eyes instead of embroidery?
Embroidered eyes or felt circles are recommended for coasters so that uneven surfaces don’t wobble when a mug is placed on top. If making this for a child under three as a toy, embroidered features are also much safer than plastic safety eyes.
What is the best way to keep the coaster flat?
Maintaining consistent tension throughout the rounds of the face base prevents curling. Lightly steam blocking at the end will also smooth out any minor ripples.
Can I wash these coasters?
Yes, because they are made with 100% cotton yarn, you can hand wash them in cool water with mild soap and lay them flat to dry.
📄 Your free PDF pattern