











14. Christmas Sheep Coaster
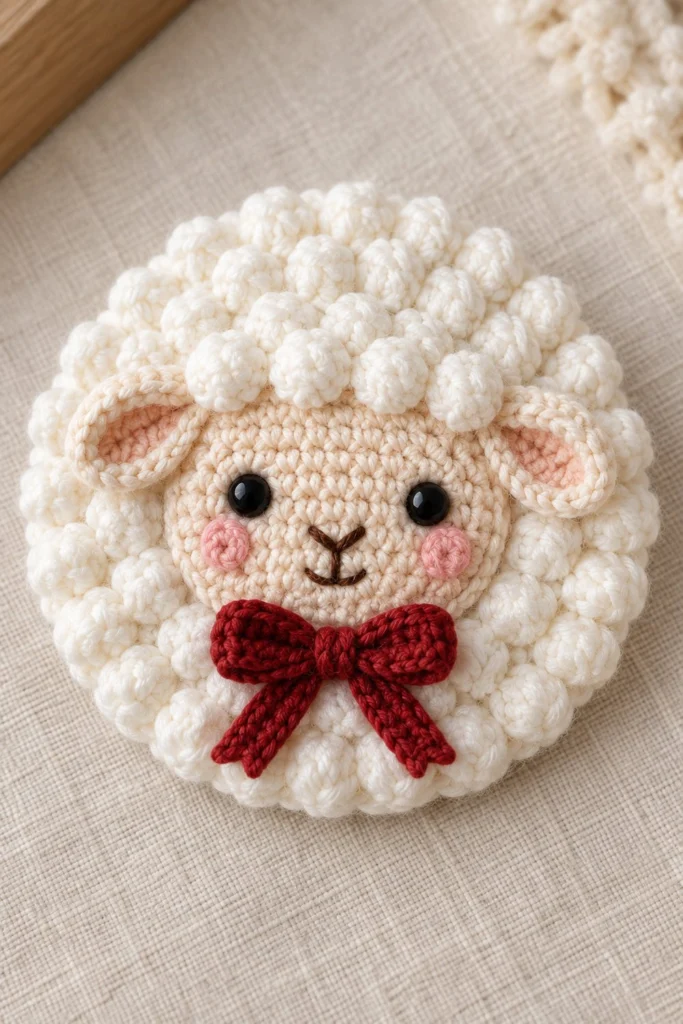
Bring festive cheer to your table with this adorable crochet Christmas sheep coaster, complete with a charming red holiday bow. Measuring about 4 inches across, this sweet project works up quickly and makes a wonderful handmade holiday gift or table decoration.
Quick Facts
| Skill level | Finished size | Yarn | Hook | Time |
|---|---|---|---|---|
| Easy-Intermediate | 4 in / 10 cm across | DK cotton (Cat. 3) | 3.5 mm (US E/4) | 1 hour |
Materials You Will Need
- DK weight cotton yarn in Off-White (approx. 20g / 50m)
- DK weight cotton yarn in Beige or Light Peach for the face (approx. 8g / 20m)
- DK weight cotton yarn in Light Pink for the inner ears and cheeks (approx. 3g / 8m)
- DK weight cotton yarn in Deep Red for the bow (approx. 5g / 12m)
- Scrap of dark brown embroidery floss for the nose and mouth
- 3.5 mm (US E/4) crochet hook
- Two 6 mm black safety eyes with washers (or black embroidery floss)
- Tapestry needle
- Scissors
Gauge
The central face circle measures 2.5 inches (6.5 cm) across after Rnd 3. Working with even tension is more important than exact gauge for this project.
Abbreviations (US Terms)
- ch: chain
- sl st: slip stitch
- sc: single crochet
- hdc: half double crochet
- dc: double crochet
- inc: increase (work 2 sc in the same st)
- dec: decrease (sc 2 stitches together)
- bobble: [yo, insert hook in st, yo, pull up loop, yo, pull through 2 loops] 4 times in the same st, yo, pull through all 5 loops on hook
- BLO: back loop only
- st(s): stitch(es)
UK terms: sc = dc, hdc = htr, dc = tr.
Pattern Notes
- The coaster base and woolly border are worked in joined rounds. Slip stitch to join the end of each round to the first stitch, and ch 1 unless otherwise noted.
- The face is worked in continuous spiral rounds without joining. Use a stitch marker to keep track of the first stitch of each round.
- Stitch counts are listed in brackets at the end of every round.
Instructions
Coaster Base and Woolly Border – Off-White, make 1
Rnd 1: Magic ring, 6 sc in ring, sl st to first sc to join (6)
Rnd 2: Ch 1, work 2 sc in each st around, sl st to join (12)
Rnd 3: Ch 1, (sc in next st, inc in next st) repeat around, sl st to join (18)
Rnd 4: Ch 1, (sc in next 2 sts, inc in next st) repeat around, sl st to join (24)
Rnd 5: Ch 1, (sc in next 3 sts, inc in next st) repeat around, sl st to join (30)
Rnd 6: Ch 1, (sc in next 4 sts, inc in next st) repeat around, sl st to join (36)
Rnd 7 (Woolly Border): Ch 2, work a bobble in the first st, ch 1, skip next st, *(bobble in next st, ch 1, skip next st)* repeat around, sl st to top of first bobble to join (18 bobbles, 18 ch-1 spaces)
Fasten off, weave in all ends securely.
Face – Beige, make 1
Rnd 1: Magic ring, 6 sc in ring (6)
Rnd 2: Inc in each st around (12)
Rnd 3: (Sc in next st, inc in next st) repeat around (18)
Rnd 4: (Sc in next 2 sts, inc in next st) repeat around (24)
Rnd 5: (Sc in next 3 sts, inc in next st) repeat around (30)
Rnd 6: (Sc in next 4 sts, inc in next st) repeat around, sl st to first st to join (36)
Fasten off, leaving a 40 cm tail for sewing.
Ears – Off-White and Light Pink (make 2)
With Light Pink, ch 5.
Row 1: Working in back bumps of chain, sc in 2nd ch from hook, hdc in next 2 ch, 3 sc in last ch. Working along opposite side of foundation chain, hdc in next 2 ch, sc in last ch, sl st to first sc to join (10)
Fasten off pink, leaving a short tail to weave in.
Join Off-White yarn to any stitch.
Rnd 2: Ch 1, working through both layers (or around the pink inner ear piece), work sc in first 4 sts, 2 sc in each of the next 2 sts, sc in last 4 sts, sl st to join (12)
Fasten off, leaving a 20 cm tail for sewing.
Cheeks – Light Pink, make 2
Rnd 1: Magic ring, 6 sc in ring, sl st to first sc to join (6)
Fasten off, leaving a 20 cm tail for sewing.
Christmas Bow – Deep Red, make 1
Ch 25, join with sl st to form a ring.
Rnd 1: Ch 1, sc in each st around, sl st to join (25)
Rnds 2-4: Ch 1, sc in each st around, sl st to join (25)
Fasten off, leaving a 30 cm tail. Flatten the tube so the seam runs down the middle back. Wrap the remaining yarn tail tightly around the center 4-5 times to create a bow shape, and secure firmly at the back.
Assembly
1. Attach safety eyes to the face piece between Rnds 3 and 4, leaving about 4 stitches between them.
2. Using dark brown embroidery floss, embroider a small upside-down ‘Y’ nose and mouth centered just below the safety eyes.
3. Sew the two light pink cheek circles directly below and slightly to the outside of each safety eye.
4. Center the completed face onto the Off-White coaster base and whipstitch it securely around the edge using the beige yarn tail.
5. Sew the inner base of each ear behind the top edges of the face, angling them outward slightly.
6. Sew the red Christmas bow to the bottom center of the face, overlapping the lower edge of the face and the woolly border.
Finishing
Weave in all remaining loose yarn ends on the back of the coaster. Gently block the finished piece with steam or a damp cloth to ensure the edges lie flat.
Tip: Keep your tension consistent when working the bobble stitches on the border so the sheep’s wool looks even and puffy.
Tips and Common Mistakes
- Make sure your safety eye washers are clicked firmly into place before assembling the face onto the coaster base.
- If you prefer not to use plastic safety eyes, substitute them with French knots embroidered using black yarn or embroidery floss.
- When attaching the face to the coaster base, pin it in place first so it stays centered while you sew.
Frequently Asked Questions
Can I make this coaster larger to use as a hot pad?
Yes, you can easily scale it up by working additional increase rounds on the base and face, then adding more bobbles to the final border.
How do I wash this cotton coaster?
Hand wash gently in cool water with mild soap, reshape while damp, and lay flat to dry. Do not tumble dry.
What should I do if my bobble stitches look flat?
Make sure you pull up the loops generously when working the bobble, and push the finished bobbles forward so they pop out nicely.
Can I make this safe for a baby or toddler?
If making this item for a child under three years old, embroider the eyes using black thread instead of using plastic safety eyes to prevent any choking hazards.
📄 Your free PDF pattern