











15. Snowflake Winter Coaster
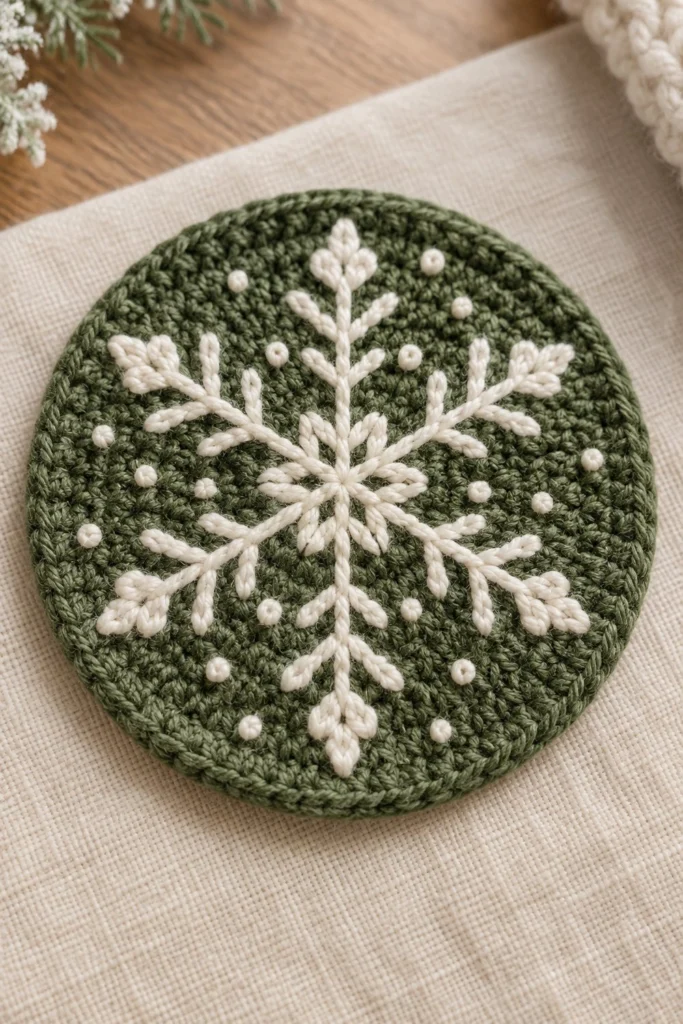
Bring a touch of winter magic to your coffee table with this charming snowflake coaster. Worked in a rich forest green with crisp cream embroidery, it pairs cozy crochet with classic surface stitching for a stunning holiday accent that takes under an hour to make.
Quick Facts
| Skill level | Finished size | Yarn | Hook | Time |
|---|---|---|---|---|
| Easy | 4 in / 10 cm across | DK cotton (Cat. 3) | 3.5 mm (US E/4) | 30 minutes |
Materials You Will Need
- DK weight 100% cotton yarn: Forest Green (approx. 15 grams / 35 metres) and Cream (approx. 5 grams / 12 metres)
- 3.5 mm (US E/4) crochet hook
- Tapestry needle
- Scissors
- Stitch marker
Gauge
The first 3 rounds of the coaster measure 2 inches (5 cm) across. Working with even, moderate tension matters more than exact gauge for this item.
Abbreviations (US Terms)
- ch = chain
- sc = single crochet
- hdc = half double crochet
- dc = double crochet
- sl st = slip stitch
- inc = increase (work 2 sc in the same st)
- BLO = back loop only
- st(s) = stitch(es)
- Rnd = round
UK terms: sc = dc, hdc = htr, dc = tr.
Pattern Notes
- The coaster is worked in continuous spiral rounds without joining, unless otherwise stated. Use a stitch marker to track the first stitch of each round.
- Stitch counts are given in brackets at the end of every round.
- Embroidery stitches are added to the finished crochet base using a tapestry needle following the photo guide.
Instructions
Coaster Base – Forest Green, make 1
Rnd 1: 6 sc in a magic ring (6)
Rnd 2: inc x 6 (12)
Rnd 3: (sc in next st, inc) x 6 (18)
Rnd 4: (sc in each of next 2 sts, inc) x 6 (24)
Rnd 5: (sc in each of next 3 sts, inc) x 6 (30)
Rnd 6: (sc in each of next 4 sts, inc) x 6 (36)
Rnd 7: (sc in each of next 5 sts, inc) x 6 (42)
Rnd 8: (sc in each of next 6 sts, inc) x 6 (48)
Rnd 9: (sc in each of next 7 sts, inc) x 6 (54)
Rnd 10: (sc in each of next 8 sts, inc) x 6 (60)
Rnd 11: working in BLO, sc in each st around (60)
Fasten off, invisible join to first st, and weave in all ends.
Assembly
Using Cream yarn and a tapestry needle, embroider a 6-pointed snowflake centered on the coaster base. Start from the central magic ring and work six main arms outward toward round 10 using whipped backstitch or stem stitch. Add diagonal branching side-stitches along each arm and tiny French knots or star dots in the negative space between arms to match the photo.
Finishing
Weave in all remaining yarn tails securely on the wrong side. Block lightly with a warm iron and a damp press cloth if needed to ensure the coaster lies completely flat.
Tip: Keep your embroidery tension relaxed so the stitches sit neatly on top of the crochet fabric without puckering the flat circular base.
Tips and Common Mistakes
- Cupping or ruffling: If your circle starts to ripple, your hook size may be too large or your stitches too loose. If it curls into a bowl shape, your tension is too tight.
- Embroidery placement: Lightly sketch or pin the main snowflake axes with contrasting thread before committing to permanent yarn stitches.
- Yarn choice: Cotton yarn is essential here because it absorbs moisture well and resists heat from hot mugs.
Frequently Asked Questions
Can I wash these coasters in the washing machine?
Yes, because they are made from 100% cotton, you can machine wash them on a gentle cycle in cool water and lay them flat to dry.
How can I make the coaster larger to fit a wider mug?
You can continue the circular increase sequence for one more round (working 66 stitches in round 12), then add an extra set of decorative branches to your embroidery.
Why do round 11 in the back loop only?
Working round 11 in the BLO creates a neat, structured outer edge that gives the coaster a clean finished border.
You Made It Through All 15
That is the whole collection – 15 patterns, each one written out in full. If you stitch one of them, I would love to see it: leave a comment telling me which one you picked, and pin this post so the patterns are easy to find again next season. Happy hooking!
📄 Your free PDF pattern