











11. Christmas Bauble Coaster
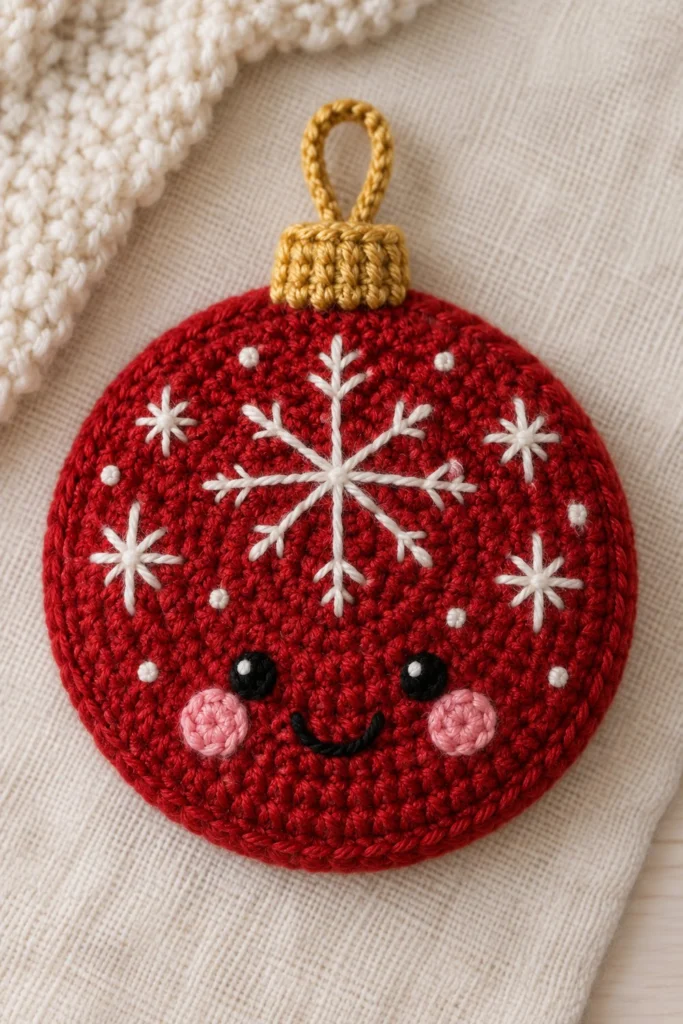
Add a charming, handmade touch to your holiday tree with this sweet Christmas bauble coaster. Worked in durable cotton yarn with adorable embroidered facial features and a delicate snowflake motif, it doubles as a festive decorative hanging ornament or a practical table coaster. Finished size is approximately 4 inches across and takes about 45 minutes to complete.
Quick Facts
| Skill level | Finished size | Yarn | Hook | Time |
|---|---|---|---|---|
| Easy | 4 in / 10 cm across | DK cotton (Cat. 3) | 3.5 mm (US E/4) | 45 minutes |
Materials You Will Need
- DK weight 100% cotton yarn in Red (approx. 20g / 50m), Mustard Yellow (approx. 5g / 12m), and scrap amounts of White and Pink
- Embroidery floss or lightweight yarn in Black for face details
- 3.5 mm (US E/4) crochet hook
- Tapestry needle
- Scissors
- Stitch marker
Gauge
First 3 rounds measure approximately 3.5 cm across. Working with even, firm tension matters more than exact gauge to keep the coaster flat and sturdy.
Abbreviations (US Terms)
- ch: chain
- sl st: slip stitch
- sc: single crochet
- hdc: half double crochet
- dc: double crochet
- inc: increase (work 2 sc in the same st)
- BLO: back loop only
- FLO: front loop only
- st(s): stitch(es)
- rnd(s): round(s)
- ( … ): repeat instructions inside parentheses the given number of times
- [ … ]: total stitch count at the end of the round
UK terms: sc = dc, hdc = htr, dc = tr.
Pattern Notes
- The main bauble body is worked in continuous spiral rounds without joining, unless otherwise stated. Use a stitch marker to track the first stitch of each round.
- The cap and hanging loop are worked in joined rounds or rows as specified.
- Stitch counts for each round are provided in brackets at the end of the line.
Instructions
Bauble Front – Red, make 1
Rnd 1: 6 sc in a magic ring [6]
Rnd 2: inc x 6 [12]
Rnd 3: (sc in next st, inc) x 6 [18]
Rnd 4: (sc in next 2 sts, inc) x 6 [24]
Rnd 5: (sc in next 3 sts, inc) x 6 [30]
Rnd 6: (sc in next 4 sts, inc) x 6 [36]
Rnd 7: (sc in next 5 sts, inc) x 6 [42]
Rnd 8: (sc in next 6 sts, inc) x 6 [48]
Rnd 9: (sc in next 7 sts, inc) x 6 [54]
Rnd 10: (sc in next 8 sts, inc) x 6 [60]
Fasten off, weave in ends.
Bauble Back – Red, make 1
Rnd 1: 6 sc in a magic ring [6]
Rnd 2: inc x 6 [12]
Rnd 3: (sc in next st, inc) x 6 [18]
Rnd 4: (sc in next 2 sts, inc) x 6 [24]
Rnd 5: (sc in next 3 sts, inc) x 6 [30]
Rnd 6: (sc in next 4 sts, inc) x 6 [36]
Rnd 7: (sc in next 5 sts, inc) x 6 [42]
Rnd 8: (sc in next 6 sts, inc) x 6 [48]
Rnd 9: (sc in next 7 sts, inc) x 6 [54]
Rnd 10: (sc in next 8 sts, inc) x 6 [60]
Do not fasten off on the back piece; leave working yarn attached for joining.
Bauble Cap – Mustard Yellow, make 1
Row 1: Ch 9, working in the back bumps of the chain, sc in 2nd ch from hook and in each ch across, turn [8]
Row 2: Ch 1, working in BLO, sc in each st across, turn [8]
Row 3: Ch 1, working in BLO, sc in each st across, turn [8]
Row 4: Ch 1, working in BLO, sc in each st across, turn [8]
Row 5: Ch 1, working in BLO, sc in each st across, turn [8]
Row 6: Ch 1, working in BLO, sc in each st across, turn [8]
Fasten off, leaving a long tail for sewing.
Hanging Loop – Mustard Yellow, make 1
Rnd 1: Ch 16, sl st in 1st ch to form a ring, ch 1, work 20 sc around the ring, sl st to 1st sc to join [20]
Fasten off, leaving a long tail for sewing.
Assembly
Embroidery and facial features should be added to the Bauble Front before joining the front and back panels together.
1. Using black yarn or embroidery floss, embroider two French knots for the eyes near the lower center, spaced about 6 stitches apart.
2. Embroider a small curved smile centered between and just below the eyes using a backstitch.
3. Stitch small pink circles (approx. 2 sts wide) just outside each eye for rosy cheeks using pink yarn.
4. Using white yarn, embroider a large central snowflake motif in the upper half of the bauble using straight stitches, surrounded by smaller starbursts and French knot dots.
5. Sew the rectangular Bauble Cap to the top center edge of the Bauble Front.
6. Attach the Hanging Loop securely to the top center of the Bauble Cap.
7. Place the Bauble Front and Bauble Back wrong sides together. Using the working yarn attached to the back piece, work sc through both thicknesses all the way around the outer edge to join them (60 sc). Fasten off and weave in all ends securely.
Finishing
Block the finished coaster lightly with steam or a damp pressing cloth if needed to ensure a completely flat, even edge. Trim all excess yarn tails.
Tip: Keep your joining stitches around the edge loose enough so the coaster doesn’t curl or cup at the outer rim.
Tips and Common Mistakes
- Make sure to embroider the face and snowflake details on the front panel before seaming the front and back together.
- Count your stitches carefully on Rnd 10 to ensure both front and back panels have exactly 60 stitches for an even seam.
- Use locking stitch markers to hold the front and back panels aligned while you crochet them together.
- Pull your magic ring tightly closed on the first round to prevent a hole from forming in the center of the coaster.
Frequently Asked Questions
Can I use this as an actual tree ornament instead of a coaster?
Yes! Simply omit the back panel, stuff lightly, or leave it flat as a hanging decoration for your tree.
What is the best way to keep the facial features symmetrical?
Use the central magic ring column as your vertical guide, counting an equal number of stitches out to the left and right when placing the eyes and cheeks.
How do I wash the coaster if it gets stained?
Spot clean gently with mild soap and cool water, reshape while damp, and lay flat to dry.
My joining round is puckering. How can I fix it?
You are likely working your single crochet stitches too tightly. Relax your tension and make sure you are working through both loops of both panels evenly.
📄 Your free PDF pattern